Connect to on-premises HULFT and send files with the HULFT Transfer service
Let's take a look at how to use the HULFT Transfer service of HULFT Square to send files to a connected on-premises HULFT system.
In this scenario, HULFT Transfer Application isn't used for sending files.
If you intend to use HULFT Transfer Application, refer to Send files with HULFT Application or HULFT Transfer Application (via VPN).
Description
- Key points of sending
-
The sending-side transfer from HULFT Square is executed from ETL scripts of HULFT Square.
Therefore, to send from HULFT Square, you need to put the icon that executes the Send File in the script and create a Send File processing.
When you send with HULFT Square, you need to configure the transfer settings on HULFT Square, such as the files to send or the remote hosts that receive the files.
Similar to when receiving, configure the transfer settings on the receiving-side host to correspond with the transfer settings set on HULFT Square of the sending-side host.
The settings on the sending-side host (HULFT Square) and the transfer settings on the receiving-side host (on-premises HULFT system) have this kind of corresponding relationship:
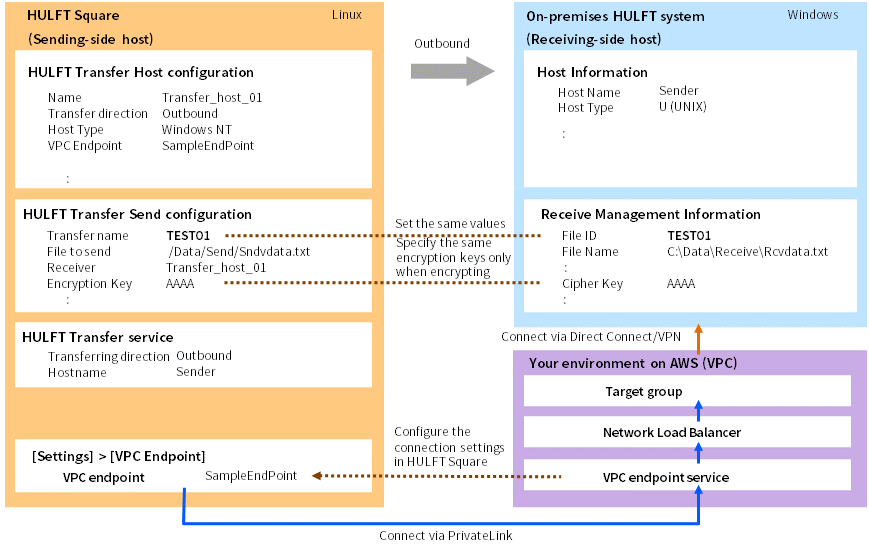
To send with HULFT Square and to also enable the above transfer settings, you need to take these steps:
-
Setup of the operating environment for HULFT Transfer (HULFT Transfer service)
-
Creation of projects and jobs for sending
-
- Scripts and jobs to execute a send
-
In this send scenario, the following script and job are created to execute a send:
- Script to execute a send (script name: Send_01)
-
Create an operation that executes the Send File.
Create a process that receives the send result using the script variables, and outputs the information to a file.
- Jobs for sending (job name: SendJob_01)
-
Create a file event job for sending.
This job launches a script that executes the Send File when a file is put in the specified folder or updated.
- Steps and what to do
-
Take these steps to send to an on-premises HULFT:
Procedures
- Preparation
-
Before you send files to a HULFT system in an on-premises environment from HULFT Square, make sure these steps are complete:
(1) Prep on your environment on the AWS (VPC) that connects to the on-premises HULFT system and HULFT Square
Create a target group, Network Load Balancer, and VPC endpoint service to connect your environment (VPC) on AWS with PrivateLink.
It's recommended that you set principals while taking into consideration security for the VPC endpoint service. You can view the AWS account ID on the HULFT Square side from ORGANIZATION > System Information.
You need the VPC endpoint service name that you created to create a VPC endpoint in
 > NETWORK > VPC Endpoint on HULFT Square.
(2) Prep on HULFT Square (sending-side host)
To use the HULFT Transfer service, you may need the following add-on license depending on your contract.
- HULFT Transfer Receiver & Sender license
-
You can create one HULFT Transfer service (inbound) and one HULFT Transfer service (outbound).
Check whether the necessary permissions to use the HULFT Transfer service are granted to each user.
If the necessary permissions are not granted, make a request to the administrator of HULFT Square to set the permissions you need.
For the permissions necessary to use the HULFT Transfer service, refer to List of policies and permissions.
Also, create a send file (Snd.txt) to use in advance.
(3) Prep on the on-premises HULFT system (receiving-side host)
Configure the settings to use a closed network connection between your environment on AWS (VPC) and the HULFT system in the on-premises environment (settings to use AWS DirectConnect and VPN connection).
In the HULFT system in the on-premises environment, configure the settings for the system management information for receiving.
At this point, in the Host Information, specify the host name for the HULFT Transfer service used on HULFT Square for the Host Name (host name of remote host), and specify U (UNIX) for the Host Type.
For the environment settings of the HULFT system in the on-premises environment, refer to HULFT8 Administration Manual and HULFT8 Operation Manual.
- Setup of operating environment for HULFT Transfer
-
Perform the setup for sending with the HULFT Transfer service on HULFT Square. These are the steps:
Here are the steps for the above tasks.
(1) Configure the storage settings and place the send file
-
Select
 > SERVICES > Storage.
 -
On the Storage page, select New Directory.
-
In the New Directory dialog, specify the name of the directory you want to create (Name).
-
Create a directory to place the send files in (/Data/Send/).
-
Place the send file (Snd.txt) that you prepared in Preparation in the directory that you created in "4.".
(2) Create a HULFT Transfer service
-
Select
> SERVICES > HULFT Transfer. -
On the HULFT Transfer page, select Add.
-
In step General on the HULFT Transfer > Add page, specify the information for the HULFT Transfer service (HULFT Sender) that you want to create.
The following values are specified in this example:
Field name
Setting content (example)
Name
HULFT_Sender_01
Description
(Optional)
Transferring direction
Outbound
Hostname
Set an appropriate name that isn't used in the Transfer Host configuration.
Assigned group
Set the group you want to assign operation permissions to.
Select Next.
-
In step Summary, confirm the settings and select Finish.
-
The created HULFT Transfer service (HULFT Sender) is added to the list on the HULFT Transfer page. Check that the service has been started up.
= Remarks =-
For details of the screens displayed during the operation, refer to HULFT Transfer.
-
The number possible to send at the same time (send multiplicity) is up to 10 for one HULFT Transfer service.
-
Select
> NETWORK > VPC Endpoint. -
On the VPC Endpoint page, select Add.
-
In step General on the VPC Endpoint > Add page, specify the information for the VPC endpoint to create.
The following values are specified in this example:
Field name
Setting content (example)
Name
SampleEndPoint
Description
(Optional)
VPC Endpoint Service Name
Specify the VPC endpoint service name retrieved by your environment on AWS.
Select Next.
-
In step Summary, confirm the settings and select Finish.
-
The created VPC endpoint is added to the list on the VPC Endpoint page. Check that it has been started up.
The VPC endpoint created here will be specified in
> HULFT TRANSFER > Host Info.= Remarks =For details of the screens displayed during the operation, refer to VPC Endpoint.
- Transfer settings (HULFT management information settings)
-
Configure the send settings on HULFT Square to send to the HULFT system in the on-premises environment.
Here are the steps for the above tasks.
(1) Set the HULFT Transfer Host configuration
-
Select
> HULFT TRANSFER > Host Info. -
On the Host Info page, select Add.
-
In step General on the Host Info > Add page, set the HULFT Transfer Host configuration (remote host information).
This example specifies values in the case when the on-premises HULFT system is Windows. In cases other than Windows, change the values according to the type of use.
Field name
Setting content (example)
Name
Transfer_host_01
Description
(Optional)
Select Next.
-
In step Profile, set the information for the profile.
The following values are specified in this example:
Field name
Setting content (example)
Profile
Choose a profile.
Select Next.
-
In step Configuration, set the information for the remote host.
The following values are specified in this example:
Field name
Setting content (example)
Host type
Windows NT
Character code
UTF-8
V7 compatible
Don't select.
Transfer direction
Outbound
VPC endpoint
SampleEndPoint
Receive Port
30000
Select Next.
-
In step Summary, confirm the settings and select Finish.
-
In the list on the Host Info page, check that the host that you set has been added.
= Remarks =-
For details of the screens displayed during the operation, refer to Host Info.
(2) Set the HULFT Transfer Send configuration
-
Select
> HULFT TRANSFER > Send Config. -
On the Send Config page, select Add.
-
In step General on the Send Config > Add page, set the HULFT Transfer Send configuration.
The following values are specified in this example:
Field name
Setting content (example)
Name
Set any name.
Description
(Optional)
Select Next.
-
In step Profile, set the information for the profile.
The following values are specified in this example:
Field name
Setting content (example)
Profile
Choose a profile.
Select Next.
-
In step Configuration, set the information for sending a file.
The following values are specified in this example:
Field name
Setting content (example)
Transfer name
TEST01
File type
Text
File to send
/Personal/Data/Send/Snd.txt
Receiver
Transfer_host_01
Compress
Don't select.
Code convert
Sender
Interval
0
Shift code
Select.
Encryption key
(Optional)
Select Next.
-
In step Summary, confirm the settings and select Finish.
-
In the list on the Send Config page, check that the Transfer Send configuration that you set has been added.
= Remarks =-
For details of the screens displayed during the operation, refer to Send Config.
-
- Creation of projects and jobs for sending
-
Create projects and jobs for sending, and link them to the HULFT Transfer service and the transfer settings.
Here are the steps for the above tasks.
-
Select
> HULFT INTEGRATE > Projects. -
On the Projects page, select Add.
-
In step General on the Projects > Add page, set the information for the project for sending.
The following values are specified in this example:
Field name
Setting content (example)
Name
HULFT_Transfer_Send_01
Workspace
Personal
Description
(Optional)
Create script
Select the checkbox.
Script name
Send_01
Select Next.
-
In step Summary, confirm the project settings and select Finish.
(2) Create a script that executes a send
-
In the Edit HULFT_Transfer_Send_01 dialog, specify Profile and Integrate service.
-
Select Launch Designer.
If you cancel it, or when you edit a script in an existing project, select the Open project icon of the project to launch Designer.
NoteTo launch Designer, HULFT Square Designer.exe must be installed.
-
Designer is launched. Create a script that executes a send.
For details on the script to create, refer to Scripts and jobs to execute a send.
-
Save the created script and close Designer.
-
Select
> HULFT INTEGRATE > Projects. -
On the Projects page, select a project to create a job.
-
Select the Create new job icon.
-
On the Select a job type page, specify File Event for the type.
-
Select Next.
-
In step General on the File Event Jobs > Add page, set the information for the job.
The following values are specified in this example:
Field name
Setting content (example)
Name
SendJob_01
Workspace
Personal
Profile
Choose a profile.
Description
(Optional)
Select Next.
-
In step File event, specify the information for file events.
The following values are specified in this example:
Field name
Setting content (example)
File events
Select the checkboxes for Create and Update.
Directory to monitor
/Personal/Data/Send/
Monitor directory
Don't select the checkbox.
File to monitor
Snd.txt
Select Next.
-
In step Project, specify the information for the project to link with this job.
The following values are specified in this example:
Field name
Setting content (example)
Project
HULFT_Transfer_Send_01
Version
1
Script
Send_01
Script version
Set the dependency relationship of scripts.
Mapping parameters to script variables
Do not add parameters.
Select Next.
-
In step Service to run scripts, specify the service to link with this job.
The following values are specified in this example:
Field name
Setting content (example)
Service to run scripts
Set the HULFT Integrate service name you configured.
Select Next.
-
In step Summary, confirm the settings and select Finish.
-
Check that the job you created exists on the File Event Jobs page.
-
- File transfer
-
According to the information set above, files are sent from HULFT Square (sending-side host) to the HULFT system in the on-premises environment (receiving-side host).
- Checking of execution results
-
Check the send results in one of these ways:
-
Select
 > SERVICE EVENTS > HULFT Transfer.
 -
On the HULFT Transfer page, select the transfer log with the transfer name TEST01.
-
Select an event to check the details of the send results and script execution results.
= Remarks =The details of the transfer results are the same as HULFT8 UNIX/Linux Error Codes and Messages.
For more details about how to read error codes, refer to the following:
-