Create a script that processes a CSV file
This section explains how a CSV file that is uploaded to the storage is read and output to another CSV file after the data is converted.
Description
The sample project reads a CSV file, converts the character string stored in "ProductName", and then outputs it to another CSV file.

- Processing flow
- Key functions
-
-
Read CSV File
Configure the settings to read data from a CSV file.
You can set them from File > CSV > Read CSV File of the tool palette.
-
Write CSV File
Configure the settings to write data to a CSV file.
You can set them from File > CSV > Write CSV File of the tool palette.
-
Replace Each String logic
This logic replaces the input character string according to a replacement table and returns the value of the string.
You can set it from String > Conversion > Replace Each String of the tool palette in Mapper.
-
Take the following steps in order to create a script that processes a CSV file.
The sample data to execute the above processing is provided.
Download the sample data from Scenario list and extract it.
Sample data name: tutorial_CSV_script.zip
Procedures
(1) Upload a CSV file to storage
-
Select
 > SERVICES > Storage.
 -
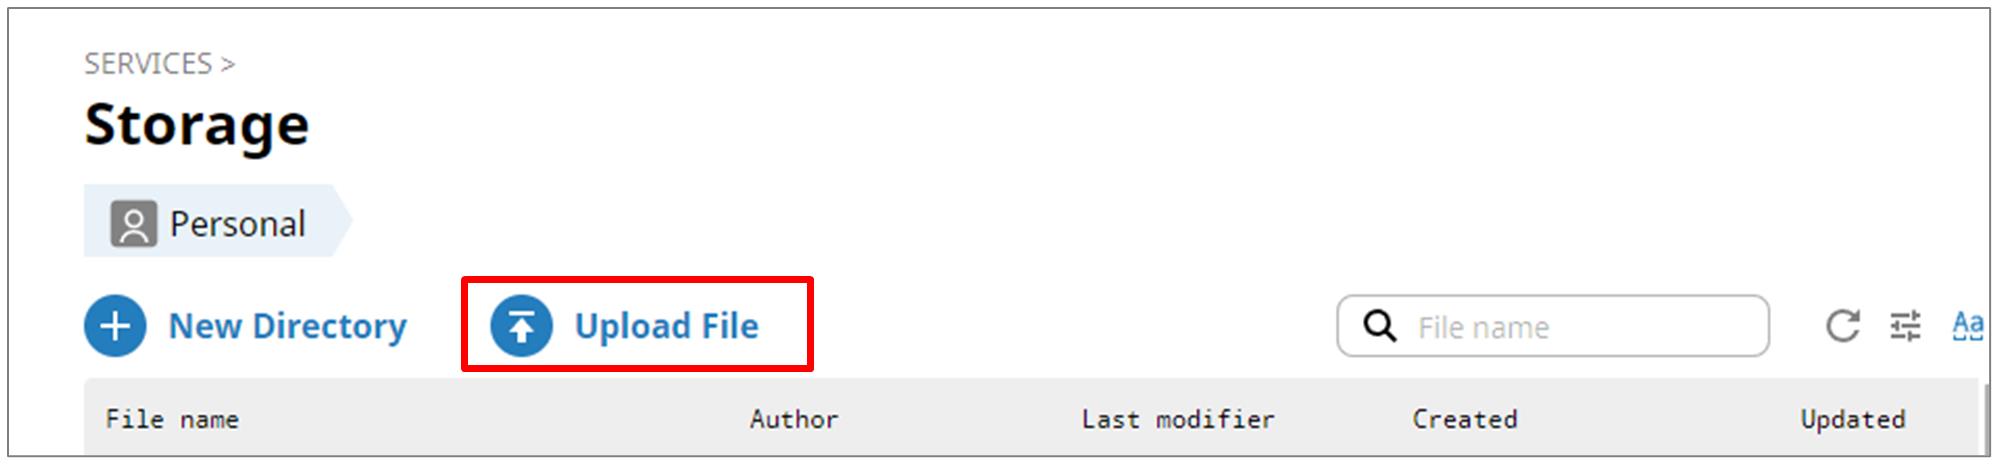
On the Storage page, select the folder to upload the CSV file to.
In this example, select the data folder under Personal.
-
Select Upload File and then select the CSV file to upload (inputdata.csv).
-
Select
> HULFT INTEGRATE > Projects. -
On the Projects page, select Add.
-
In step General on the Projects > Add page, set the fields related to the project as shown below, and then select Next.
Field name
Setting (example)
Name
sample1
Workspace
Personal
Description
(Optional)
Create script
Select the checkbox.
Script name
script
-
In step Summary confirm the entered contents and select Finish.
-
In the Edit sample1 dialog, specify Profile and Integrate service.
For details about profiles, refer to Profiles.
For details about Integrate services, refer to HULFT Integrate.
-
Select Launch Designer.
NoteTo launch Designer, HULFT Square Designer.exe must be installed.
= Remarks =If you canceled launch of Designer, or when you edit a script in an existing project, select the Open project icon of the project to launch Designer.
-
Select Open HULFTSquareDesigner at the top of the screen. The button name may vary depending on your browser.
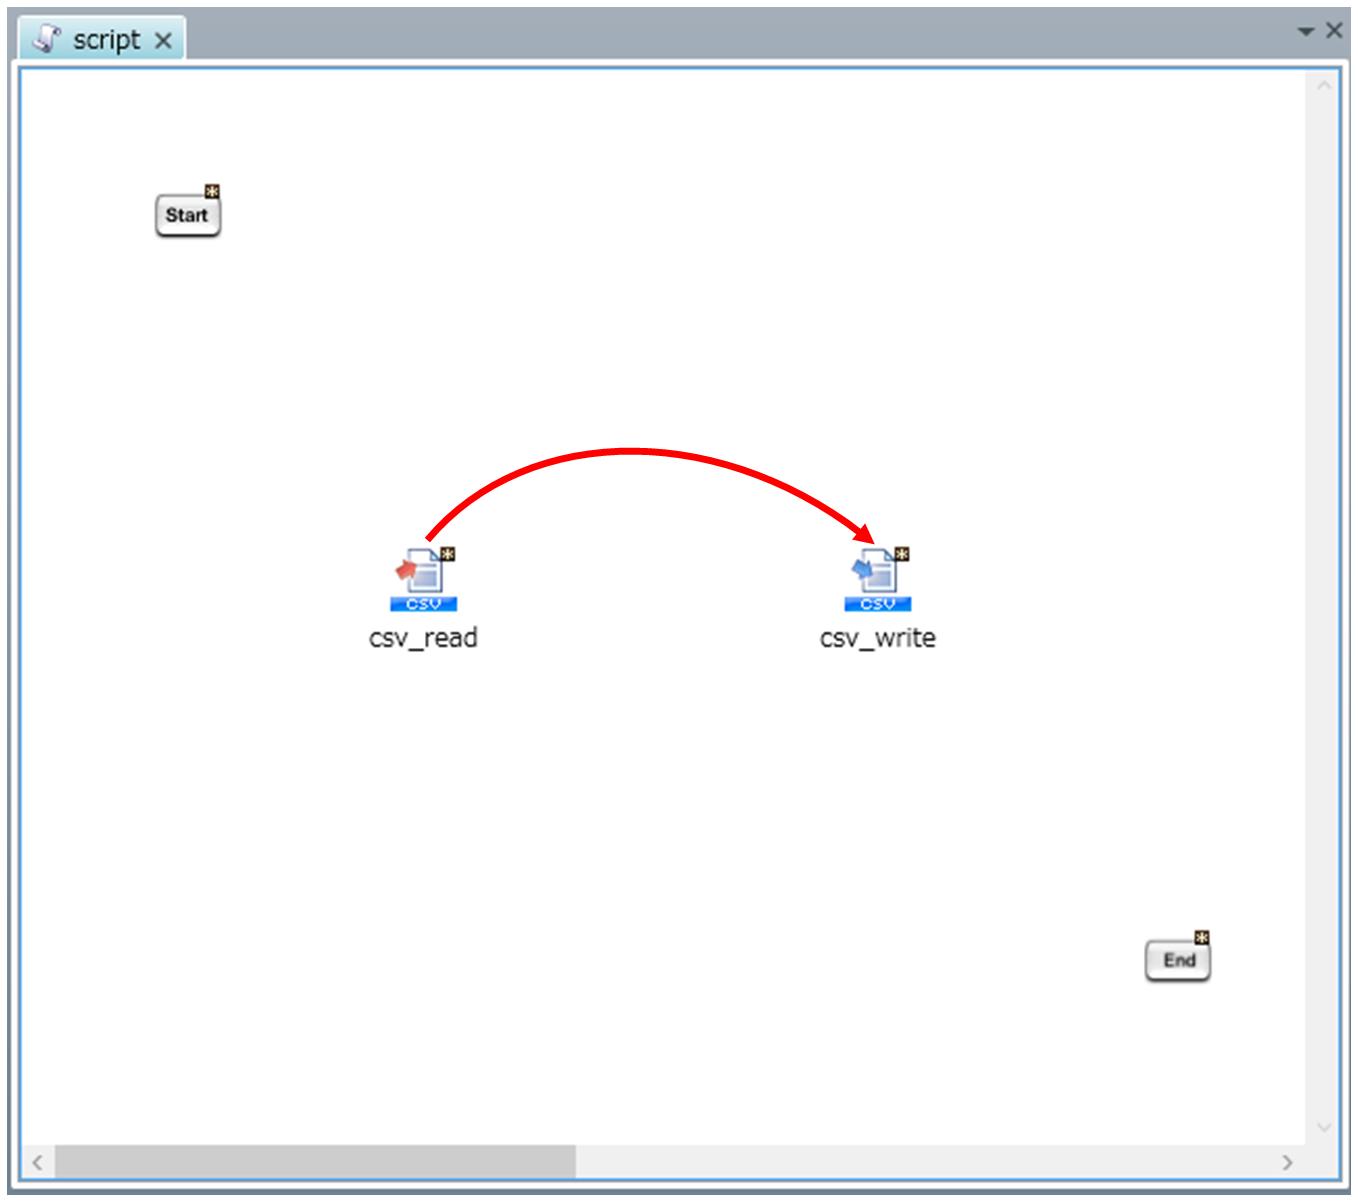
(4) Place an operation that reads a CSV file
-
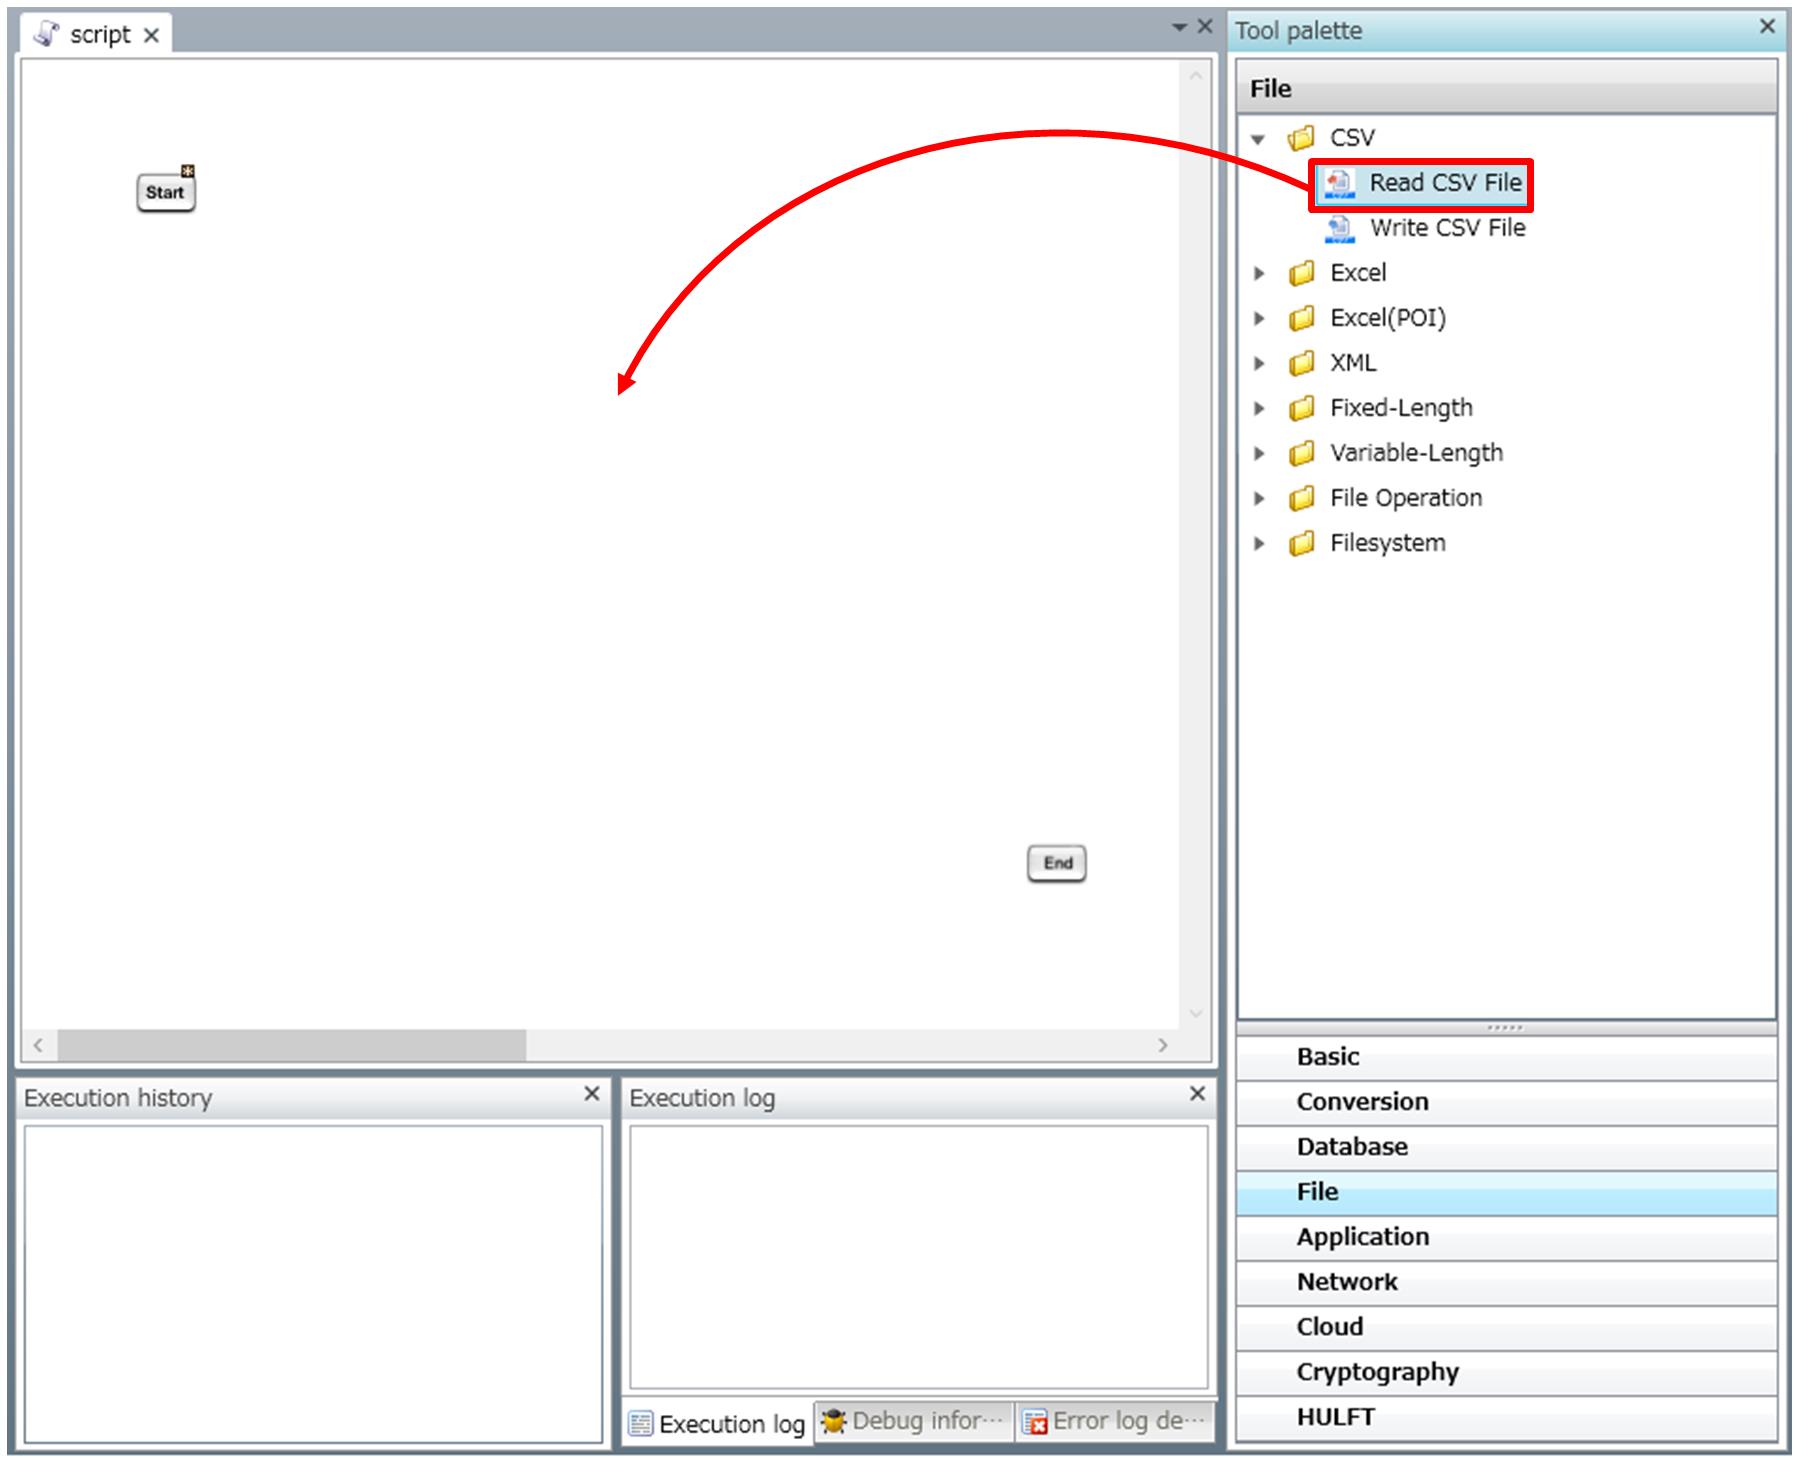
Double-click a created script in the project explorer shown on the left of the Designer screen to open the script.
-
From the tool palette shown on the right of the Designer screen, drag File > CSV > Read CSV File onto the script canvas.
-
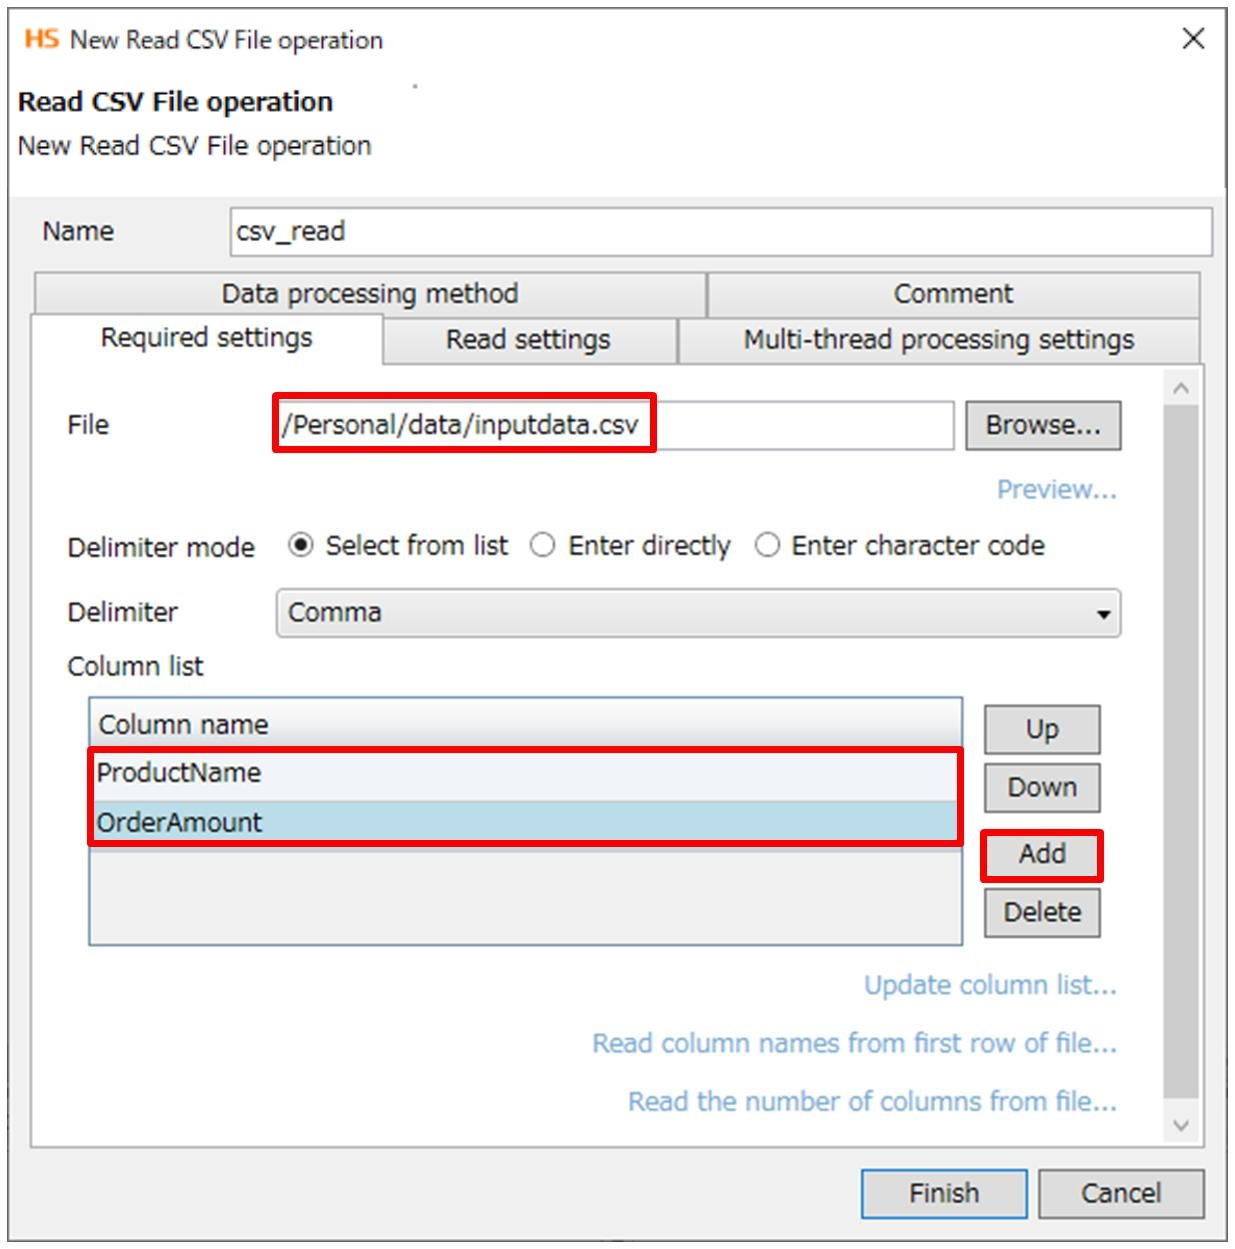
On the New Read CSV File operation screen, configure the settings in order to read a CSV file.
Field name
Setting value
Description
Name
csv_read
Enter a component name (single-byte alphanumeric characters and underscores)
The default value of csv_read is used in this example.
File
/Personal/data/inputdata.csv
Specify a CSV file to be read
Select Browse and then select a CSV file from the storage. In this example, select the CSV file that was prepared in the first step, inputdata.csv, and select Open.
Delimiter mode
Select from list
Delimiter
Comma
Column list
ProductName
OrderAmount
Select Add and enter ProductName in the input field of Column name.
Select Add again and enter OrderAmount in the input field of Column name.
-
Select Finish.
(5) Place an operation that writes a CSV file
-
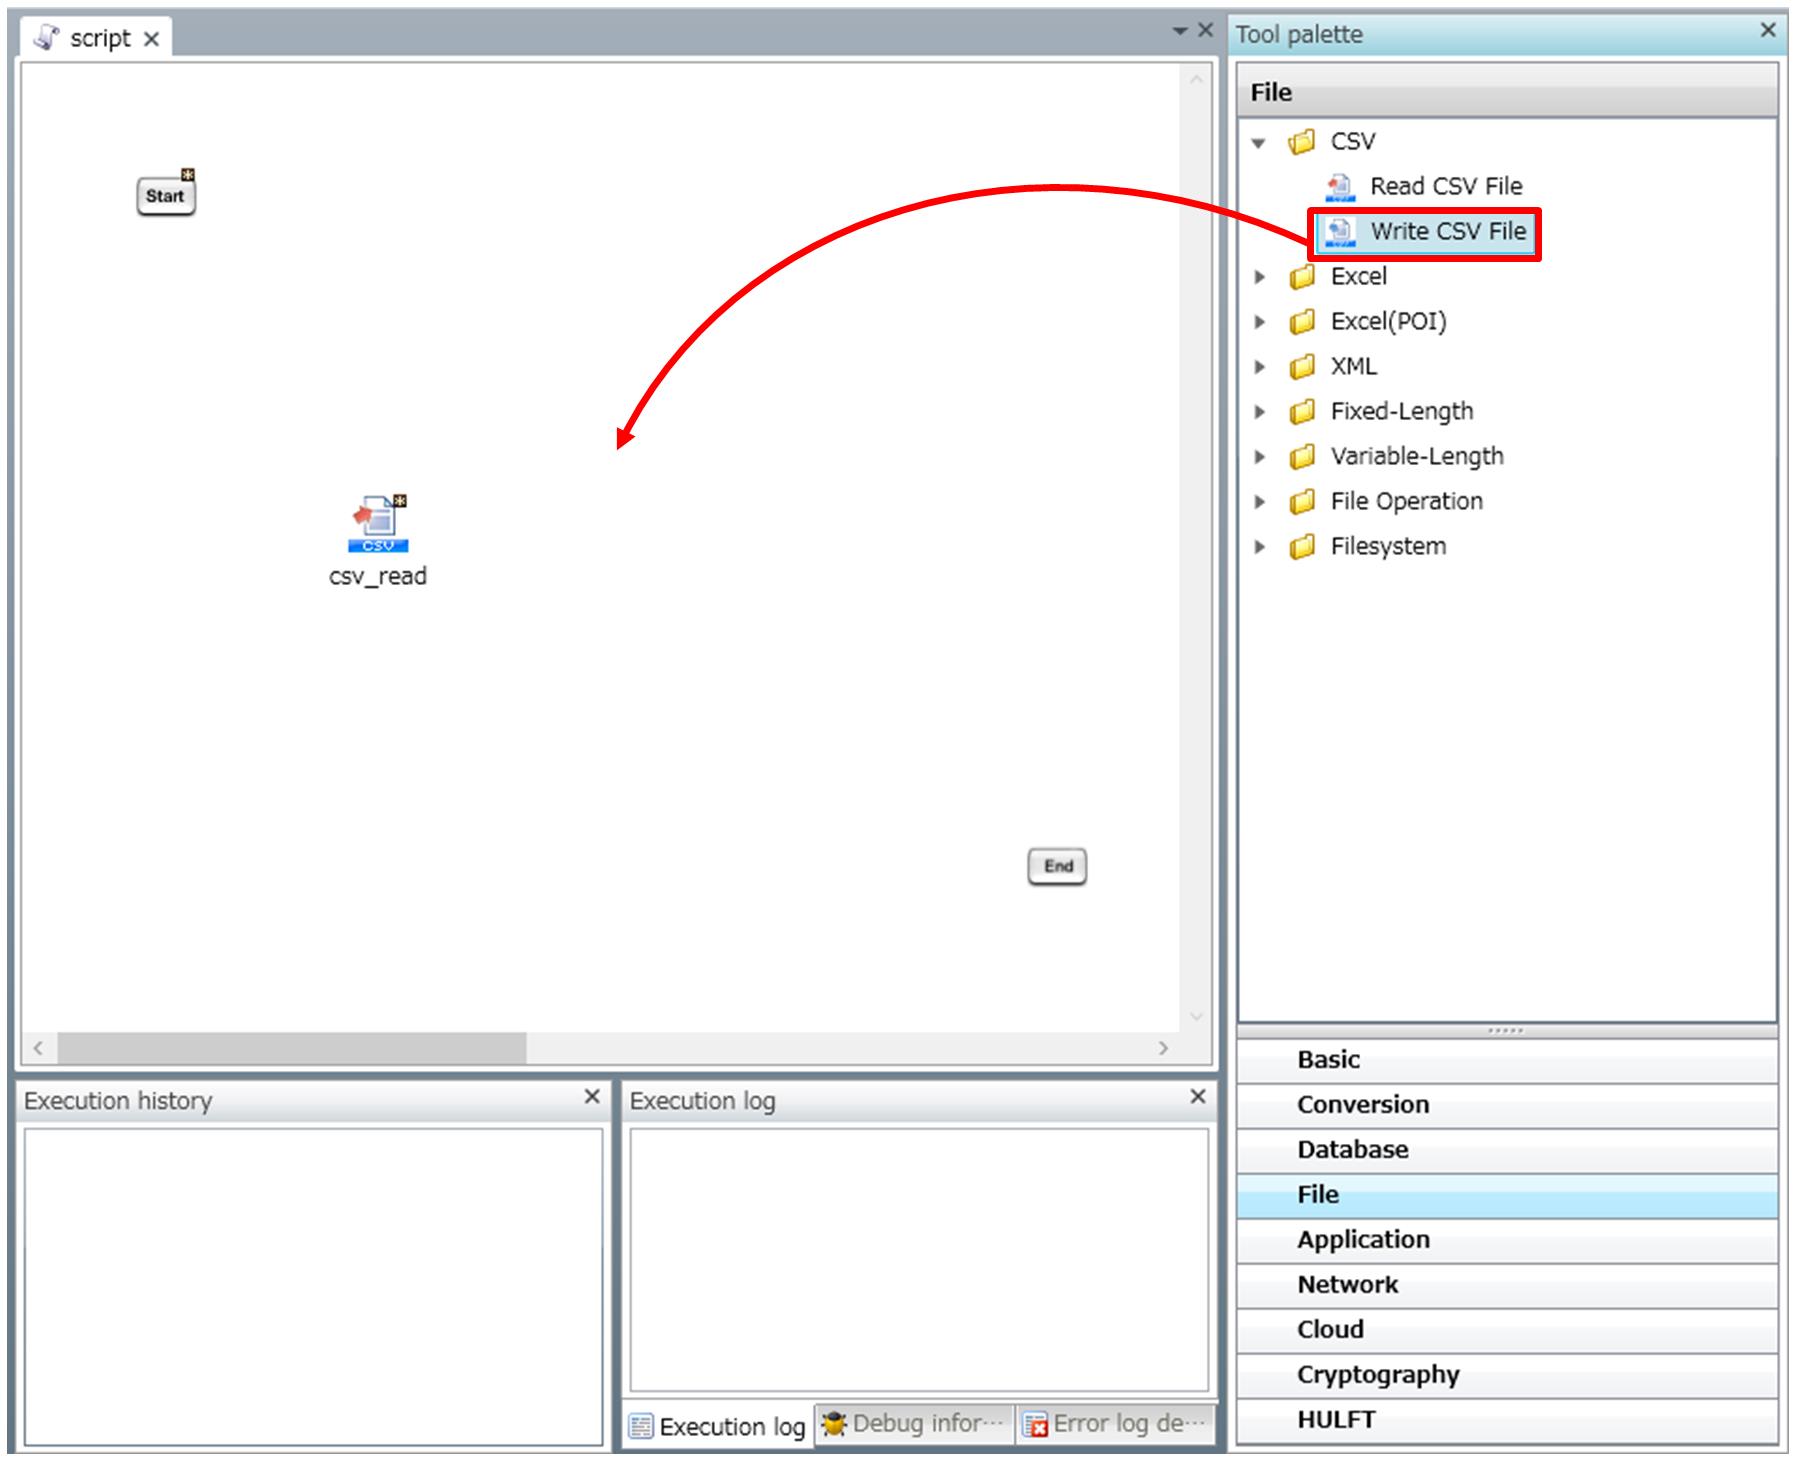
From the tool palette, drag File > CSV > Write CSV File onto the script canvas.
-
On the New Write CSV File operation screen, configure the settings in order to write a CSV file.
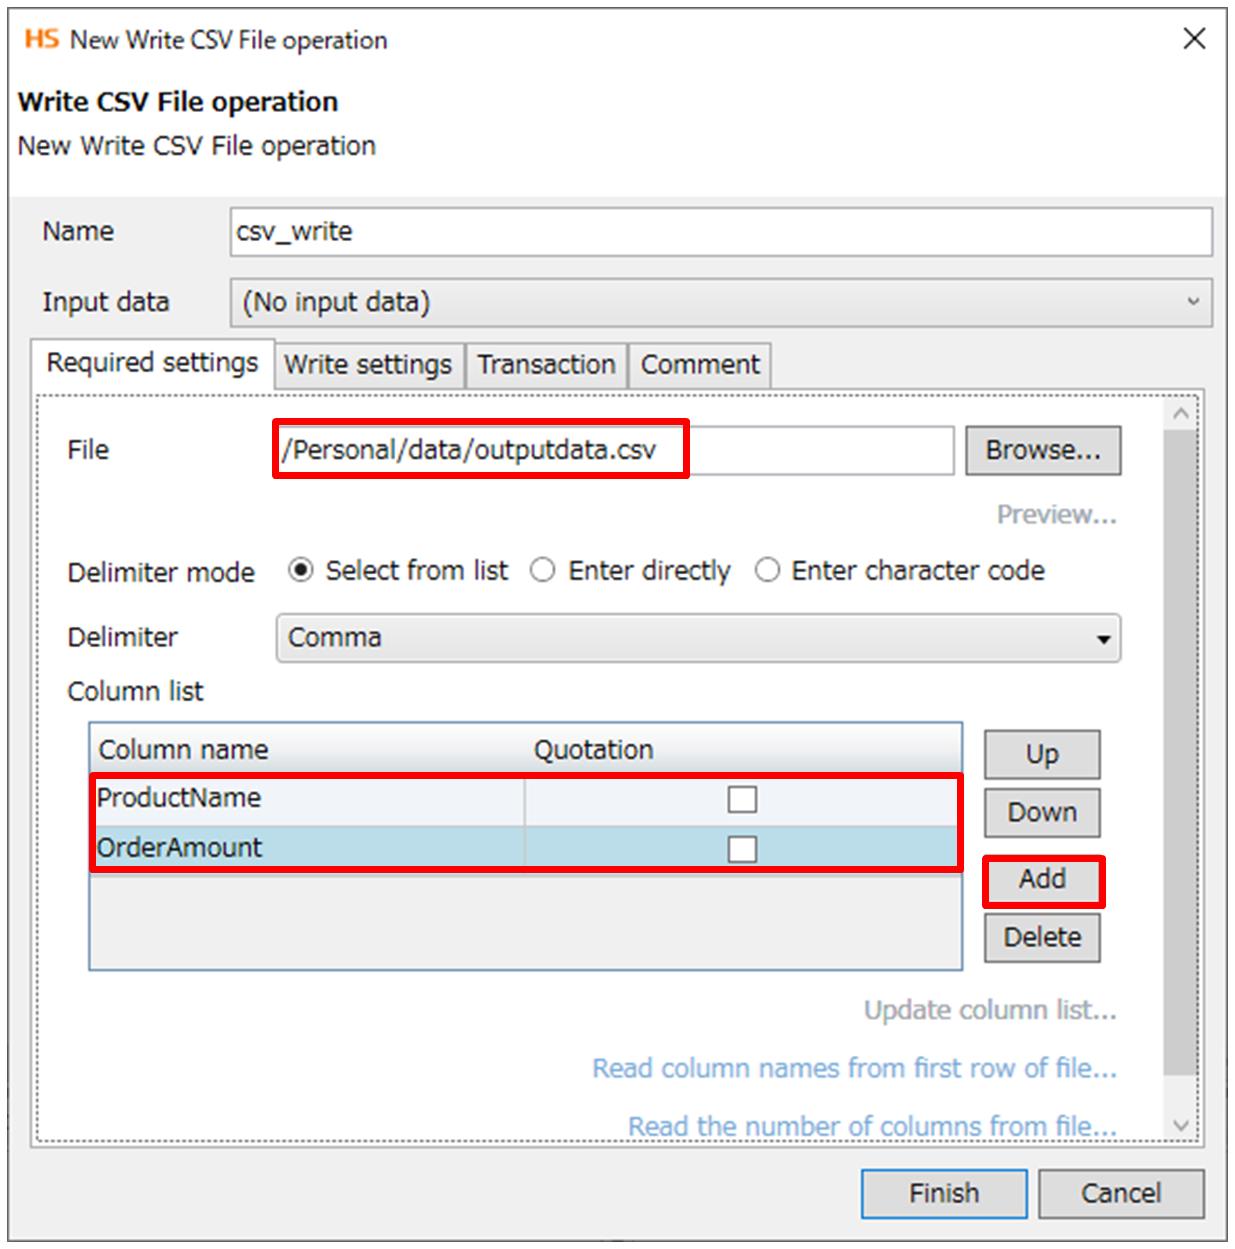
Field name
Setting value
Description
Name
csv_write
Enter a component name (single-byte alphanumeric characters and underscores)
The default value of csv_write is used in this example.
Input data
(No input data)
File
/Personal/data/outputdata.csv
Specify a CSV file to be written
In this example, specify /Personal/data/outputdata.csv as the path and the output CSV file name.
Delimiter mode
Select from list
Delimiter
Comma
Column list
ProductName
OrderAmount
Select Add and enter ProductName in the input field of Column name.
Select Add again and enter OrderAmount in the input field of Column name.
-
Select Finish.
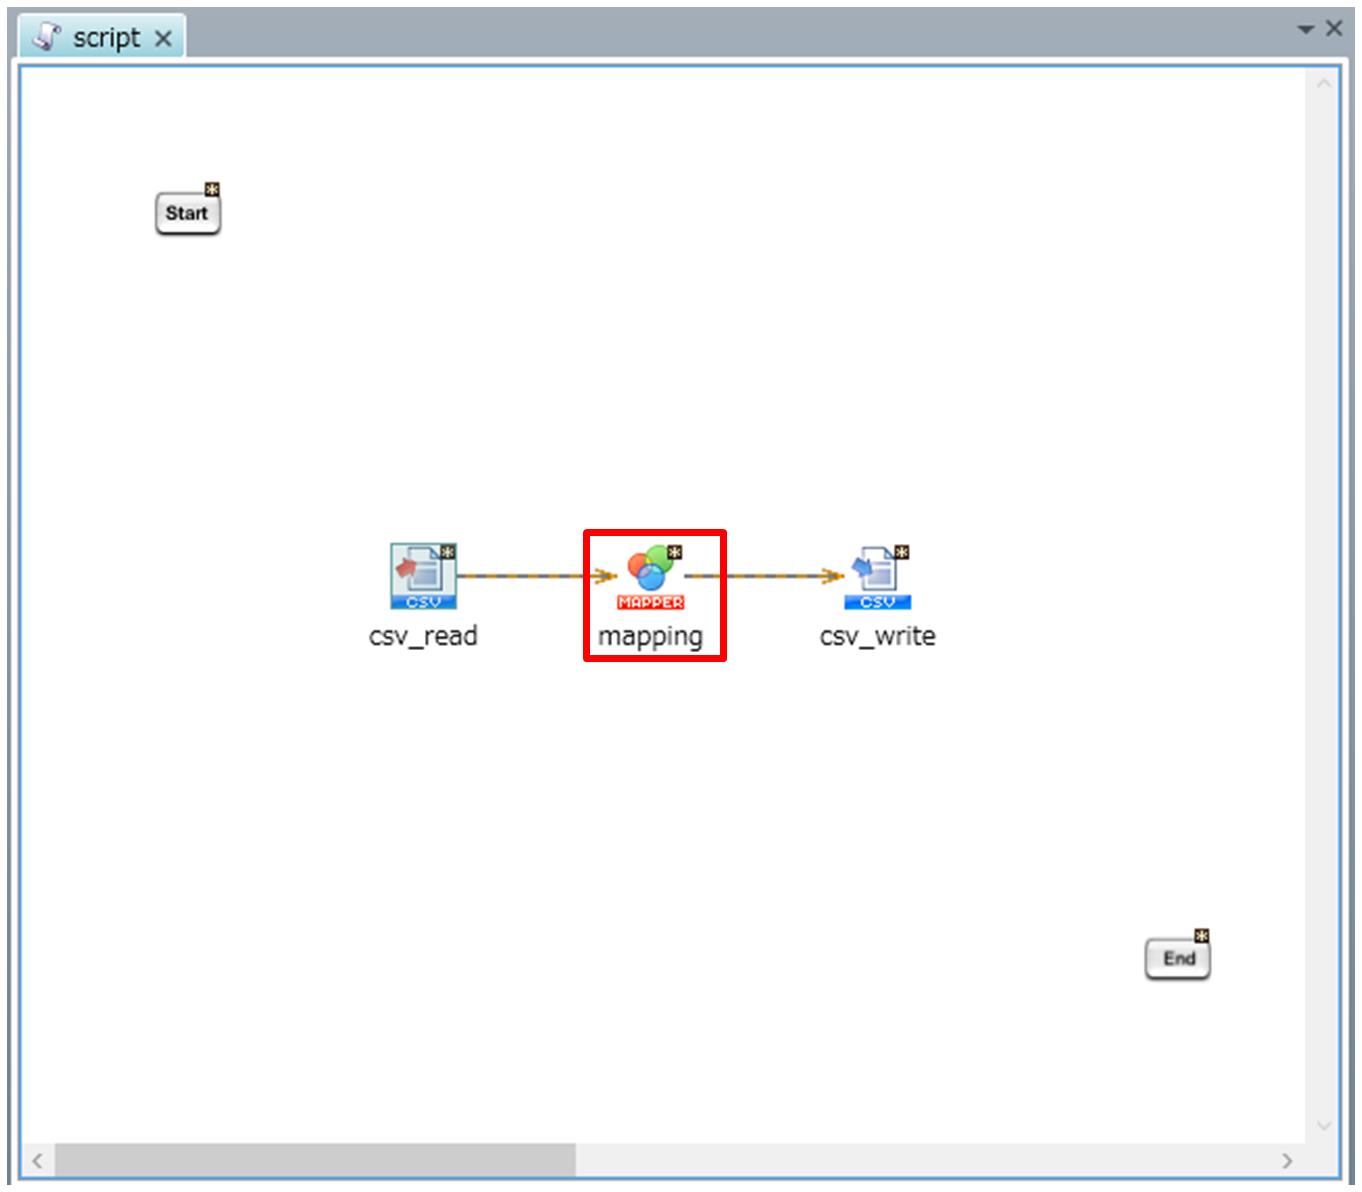
(6) Create a mapping in the mapping canvas
-
Drag the csv_read component icon onto csv_write.
-
Select Draw process flow and data flow from the dialog that appears after the icon is dropped.
-
Select Add mapping, and then select OK.
= Remarks =If you select Cancel in the dialog, you can re-display the dialog by dragging the Read CSV File operation onto the Write CSV File operation again.
-
Double-click the mapping icon that is created on the script canvas.
-
In Mapper editor, create processing that converts character string "A" in the input character string to "B".
Configure the mapping canvas as shown below.
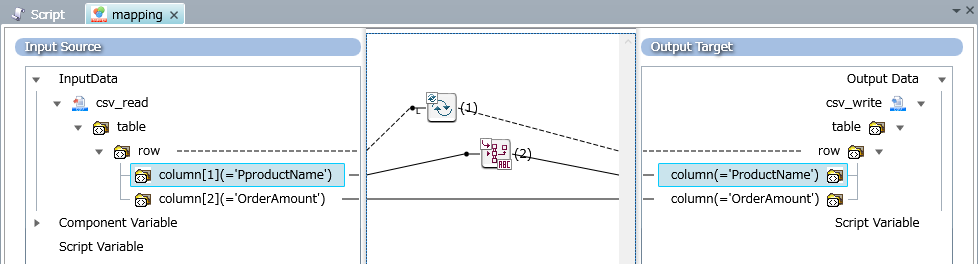
No.
Logic name
Description
Location on tool palette
(1)
Iterate specified node
This logic iterates the specified node.
Loop > Basic > Iterate specified node
(2)
Replace Each String
This logic replaces the input character string according to a replacement table and returns the value of the string.
Enter the following values in Replacement table on the Required settings tab.
Replace from
Replace to
A
B
Select Partial match for Matching method.
Select Partial replacement for Replacing method.
String > Conversion > Replace Each String
= Remarks =Select Partial match for Matching method and Partial replacement for Replacing method in the Replace Each String logic.
With the above combination, the character strings in the input character string that partially matches the character string specified for Replace from are replaced with the character string of Replace to.
-
Select Finish to close the mapping canvas and go back to the script canvas.
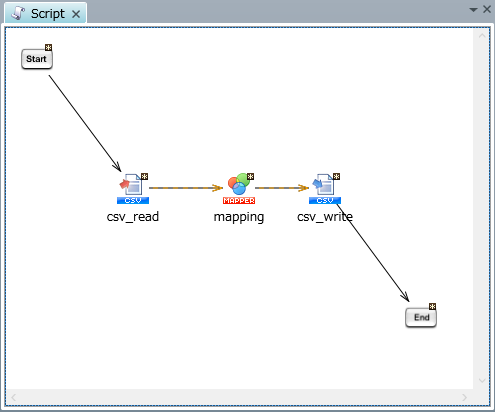
(7) Draw a flow on the script canvas
-
Drag the Start icon onto csv_read.
A solid black arrow is displayed from the Start icon to csv_read.
= Remarks =The process flow is displayed with a solid black line. The data flow is displayed with a yellow dashed line.
-
Drag csv_write onto the End icon.
A solid black arrow is displayed from csv_write to the End icon.
-
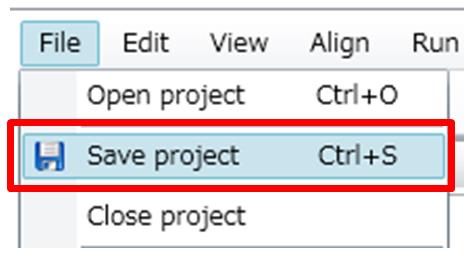
Save the script by selecting Save project from the File menu or with Ctrl+S.
For details about keyboard shortcuts, refer to Keyboard shortcuts.
NoteWhile the project is being saved, if a problem occurs such as a network disconnection, the project may be saved incorrectly and can't be reopened.
-
Select Start/Restart debug in the Run menu.
= Remarks =Scripts can also be executed from
 in the tool bar.
 -
Check the execution log shown on the bottom of the Designer screen, and confirm that the script was debugged.
= Remarks =By running debug, you can view the processing time for each component and view the script execution log.
The execution history view shows the overall processing time and the processing time for each icon.
-
Select Run from the Run menu.
= Remarks =Scripts can also be executed from
 in the tool bar.
 -
In the Run script dialog, select OK.
= Remarks =The execution history view shows the processing time of the script execution.
-
Check the execution log shown on the bottom of the Designer screen, and confirm that the script was executed.
-
Select X on the upper-right of the Designer screen.
-
Exit HULFT Square Designer? is shown on the screen.
Select OK.
-
Go back to the HULFT Square site.
(12) Check that the file is created on the storage
-
Select
> SERVICES > Storage. -
Check that "outputdata.csv" is created in the specified folder of the storage.
-
Open "outputdata.csv" and confirm that the character string is replaced.
Download the file with Download in the action menu and confirm that the contents of the file have been changed as follows.
SampleDataB,100
SampleDataB,200
SampleDataC,300
(13) Confirm the service event log
-
Select
 > SERVICE EVENTS > HULFT Integrate.
 -
Confirm the log with the project name "sample1" in the HULFT Integrate page.
Now, the procedure for processing a CSV file that is uploaded to the storage and outputting it to another CSV file is completed.