Schedule Jobs
On the Schedule Jobs page in the Main category, you can create jobs that execute scripts according to a scheduled time, date, or day of week. When you regularly retrieve or process data, use scheduled jobs to execute scripts. To set scheduled jobs, select  > JOBS > Schedule Jobs in the navigation menu.
The user who creates a job becomes the user who executes the job (script).
Users can specify workspaces in scheduled jobs to share with other users or groups.
For more details about how to use workspaces to share settings, refer to Share settings with team members.
The key points about creating and setting scheduled jobs are explained in this section.
Tutorials
For the creation method for scheduled jobs, refer to the following tutorial:
Points for settings
To create a new scheduled job, select Add on the Schedule Jobs page and specify a time, date, or day of week.
You can manage the execution of the created jobs by turning the jobs on and off.
You can make an application using a scheduled job you have created.
This section explains the screen transitions from the Schedule Jobs page and the operations for setting scheduled jobs.
For the names and functions of basic UI elements and other items of HULFT Square, refer to the following topic:
Schedule
In the navigation menu, select > JOBS > Schedule Jobs to open this page.
On the Schedule Jobs page, you can manage your scheduled jobs by performing the following operations:
-
Viewing detailed information about jobs
-
Turning jobs on and off
-
Showing execution history for jobs
-
Creating new applications
-
Deleting jobs
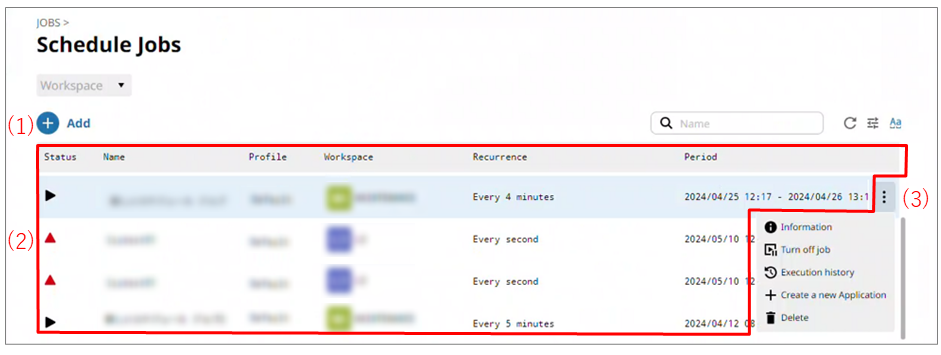
- (1) Add
-
Select this icon to create a new scheduled job.
For the screen displayed after selecting this icon, refer to Schedule Jobs > Add.
- (2) List of settings
-
Scheduled jobs that have already been created are displayed in tabular form.
The status is indicated as follows:

:
This icon indicates that the scheduled job is running.

:
This icon indicates that the scheduled job is suspended.
To run or suspend a scheduled job, select Turn on/off job from the action menu.
= Remarks =You can register more than 5,000 scheduled jobs, but the maximum number displayed for each workspace is 5,000. If you select multiple workspaces, the amount over 5,000 isn't displayed.
- (3) Action menu
-
Select this icon to perform operations for scheduled jobs that have been created.
Selecting
 shows the menu of operations below.
- Information
-
Displays detailed information about the selected scheduled job.
For the screen displayed after selecting this menu item, refer to Schedule Jobs > Scheduled job name.
- Turn on/off job
-
Turns the selected scheduled job on and off.
- Execution history
-
The execution history for the scheduled job is displayed.
For the screen displayed after selecting this menu item, refer to
 > JOB EVENTS > Schedule Jobs.
 - Create a new Application
-
You can create an application from an existing scheduled job.
For the screen displayed after selecting this menu item, refer to Schedule Jobs > Scheduled job name > Create a new Application.
- Change ownership
-
Changes the ownership of the selected scheduled job to another member. When you change the owner, the value of Author changes.
In order to change the ownership, in addition to permission to view the scheduled job, you need the permission ChangeOwnership.
- Delete
-
Deletes the selected scheduled job.
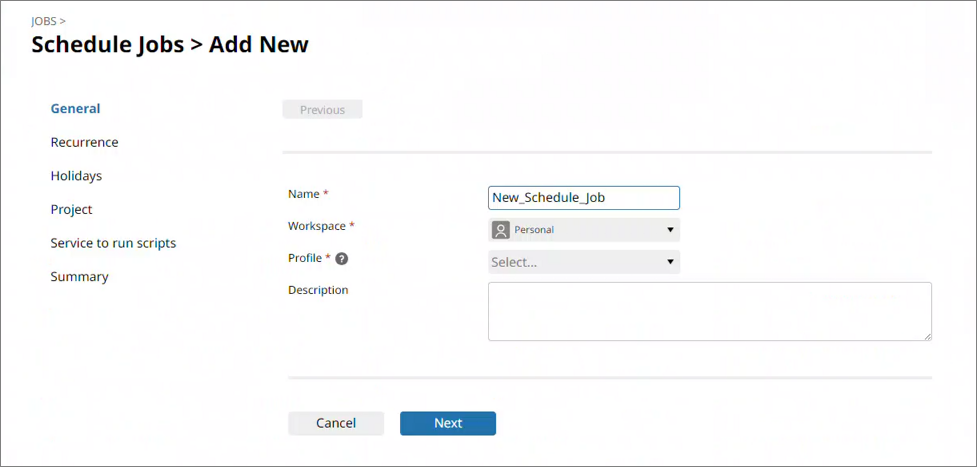
On the Schedule Jobs page, select Add to open this page.
Set the information to create a scheduled job by following the wizard-style pages step by step.
After you specify the script in step Project, you must set the dependency relationship.
For more details, refer to Script dependency.
Schedule Jobs > Scheduled job name
On the Schedule Jobs page, select Information from the action menu in the list of settings to open this page.
You can view detailed information about the selected scheduled job.
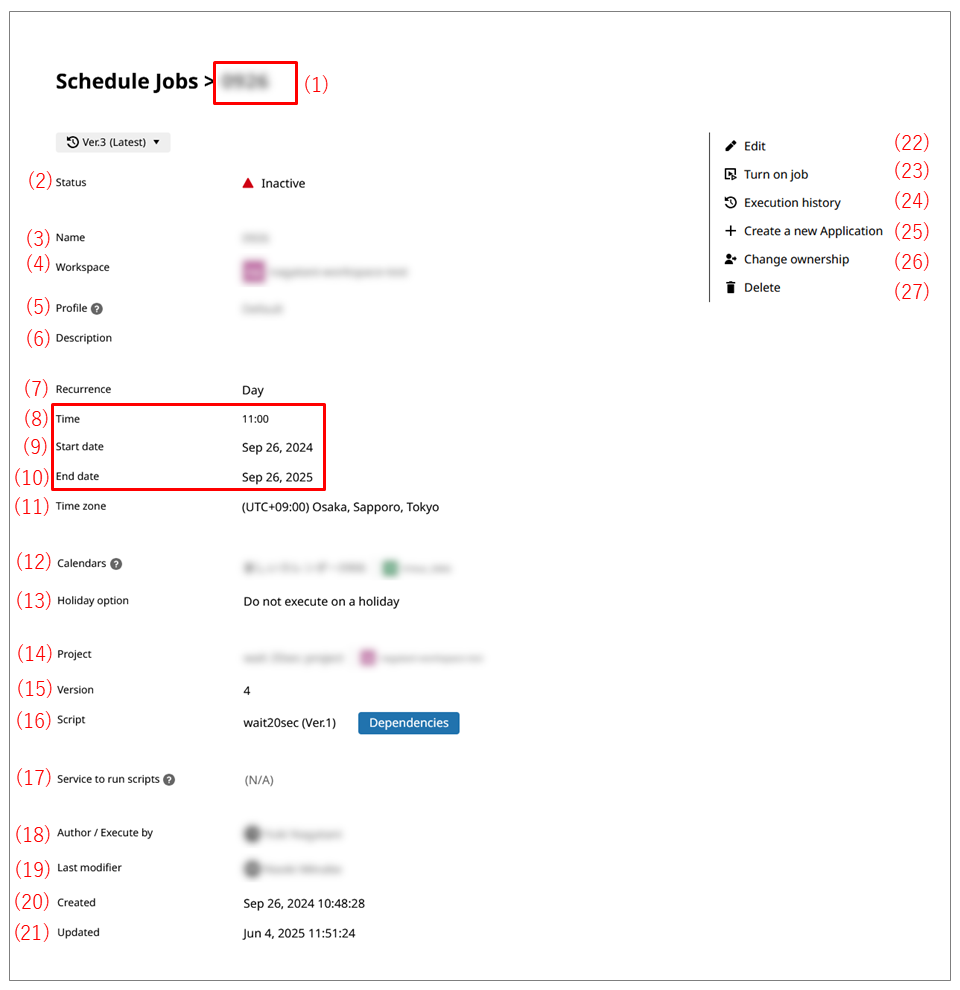
- (1) Scheduled job name
-
In Scheduled job name, the name of the scheduled job is displayed.
- (2) Status
-
The status of the scheduled job is displayed.
- (3) Name
-
The name of the scheduled job is displayed.
- (4) Workspace
-
The workspace that is used to share the scheduled job is displayed.
- (5) Profile
-
The name of the profile linked with the scheduled job is displayed.
- (6) Description
-
The description of the scheduled job is displayed.
- (7) Recurrence
-
The recurrence period for the scheduled job is displayed.
- (8) Execution schedule for the scheduled job
-
The execution schedule for the scheduled job is displayed.
The displayed contents change according to the schedule recurrence period that is selected in Recurrence.
- (9) Start date
-
The date to start execution of the scheduled job is displayed.
- (10) End date
-
The date to end execution of the scheduled job is displayed.
- (11) Time zone
-
The time zone used for the schedule is displayed.
- (12) Calendars
-
The base calendar to execute the scheduled job is displayed.
- (13) Holiday option
-
The option for whether to execute the scheduled job on holidays is displayed.
- (14) Project
-
The project used for the scheduled job is displayed.
- (15) Version
-
The version of the project is displayed.
- (16) Script
-
The script used for the scheduled job is displayed.
- (17) Service to run scripts
-
The service that runs the scripts is displayed.
- (18) Author / Execute by
-
The author of the scheduled job is displayed.
- (19) Last modifier
-
The person who last modified the scheduled job is displayed.
- (20) Created
-
The creation date of the scheduled job is displayed.
- (21) Updated
-
The last updated date of the scheduled job is displayed.
- (22) Edit
-
Edits the scheduled job.
- (23) Turn on/off job
-
Turns the scheduled job on and off.
- (24) Execution history
-
The execution history for the scheduled job is displayed.
For the screen displayed after selecting this menu item, refer to
> JOB EVENTS > Schedule Jobs. - (25) Create a new Application
-
You can create an application from a scheduled job.
For the screen displayed after selecting this menu item, refer to Schedule Jobs > Scheduled job name > Create a new Application.
- (26) Change ownership
-
Changes the ownership of the selected scheduled job to another member. When you change the owner, the value of Author changes.
In order to change the ownership, in addition to permission to view the scheduled job, you need the permission ChangeOwnership.
- (27) Delete
-
Deletes the scheduled job.
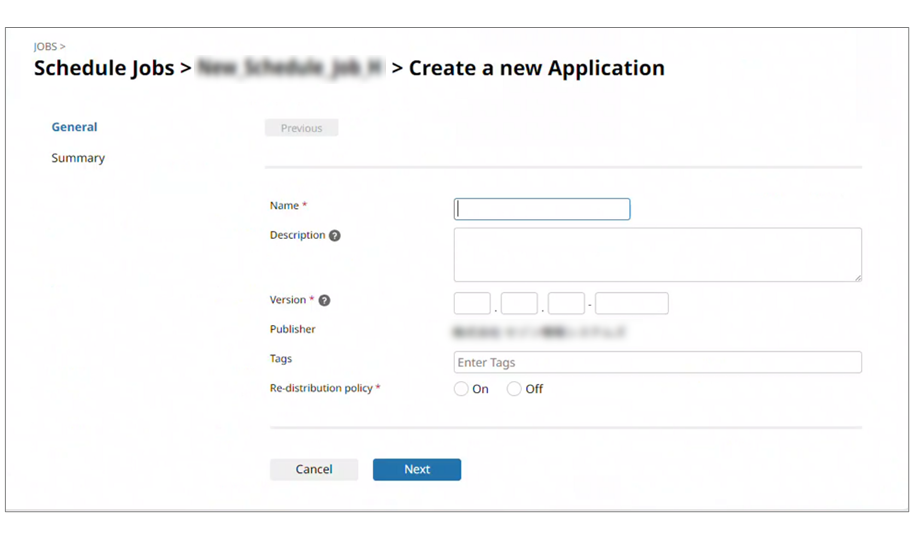
Schedule Jobs > Scheduled job name > Create a new Application
On the Schedule Jobs page, select Create a new Application from the action menu in the list of settings to open this page.
Set the fields to create an application by following the wizard-style pages.
For details about creating applications, refer to Creating applications.