HULFT Square Designer
Overview of Designer
Designer enables you to design and develop a script by using a GUI.
The Designer screen lets you display or hide functions according to the developer's purposes and create a unique layout, providing you with an easy-to-use work environment.
Launching of Designer
This section describes how to launch Designer.
-
Select
 > HULFT INTEGRATE > Projects.
 -
Select Open project for a project on the Projects page.
= Remarks =For details about how to create a new project, refer to the tutorial Create a project.
-
In the Edit project name dialog, select the profile and Integrate service that you want to use from the dropdown list.
-
Select Launch Designer.
= Remarks =To launch Designer, HULFT Square Designer.exe must be installed.
When the Open HULFTSquareDesigner? dialog is displayed, after selecting Launch Designer, select Open HULFTSquareDesigner within one minute. The message and the button names may vary depending on your browser.
If the message The Token has expired is displayed, try again from Launch Designer.
Designer screen layout
This section describes the default screen layout.
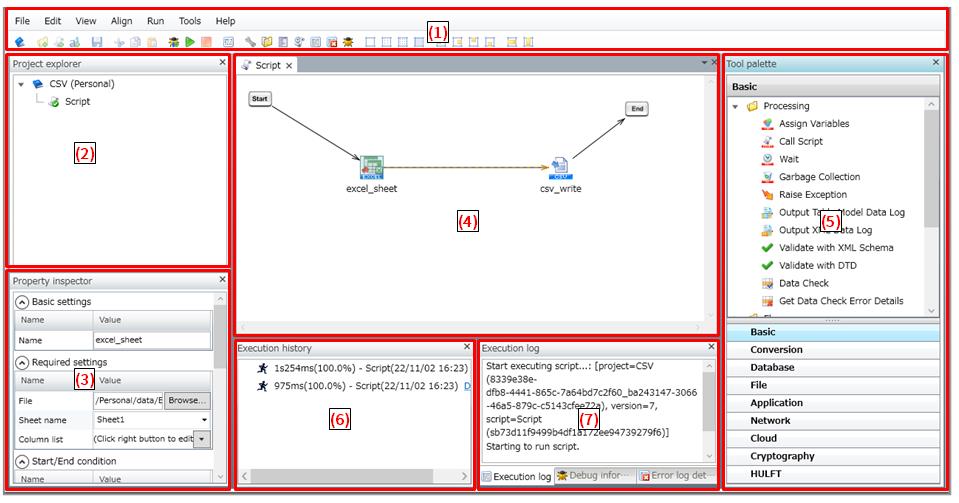
- (1) Menu
-
This area shows various types of menus and a tool bar for each menu that enable you to use the basic functions of Designer.
- (2) Project explorer
-
You can create scripts and folders. The scripts and folders you created can be opened by double-clicking on them.
- (3) Property inspector
-
You can configure various component icons that are created on the script canvas.
- (4) Script canvas
-
The various component icons can be dragged from the tool palette.
You can create a flow by dragging the various component icons in this area.
- (5) Tool palette
-
This area shows the various component icons needed to create a flow on the script canvas.
The various component icons can be dragged from the tool palette to the script canvas.
- (6) Execution history
-
When you execute a script in debug mode, this area shows the processing time for the entire script, the processing time for each component, and the processing ratio (%) for each component.
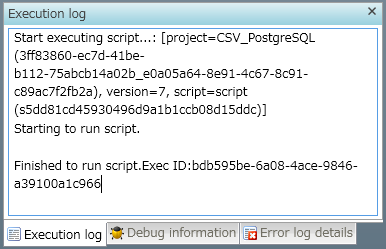
- (7) Execution log
-
This area shows the execution log for scripts that are executed in debug mode.
The content of the log differs depending on the log level.
The execution results of scripts are also displayed in a list in
 > SERVICE EVENTS > HULFT Integrate.
You can refer to Exec ID and view the details on the event log details page.
NoteWhen scripts like those described below are executed and the number of log records exceeds 10,000, the upper limit for display is reached, and only errors and completion messages are displayed.
-
The log level is set as DEBUG, and a large amount of data is handled during debugging
-
A large volume of processing is required because of loop execution or other reasons
You can view all the log records in the event log of HULFT Integrate. Use the filter function by specifying hours, minutes, and seconds for Date or specifying error for Log level to narrow down the records to view.
= Reference =For details about log levels, refer to Log levels.
-
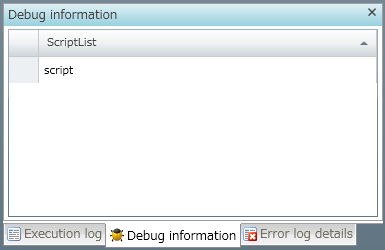
- (7) Debug information
-
This area shows the values of script variables within scripts that are executed in debug mode.
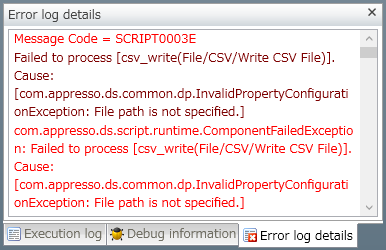
- (7) Error log details
-
This area shows error details of scripts that are executed in debug mode.
Menu
The Designer menu contains the following menus. When you select each menu, the menu items are displayed as a dropdown list.
File menu
Select the File menu to perform any of the following operations for a project:
Item description
- Open project
-
Opens an existing project.
- Save project
-
Saves a project.
= Reference =For notes on saving projects, refer to Notes.
- Close project
-
Closes the project.
- Close editor
-
Closes the editor within the script canvas. If multiple editors are open, only the active editor is closed.
- Close all editors
-
Closes all editors that are currently open.
- Properties
-
Opens the Properties window.
- Exit
-
Exits Designer.
Edit menu
Select the Edit menu to perform any of the following editing operations for the currently selected script or component icon:
Item description
- Cut
-
Cuts the selected script or component icon.
- Copy
-
Copies the selected script or component icon.
- Paste
-
Pastes the copied script or component icon.
- Delete
-
Deletes the selected script or component icon.
- Select all
-
Selects all scripts or component icons.
View menu
Select the View menu to configure Designer display settings.
Item description
- Show/Hide PSP data flow
-
You can choose whether to show or hide the PSP data flow (thick yellow line) on the script canvas.
- Hide Grid
-
Hides the grid on the script canvas.
- Show 32x32 grid
-
Shows a 32x32 grid on the script canvas.
- Show 16x16 grid
-
Shows a 16x16 grid on the script canvas.
- Show 8x8 grid
-
Shows an 8x8 grid on the script canvas.
- Show/Hide tool palette
-
You can choose whether to show or hide Tool palette.
- Show/Hide project explorer
-
You can choose whether to show or hide Project explorer.
- Show/Hide property inspector
-
You can choose whether to show or hide Property inspector.
- Show/Hide execution history
-
You can choose whether to show or hide Execution history.
- Show/Hide execution log
-
You can choose whether to show or hide Execution log.
- Show/Hide error log
-
You can choose whether to show or hide Error log details.
This item isn't shown by default.
- Show/Hide debug information
-
You can choose whether to show or hide Debug information.
- Initialize layout
-
Resets all views and editors to their default state.
- Maximize current view/editor
-
Maximizes the view and editor.
Align menu
Select the Align menu to align component icons on the script canvas.
Item description
- Align left
-
Aligns the script to the left.
When you align the script to the left, the x-coordinates of all selected component icons on the script canvas are aligned with the leftmost component icon.
- Align right
-
Aligns the script to the right.
When you align the script to the right, the x-coordinates of all selected component icons on the script canvas are aligned with the rightmost component icon.
- Align top
-
Aligns the script to the top.
When you align the script to the top, the y-coordinates of all selected component icons on the script canvas are aligned with the topmost component icon.
- Align bottom
-
Aligns the script to the bottom.
When you align the script to the bottom, the y-coordinates of all selected component icons on the script canvas are aligned with the bottommost component icon.
- Align horizontally
-
Aligns the selected component icons horizontally at equal intervals.
- Align vertically
-
Aligns the selected component icons vertically at equal intervals.
Run menu
Select the Run menu to perform actions related to running scripts, or to set or release breakpoints.
Item description
- Start/Restart debug
-
Runs a script in debug mode. When you use this item, the script behaves as follows:
-
The script pauses its operation at a component icon on which a breakpoint is set.
-
When the script is paused at a breakpoint, the script operation restarts.
-
The processing time of each component icon appears in the execution history.
= Reference =For notes on running scripts, refer to Notes.
NoteDon't close Designer while the script is paused at a breakpoint. Before closing Designer, restart the script operation and make sure the script ended.
-
- Run
-
Runs a script. When you use this item, the script behaves as follows:
-
Even if a breakpoint has been set on a component icon within the script, the script is run until it reaches the End component icon.
-
The processing time of each component icon doesn't appear in the execution history.
= Reference =For notes on running scripts, refer to Notes.
-
- Stop
-
Stops a script that is running.
= Hint =It may take a while before the script stops.
- Build
-
Compiles a script.
- Set/Release breakpoint
-
Sets or releases breakpoints on the component icons selected on the script canvas.
- Release all breakpoints
-
Releases the breakpoints set on all the component icons on the script canvas.
Tools menu
Select the Tools menu to launch various tools related to Designer.
The dedicated tool menu opens in the mapping canvas. Refer to Tool Menu.
- Option
-
Opens a dialog to set Designer options.
In the Option settings dialog, you can set the following options:
- Services
-
Specify Integrate service for execution
Select a HULFT Integrate service for execution.
Specify HULFT Transfer service for execution
Select a HULFT Transfer service for execution.
- Log
-
- Log level
-
You can select the log level to output when executing scripts from Designer.
-
NOTICE
-
INFO (default)
-
FINFO
-
FINEST
-
DEBUG
For details about log levels, refer to Log levels.
-
- Project auto-saving
-
Enable project auto-saving
You can select whether projects are automatically saved.
When this item is selected (default), projects are saved automatically.
When this item isn't selected, projects aren't saved automatically.
= Reference =For details about project auto-saving, refer to Project auto-saving function.
Time until the start of auto-saving
You can specify the time in minutes until project auto-saving starts.
This item is available when Enable project auto-saving is selected.
The default value is 15. You can specify a value from 10 through 25.
- Smart Compiler
-
Use Smart Compiler when creating data flow
You can select whether to use Smart Compiler when you create a data flow.
When this item is selected (default), Smart Compiler is used.
When this item isn't selected, Smart Compiler isn't used.
= Reference =For details about Smart Compiler, refer to Smart Compiler.
- Profiles
-
Select Profile
You can select a profile from the dropdown list when executing a script in Designer.
= Reference =For details about profiles, refer to Profiles.
Help menu
Select the Help menu to view the help window or the version information.
Item description
-
Shows the help window.
- Version information
-
Shows the version.
Help
Project explorer
Use Project explorer for operations such as configuring script properties and registering script variables.
Project menu
The project menu opens when you right-click a project in Project explorer. Select the project menu to perform any of the following operations for a project:
Item description
- New
-
Creates a new folder or script within the project.
- Paste
-
Pastes a copied folder or script.
- Close project
-
Closes the selected project.
- Restore project from server
-
Restores a project from a backup file, by referring to the following information:
-
Version name
-
Date and time of the update
-
User who performed the update
NoteIf an extremely large number of versions of a project exist, Restore project from server may fail.
The version number will start again from one if you copy the project and create a separate project from it.
-
- PSP data flow operation
-
= Reference =
-
For details about Parallel Stream Processing, refer to Parallel Stream Processing.
-
For details about Smart Compiler, refer to Smart Compiler.
Enable at once
Changes the changeable data flows in all scripts of the selected projects to PSP data flows.
Disable at once
Changes the PSP data flows in all scripts of the selected projects to data flows.
-
Script menu
The script menu opens when you right-click a script in Project explorer. Select the script menu to perform any of the following operations for a script:
Item description
- New
-
Creates a new script variable that is used in the selected script.
= Reference =For details about script variable creation, refer to Creating script variables .
- Open
-
Opens the selected script on the script canvas.
- Cut
-
Cuts the selected script.
- Copy
-
Copies the selected script.
- Paste
-
Pastes the copied or cut script.
- Delete
-
Deletes the script.
- Restore script from server
-
Restores a script from the backup file, by referring to the following information:
-
Version name
-
Date and time of the update
-
User who performed the update
-
- PSP data flow operation
-
= Reference =
-
For details about Parallel Stream Processing, refer to Parallel Stream Processing.
-
For details about Smart Compiler, refer to Smart Compiler.
Enable at once
Changes the changeable data flow in the selected scripts to PSP data flow.
Disable at once
Changes the PSP data flow in the selected scripts to data flow.
-
- Properties
-
Opens the Script properties dialog.
You can change the script name and check settings information.
For details about the settings, refer to Configuring and viewing script information.
Folder menu
The folder menu opens when you right-click a folder in Project explorer. Select the folder menu to perform any of the following operations for a script:
Item description
- New
-
Creates a new folder or script within the folder.
- Cut
-
Cuts the selected folder.
- Copy
-
Copies the selected folder.
- Paste
-
Pastes the copied or cut folder or script.
- Delete
-
Deletes the selected folder.
- PSP data flow operation
-
For details about Parallel Stream Processing, refer to Parallel Stream Processing.
-
For details about Smart Compiler, refer to Smart Compiler.
-
Enable at once
Changes the changeable data flows in all scripts of the selected folders to PSP data flows.
Disable at once
Changes the PSP data flows in all scripts of the selected folders to data flows.
Creating script variables
-
Create script variables in the following ways:
Create with button on tool bar
-
Select the target script in Project explorer
-
Select Create new script variable on the tool bar
Create by right-clicking
-
Right-click the target script in Project explorer
-
Select New > Script variable
Create with shortcut key
-
Select the target script in Project explorer
-
Ctrl+Shift+N
-
-
Enter values for the items in the New script variable dialog that appears after the above operation.
- Name
-
Enter the name of the variable.
Required settings tab
The items on the Required settings tab in the New script variable dialog are as follows:
Item description
- Variable type
-
Select the variable type.
-
String (default)
-
Integer
-
Decimal
-
Date/Time
-
Boolean
-
Binary
-
XML
= Reference =For details about the variable types, refer to Script variables.
-
- Initial value
-
Enter the initial value of the variable.
- Use as script input variable
-
When this item is selected, the script variable is set as an input variable.
Select this item to use the script variable in Request settings for API projects.
When this item isn't selected (default), the script variable isn't set as an input variable.
You can also set this item from the Input/Output tab in the Script properties dialog.
- Use as script output variable
-
When this item is selected, the script variable is set as an output variable. This setting allows scripts outside the script to refer to the variable.
Select this item to use the script variable in Response settings for API projects.
When this item isn't selected (default), the script variable isn't set as an output variable.
You can also set this item from the Input/Output tab in the Script properties dialog.
Comment tab
The items on the Comment tab in the New script variable dialog are as follows:
Item description
- Comment
-
Add an explanation of the script variable.
-
Click Finish.
The script variable is created.
Configuring and viewing script information
This section describes how to configure and view script information.
-
Right-click a script in Project explorer.
-
Select Properties.
-
Enter or view the script information.
The script menu opens.
The Script properties dialog opens.
Name
You can check the script name and change it.
Input/Output tab
You can view the input/output settings of the script variables on the Input/Output tab.
Transaction tab
You can use this tab to select the script transaction. The default setting is SUPPORTS.
For details about transactions, refer to Transactions.
Data processing method tab
You can choose whether to perform mass data processing on the Data processing method tab.
- Perform mass data processing
-
When this item is selected, mass data processing is performed for each script.
When this item isn't selected, mass data processing isn't performed.
= Reference =For more details about mass data processing, refer to Overview of mass data processing.
Test execution tab
You can view the argument value settings at the time of test execution on the Test execution tab.
- Set argument value for test execution
-
When this item is selected, the values input in Argument value for test execution are assigned to the variables when the script is executed in debug mode.
When this item isn't selected, the argument values during test execution aren't set.
Comment tab
You can add any comments.
Script canvas
Use the script canvas to create a flow by placing various component icons on the script canvas and dragging them.
Component menu
The component menu opens when you right-click a component icon on the script canvas. Use the component menu to perform any of the following operations for the selected component icon:
Item description
- Set/Release breakpoint
-
Sets or releases breakpoints on the selected component icons.
- Cut
-
Cuts the selected component icons.
- Copy
-
Copies the selected component icons to the clipboard.
- Delete
-
Deletes the selected component icons.
- Align
-
Is available when multiple component icons are selected.
Align left
Aligns the selected component icons to the left.
When you align the script to the left, the x-coordinates of all selected component icons on the script canvas are aligned with the leftmost component icon.
Align right
Aligns the selected component icons to the right.
When you align the script to the right, the x-coordinates of all selected component icons on the script canvas are aligned with the rightmost component icon.
Align top
Aligns the selected component icons to the top.
When you align the script to the top, the y-coordinates of all selected component icons on the script canvas are aligned with the topmost component icon.
Align bottom
Aligns the selected component icons to the bottom.
When you align the script to the bottom, the y-coordinates of all selected component icons on the script canvas are aligned with the bottommost component icon.
Align horizontally
Aligns the selected component icons horizontally at equal intervals.
Align vertically
Aligns the selected component icons vertically at equal intervals.
- Properties
-
Opens the properties window of the selected component icons.
The contents displayed in the properties window vary depending on the operation. For more details, refer to Connector operation guide.
Session in Designer
A session timeout occurs if you login to Designer and don't perform any operations for a certain period of time. The timeout period is 60 minutes.
When a session times out, a message about the timeout appears in the screen of Designer, and it goes back to the login window.
Changes that weren't saved prior to the timeout, such as modifications to the script, are discarded.
If a script is running when a timeout occurs, a message about the timeout appears in the screen of Designer, but the running of a script continues until it finishes.