API Projects
In API projects, configure the settings to make Data Integration projects public as REST APIs.
Create the base path for the URL that acts as the endpoint for HTTP REST, and manage the HTTP method to link to the execution script.
The request data and response data that can be handled in an API project are limited to a maximum size of 10 MB.
On the API Projects page, you can check information such as the API project name, version number, date created, base path, and creator.
You can configure API projects from  > API MANAGEMENT > API Projects in the navigation menu.
Users can specify workspaces in API projects to share with other users or groups.
For more details about how to use workspaces to share settings, refer to Share settings with team members.
The key points about creating and configuring API projects are explained in this section.
To execute scripts created by users in the data integration process, deploy a created project as a job.
Tutorials
For the creation method for API projects, refer to the following tutorials:
Points for settings
This section explains the screen transitions from the API Projects page and the functions such as creating and editing API projects.
For the names and functions of basic UI elements and other items of HULFT Square, refer to the following topic:
API Projects
In the navigation menu, select > API MANAGEMENT > API Projects to open this page.
You can manage your API projects from here, such as creating, editing, deleting, and associating with a job.

- (1) Add
-
Select this icon to create a new API project.
For the API project settings, refer to API Projects > Add.
- (2) API projects
-
Created API projects are displayed.
The following information is shown in the API project tiles:
-
API project name
-
Version (updated date and time)
-
Base path
-
Description
-
Author of the API project
-
Workspace name
-
- (3) Operation icons
-
Select these icons to perform operations for created API projects.
- Information icon
-
You can view detailed information about the selected API project. You can edit and delete the API project that is displayed and check its history.
When you select this menu item, API Projects > Project name is opened.
- Resources icon
-
Creates resources for the selected API project.
When you select this icon, API Projects > API project name > Resources is opened.
- Create new job icon
-
Creates a job with the selected API project.
- Change ownership icon
-
Changes the ownership of the selected API project to another member. When you change the owner, the value of Author changes.
In order to change the ownership, in addition to permission to view the API project, you need the permission ChangeOwnership.
- Delete icon
-
Deletes the selected API project.
On the API Projects page, select Add to open this page.
Set API project information to create an API project by following the wizard-style pages step by step.
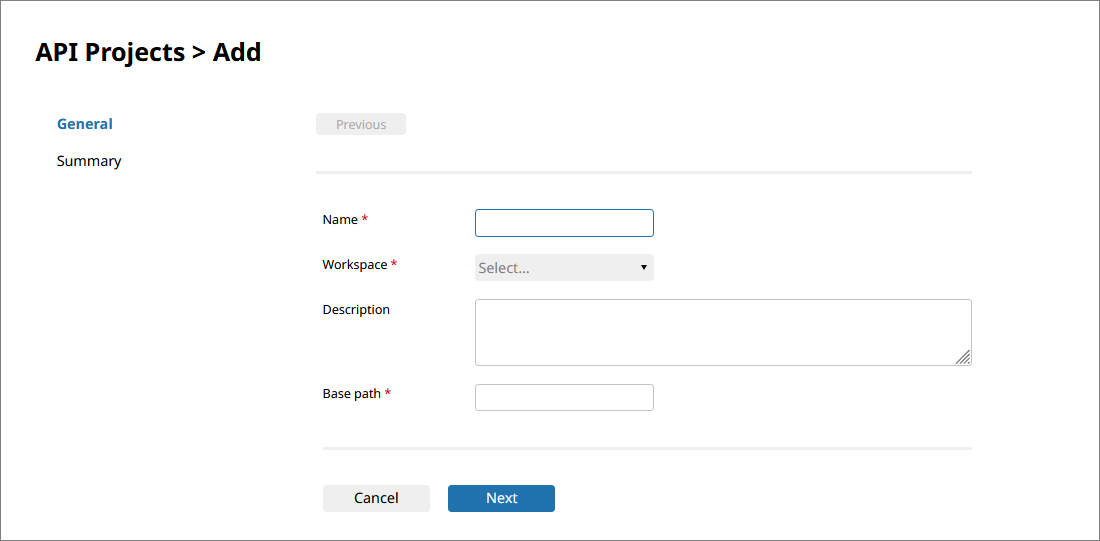
- Name
-
Specify the API project name.
- Workspace
-
Specify the workspace that is used to share the API project.
= Remarks =If you select Personal for the workspace, it's not shared with users other than yourself.
To share the settings, select the workspace that is used to share.
- Description
-
Specify the description of the API project.
- Base path
-
Specify the base path for the URL that acts as the endpoint for HTTP REST.
- Next
-
Displays the next page.
On the API Projects page, select the Information icon on a project to open this page.
You can view detailed information about the selected API project.

- (1) API project name
-
In API project name, the name of the API project is displayed.
- (2) Name
-
The API project name is displayed.
- (3) Workspace
-
The workspace that is used to share the API project is displayed.
- (4) Description
-
The description of the API project is displayed.
- (5) Base path
-
The base path of the API project is displayed.
- (6) Created
-
The created date of the API project is displayed.
- (7) Modified
-
The last updated date is displayed.
- (8) Owner
-
The owner of the API project is displayed.
- (9) Modifier
-
The updater who made the last update is displayed.
- (10) Edit
-
Edits the project name and description.
- (11) Resources
-
Creates resources for the API project.
When you select this menu item, API Projects > API project name > Resources is opened.
- (12) Create new job
-
Creates a job with the selected API project.
- (13) Change ownership
-
Changes the ownership of the selected API project to another member. When you change the owner, the value of Author changes.
In order to change the ownership, in addition to permission to view the API project, you need the permission ChangeOwnership.
- (14) Delete
-
Deletes the displayed project.
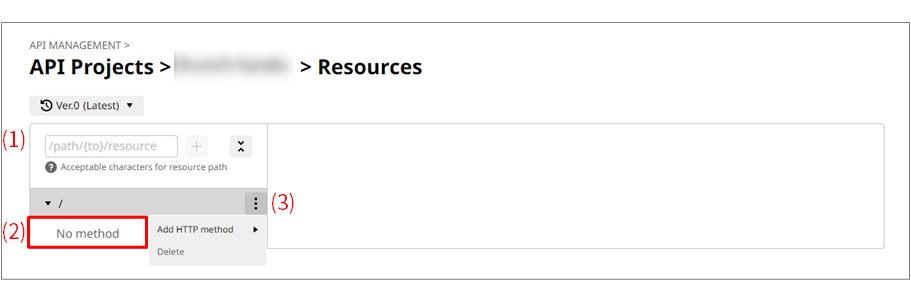
API Projects > API project name > Resources
On the API Projects page, select the Resources icon on a project, or on the API Projects > Project name page, select the Resources icon to open this page.
Set the HTTP method to link to the execution script.
On this page, the following settings can be performed:
- (1) Resources
-
Specify paths that indicate resources such as databases or files.
- (2) List of settings
-
HTTP methods that are already configured are displayed.
From the action menu of the HTTP method that you added, you can change settings for the HTTP method or delete it.
- (3) Action menu
-
Select this icon to add or delete an HTTP method.
- Add HTTP method
-
You can add the following HTTP methods:
-
GET
-
POST
-
PUT
-
PATCH
-
DELETE
-
OPTIONS
When you add an HTTP method, you can configure Script to execute, Request settings, and Response settings.
-
- Delete
-
You can delete the HTTP method.
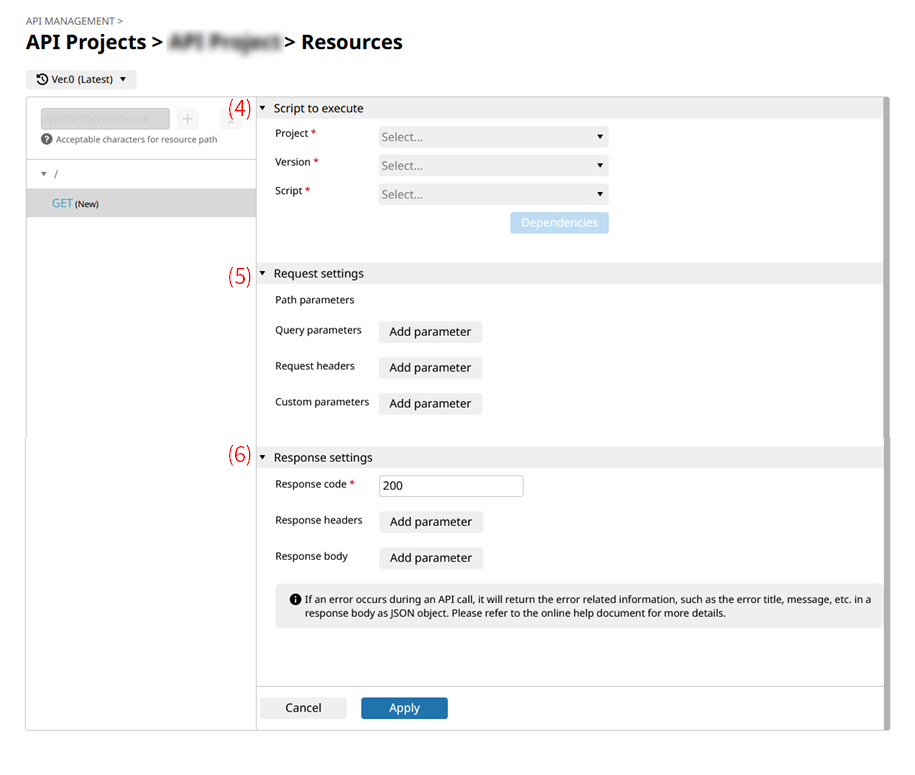
- (4) Script to execute
-
Specify the Project that you want to link to the HTTP method, and specify Project version and Script for that project.
After you specify the script, you must set the dependency relationship.
For more details, refer to Script dependency.
- (5) Request settings
-
You can use a script variable to pass a parameter to a script.
You can add specification of the following parameters:
-
Path parameter
-
Query parameter
-
Request header
-
Request body
When the HTTP method is POST, PUT, or PATCH, you can specify the request body.
The formats that can be specified in the request body are as follows:
-
JSON
-
XML
-
Form
-
Multipart/form-data
Multipart/form-data for REST API jobs is only supported for upload of a request body within 4 MB. If you try to upload a request body with a size that exceeds 4 MB, the message "403 error Forbidden" is returned.
-
-
Custom parameter
NoteMulti-byte characters can't be used for Query parameters or Request headers.
= Remarks =To use script variables in Request settings, select the checkbox for Use as script input variable during creation of the script variables.
-
- (6) Response settings
-
Specify the Response code, Response headers, and Response body for when script execution succeeds.
JSON format or XML format can be specified in the response body.
NoteMulti-byte characters can't be used for Header name in Response headers.
= Remarks =To use script variables in Response settings, select the checkbox for Use as script output variable during creation of the script variables.