Service Development

The following sections describe the functions and the terminology that are necessary to understand when developing service using DataSpider Servista.
The sections below assume that reader has studied the "The Basic Knowledge of Service" and understands the concept of the service and knows how to create scripts.

Preparation

The following sections will explain the preparation required prior to developing services

Develop standardized procedures

A standardized procedure in service development will bringing a certain uniformity in deliverables and is a key factor which will help improve the quality, production efficiency, and maintainability.
Before you begin developing services, it is recommended that you determine how you want to address each of the followings.

Composition of projects and scripts

The more scripts are created within a project, the slower it would take to save the project and load individual scripts.
Therefore, it is highly recommended that you divide the project if it gets too large.
Also, the more component icons used in a script, the harder to maintain the script will become and its readability is lowered. The more icons generally means that the use of memory by DataSpiderServer gets higher.
Again, therefore it is recommended that you divide a script if it starting to get too large. Recommended component icons used in a script is 100.

Development and production environments

Refer to "Log Level"for log levels.
Refer to "Types"for types.

File storage

Refer to"DataSpider filesystem" for DataSpider Filesystem.

Naming conventions

Refer to"Restrictions on characters used in DataSpider" for restricted characters.

Designing a script

Others

Refer to "Monitor Exception operation" for monitoring exceptions.
Refer to"Application Log Output Settings" for application logs.

Other development standards that are not discussed above should be set to meet your need.

Team development

This section explains features that are necessary for team development (services developed by multiple users).

Repository DB

For team development, you need to set repository DB and use the user administration organization.

What is Repository DB

Repository DB is an organization used for managing services, user information as well as other setup data, which is stored in RDB (Relational Data Base).
If repository DB is not set, the function of the user management and the function of the access control of the file cannot be used.

Repository DB setting

When installing it, repository DB setting can be set. Moreover, after it installs it, repository DB setting can be changed.
For more details about installation settings, refer to the "DataSpider Servista Installation Guide" available in PDF. For settings after installation, refer to the "Repository DB Management".

One repository DB must prepare one DataSpiderServer. It is not possible to connect it with same repository DB with two or more DataSpiderServer.
The instance of the data base used as repository DB is made only for repository DB, and it doesn't use it with another system.

Repository DB construction

DataSpider makes a special table for the set data base, and saves data. When DataSpiderServer is started, the table is made.
Do not newly make, and use an existing table when a special table has already existed.

Operation when repository DB is enabled/disabled

Operation when repository DB is enabled/disabled is as follows.

Team development function

The team development function is a group of enhanced functions to support developing services by multiple users.
As this is organized based on IDE (Integrated Development Environment) and the upgrade management system, it is intended for developers who have experienced these products.
Refer to "Team development" for details.

Mass Data Correspondence

DataSpider Servista has two functions Smart compiler and Mass data processing, to avoid the memory shortage.

Enabling Smart compiler is set as default. Smart complier is the function to operate Parallel Stream Processing(PSP), theoretically having unlimited data capacity, automatically.
In PSP, you can manage the mass data efficiently fast due to the multithread-processing of the flows such as loading block-unit-allocated data, converting, and writing.
However, due to its unique characteristics, PSP does not correspond to all of the processing in the mechanism.
For details on PSP, please refer to "Parallel Stream Processing".
For details on components corresponding to PSP, please refer to "Components corresponding to Parallel Stream Processing".

For processes not corresponding to PSP, to avoid memory shortage, please modify the heap size of DataSpiderServer according to the data amount, or enable Mass Data Processing.
For details on how to change the heap size of DataSpiderServer, please refer to "Property reference".

In mass data processing, you store minimum necessary data required for the process in memories and save other data in a file. This enables you to process mass data without overusing memories.
However, the process will take more time compared to On-memory processing, as disc access occurs to avoid memory shortage.
In a phase definition where good performance is required, disabling Mass data processing to conduct On-memory processing can be recommended.
For details on Mass data processing settings, please refer to "Parallel Stream Processing".

If both PSP and mass data processing are valid, PSP is prioritized and mass data processing will not be conducted.
However, if write without corresponding to PSP via Mapper, following read process executed on PSP, mass data processsing will be conducted between Mapper and write proess.

Development support functions

A variety of supportive functions, which will facilitate the development of services, are available In DataSpider Servista.
Some of the major functions are described as follows: This section will use the the script that you created in tutorial "Tutorial" on page "The Basic Knowledge of Service".
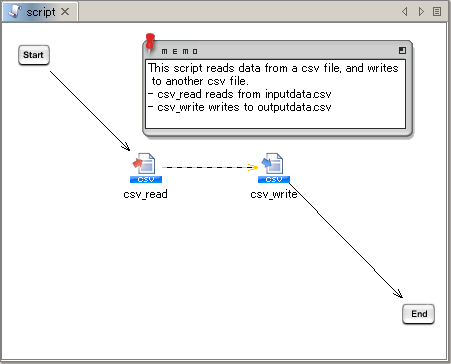
Memo

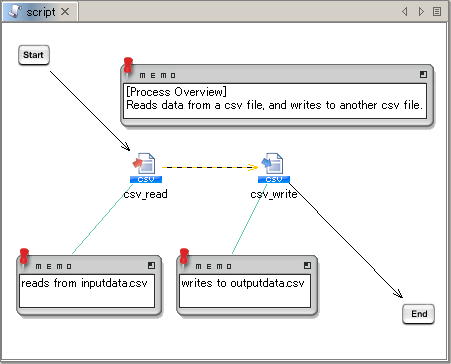
By taking advantage of memo component, it is possible to describe the outline and other notes on the script, which will help increase the readability of the script, ensuring a smooth handover to other developers and better maintainability.

From "Basic" category, select "Memo" and drag and drop it onto the Script Canvas.
Determine the size and position of the note, and then enter a note, such as a description of each component or about the script itself.


By double-clicking the frame of the note component, it can be displayed as icon.


Drag it onto an another component to make an association with it.This leads to clarify which component the memo is referring to.

Log Level

Sets the log level of the log output when the script is executed from the Designer.
Depending the severity of the chosen log level, the output message varies. By having the log level set appropriately during development phase, developers will be able to figure out the problems easily by the details given in the messages.

The log level can be selected from the following types.The verbosity level of logging message becomes higher if you lower the log level.

  Log Level

High

Low
NOTICE
INFO
FINFO
FINEST
DEBUG

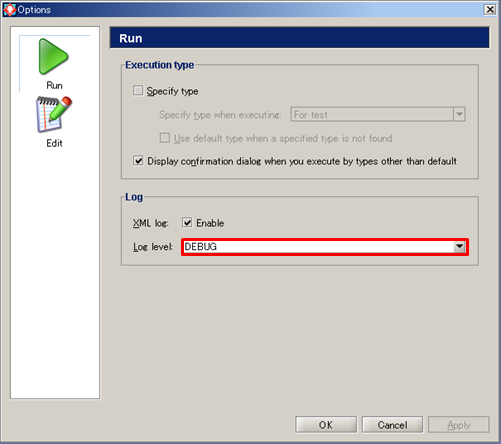
Log level used during runtime can be set at [Tool]-[Option].


Option settings window will open.
We will set it DEBUG and click [OK] to proceed.
If the [Enable] of the [XML log] is left unchecked, logging is not performed.


See Log Level for any further details.

Debug Execution

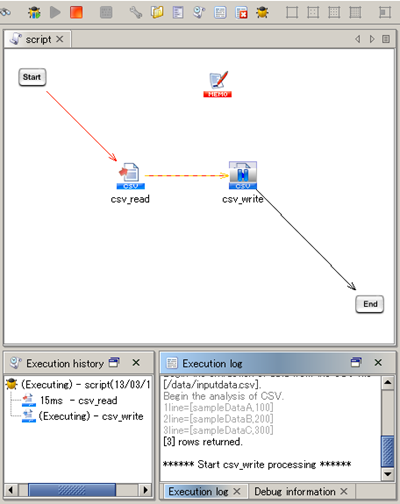
Executing the script in debug mode will provide you useful information such as the duration of each operation performed by the components.
You can also pause the script operation at the breakpoint to check the value of the script variable.

To execute the script in debug mode, click [Debug] button.


If the breakpoint is set, the script process is paused at the component.


When paused at the breakpoint, finished process flows are shown in red.
Executing the script in debug mode differs from executing the script in test mode in the following particulars: Press the [Start/restart debug] button from the toolbar to restart the process.
Breakpoint

A breakpoint is a intentional pausing place in a script that are set in places for debugging purposes used when the script is run from Execution test. By settings breakpoints, it becomes possible to acquire knowledge about the script during its execution.
Developer can use this feature to inspect the values assigned to the script variables and find out whether the script is functioning as expected.

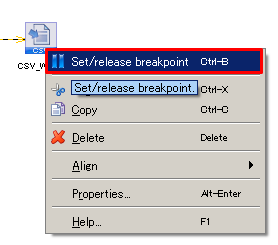
Breakpoints can be set by toggling [Set/release breakpoint] item in the context menu displayed when the icon of the interest is right-clicked. When the breakpoint is toggled on, a circle is shown at the left top corner of the icon.


The appearance of the icon Status
A breakpoint is toggled on
A break point is toggled off

A breakpoint can be enabled/disabled by toggling the [Set/release breakpoint] item in the context menu displayed when icons are right-clicked.

Grid and Alignment

Setting grids on a script and aligning icons with the alignment function lead to improve readability of scripts, avoid bugs, and increase the maintenance efficiency.
The alignment function of grids and icons is available both on the Script Canvas and in Mapper Editor.
See "Designer" for any details.

Grid

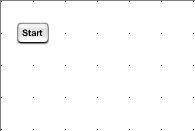
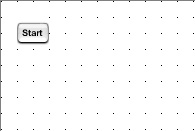
The below grid sizes are available. By using the same format in the service, you can make your script much easier to read.

32*32 16*16 8*8

Alignment

By selecting two or more components, you will be able to align icons.
By selecting two components, you will be able to "align left", "align right" "align top", and "align bottom" them. By selecting three or more components, you will be able to "align horizontally" and "align vertically" them.
If the components are not aligned correctly, do [Undo/Redo] to reverse the position of them.

Variables

By taking advantage of characteristics of variables when designing a script, you will be able to build a flexible service that can respond to configuration changes.

Script variables

Variables are used as temporary storage for data being transfered between scripts.
Variables have specific data types and they are declared by users.
Variable Mapper and Document Mapper are used to store values in a script. variables are dereferenced when it is used in input field.
The scope of the variables is the script in which they are declared, therefore they are not accessible system wide. You need to create environment variables if that is what you need.

Environmental variables

Can be declared arbitrary by users. As it can be commonly used across the system, it is recommended to apply to strings which can be changed later such as file path and global resources.
It can be used by combining to strings. For example, when there is a chance for changing only the file directories, it is expressed as "%{FILE_DIR}/read_file.csv".
By defining this way, it enables you to take flexible actions. For example if you want to change the structure, you need to only change the environment variables, not the service itself.
See Environment Variable Settings for any further details.
Component variables

Declared for each adapter operations. These will have any return values and error messages from the operations performed by adapters.
These are read only variables and not meant to be used by users.
These are dereferenced in Variable Mapper and Document Mapper

Trigger variables

Declared for each trigger component Trigger variables are meant to be used as temporary storage for data that needs to be exchanged between a script and the trigger the script is executed on its event.
These are read only variables and not meant to be used by users.
Variables are available only in trigger settings dialogs.

Search

My Project, My Trigger, Global Resources Setup, and the Designer all have their own search function.
For example, if you want to change the name of services, global resources, or variables after some development have been made, you need to know which settings are used where, otherwise you won't see the changed parts.
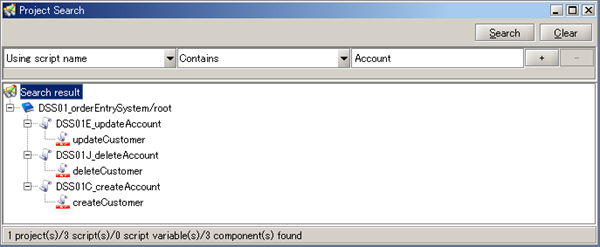
You can set advanced criteria in "Search project" in My Project to search script settings, in "Search trigger" in My Trigger to search trigger settings, and in "Search global resource" in Global Resource settings.
By making a full use of these functions, you can recognize which parts to modify. It will eventually lead to reduce the number of processes and minimize the burden for the following tests and operations.

Below gives an example of changing the service name.

The service name is specified in the Call Script Operation and Trigger.
Therefore you set the condition as "Using service name" in "Search Project" in My Project.


Therefore you set the condition as "Using service name" in "Search project" in My Project.


The component and trigger shown as search results are the influential area by changes.

Other auxiliary components

There are other auxiliary components which will facilitate the development of scripts are available in DataSpider Servista.
Some of them are described in the following sections.

Application Log Output

The errors and the result of processes during the execution of scripts are output to designated locations.
Configure the Application Log output as appropriate in "Application Log Output Settings" window and use it as needed in the script.

Types of log destinations

Select one of the followings to be used for logging destination.

Setting Application Log output

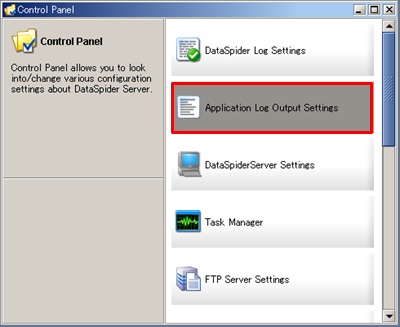
Select "Application Log Output Settings" in Control Panel


Select the [Create new application log output setting] in the Application Log Output Settings.


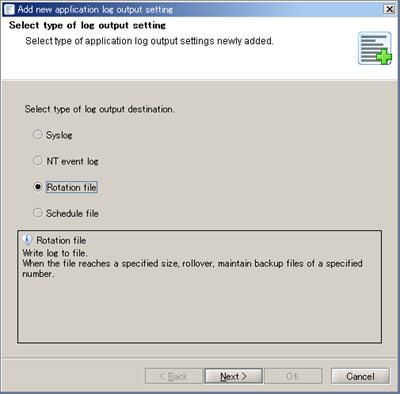
Select "Rotation file" as its type and press [Next] to continue.


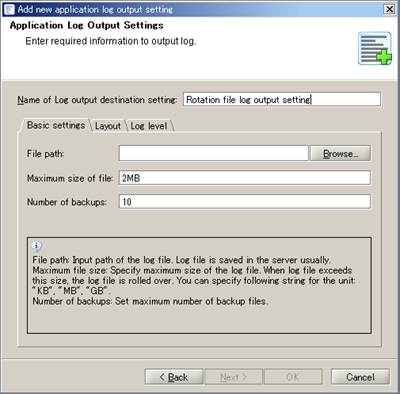
Enter "application log output destination" in the [Name of Log output destination setting].
Specify <arbitrary file path>/applog.log in the [File Path].

Click [Finish].


Refer to Application Log Output Settings for any further details.

Monitor Exception

Monitor Exception component will respond to the occurrence of exception, during processes.

Setting Monitor Exception

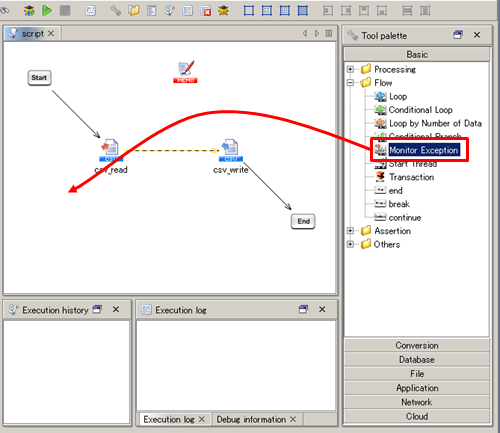
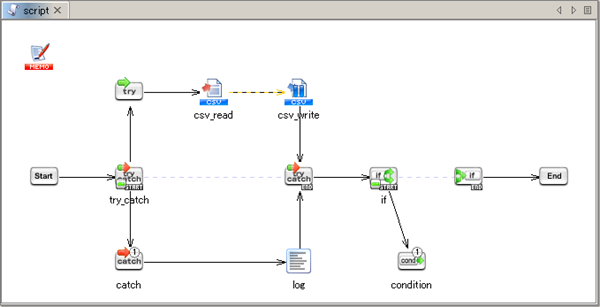
From "Basic" category, drag the "Monitor Exception" on to the script canvas.


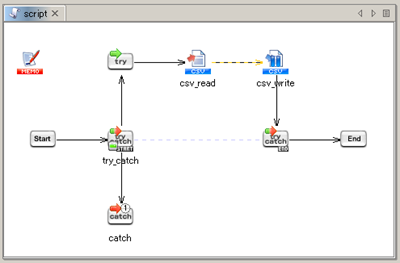
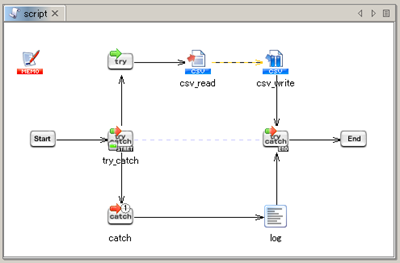
Enclose the components to be monitored with "Monitor Exception" component as follows.
Here we monitor the CSV file Read and Write components and handle any exceptions occurs during their operations.


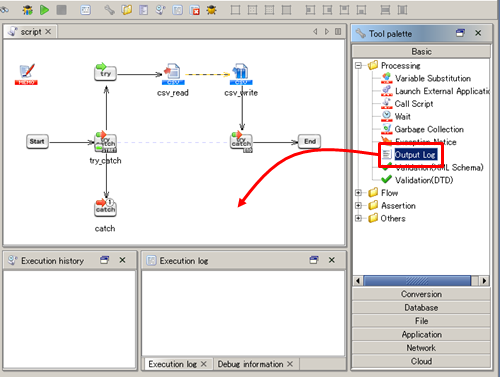
From the "Basic" category drag the "Output Log" on to the script canvas.


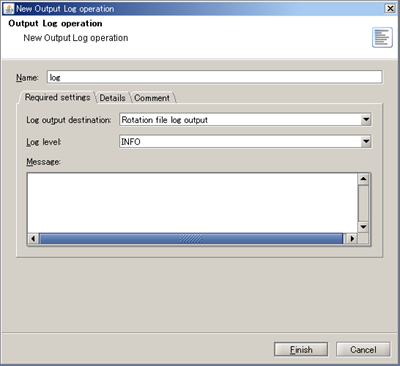
When it is dropped, its property settings dialog will open.


Enter "An error occurred." in the [Message] and click [Finish] to finish.

Wire the flow so that the errors which will occur during processes will be logged.


Rename the /data/inputdata.csv so that CSV Read operation will fail.
Run the script.


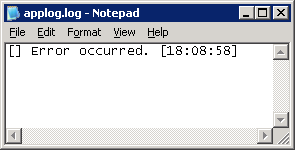
See if the applog.log has any entry in it.


Please set the CSV file back to "/data/inputdata.csv" once you confirmed.

See Monitor Exception operation for any details.
See Output Log operation for any details.
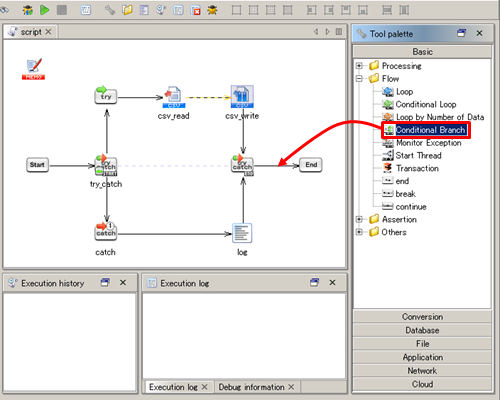
Conditional Branch

Conditional branch, is a component that has the same semantics as conditional statement which performs actions depending on whether the condition specified evaluates to true or false.

Conditional Branch

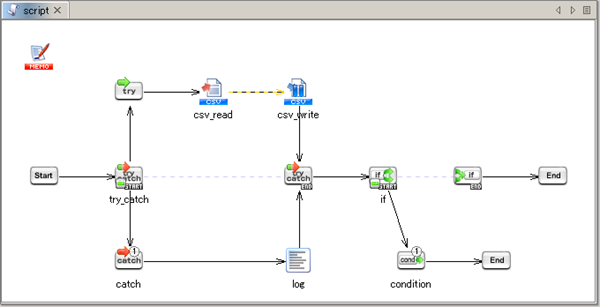
From "Basic" category, drag the "Conditional Branch" component onto the script canvas.


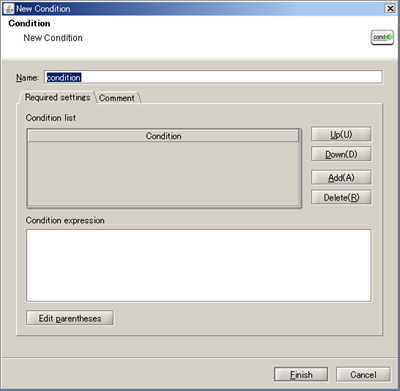
When it is dropped, the property settings dialog will open.


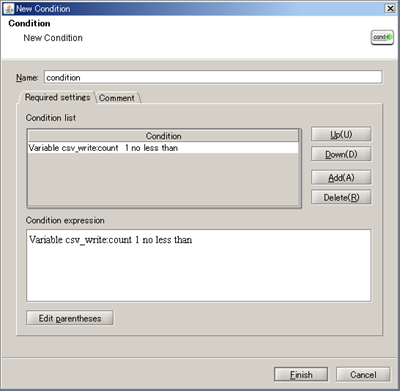
Click [Add] button to add the following condition.
Set "Compare with variable and fixed value" to [Condition type].
Set it so that when the statement evaluates to 1 when the value of the "csv_write:count" variable is "In case Equal to or more than".


Set it before the the "End"component".


Drag the "end" from "Basic" category.
Wire the "Conditional Branch" and "end" together.


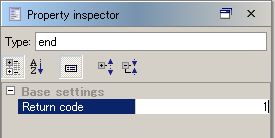
Select the "End" component and open the Property Inspector.
Set 1 as [Return code].


Should no data is written to the "/data/outputdata.csv", the return value of the script is 0.
Script will return 1, if data is written to the file.

See Conditional Branch operation for any details.
See End operation for any details.
Mapper

Mapper is a component with which you can convert or edit data and write it to a different component. You can even assign data to a variable by using a certain GUI tool called the Mapper Editor.

Mapper Types

There are three types of Mapper. Mapper is canonical term for all three types.

Mapper functions

The main functions provided by Mapper are the followings.

Setting Mapper

Mapping can be created just by simply connecting fields of input and output schemas.The created map may require conversions or processing of values in certain fields before they are transferred from the source to the target. All of these can be done by placing Mapper logic components appropriately.

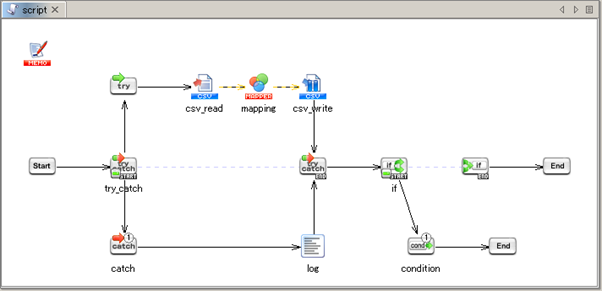
Here we use Document Mapper to transform the data read by CSV Read operation and write it to the destination.
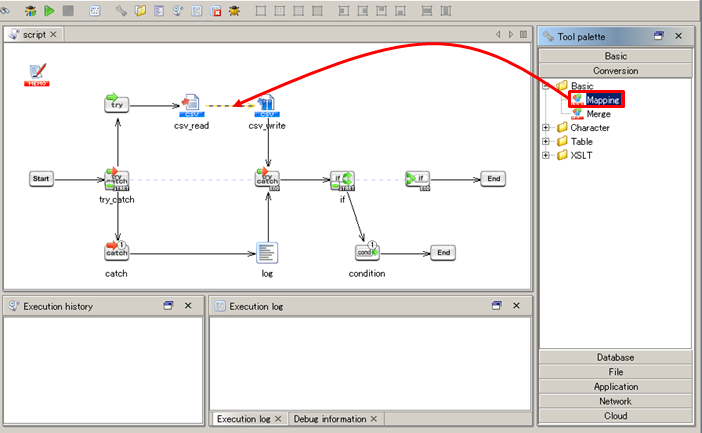
From "Conversion" category, drag the "Mapping" component onto the script canvas.


Wire the csv_read and mapping together.
Wire the mapping and the csv_write likewise.


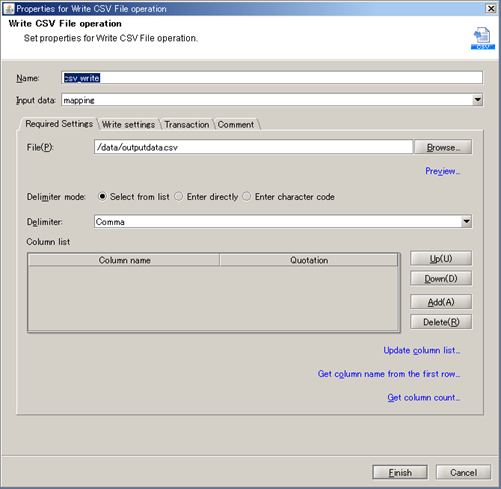
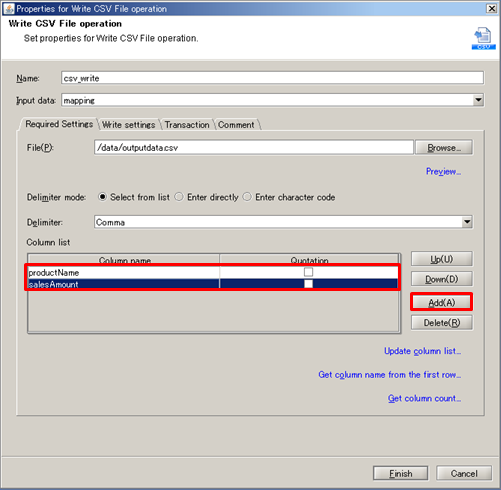
Double click the "csv_write" and open the property settings.


Click [Add] and Enter "Product name" in the [Column name] input field.
Repeat the step, but enter "Quantity" in the input field this time.


Clicking the [Finish] will close the dialog.

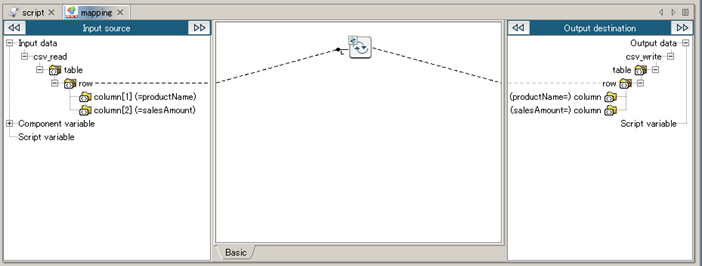
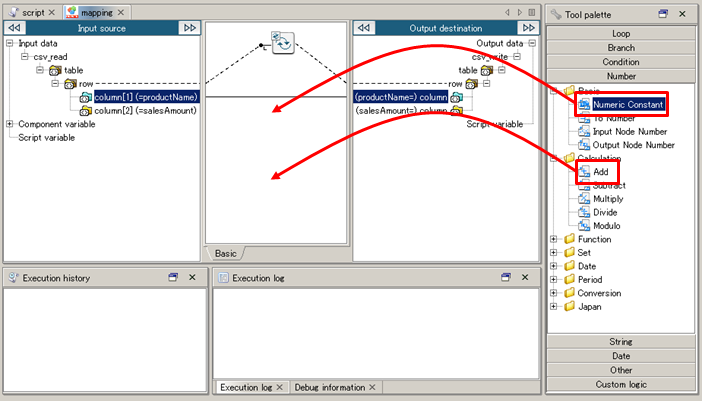
Double click the "mapping" and open Mapper Editor.


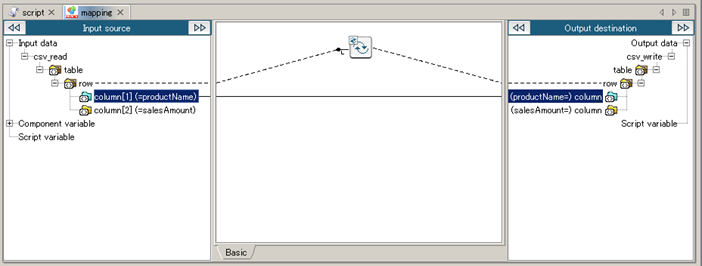
Select the "Product name" element from the input source schema of the left pane and drag it onto the "Product name" element of the output destination schema of the right pane.


no conversion is performed on the "Product name" data.
"Quantity" element will be passed some computation result.

From the "Number" category, drag the "Numeric Constant" and drop it onto the mapping canvas.
Then drag the "Addition" from the "Number" category onto the mapping canvas.


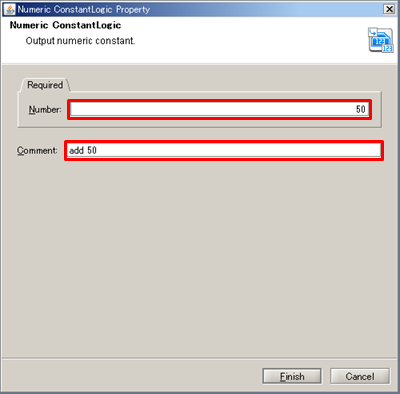
Double click the "Numeric Constant" logic and open the property settings dialog.
Enter 50 in the [Number] field.
Add appropriate [Comment] and click [Finish] to finish.


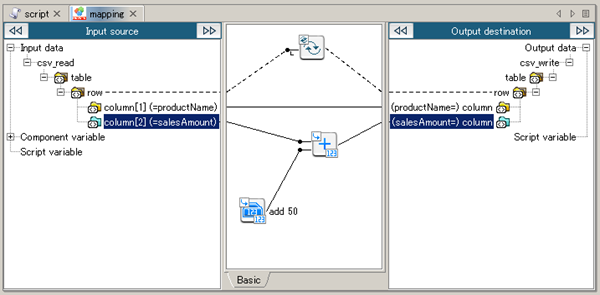
Select the "Quantity" element from the input source schema of the left pane and drag it onto the "Addition".
Drag the "Numeric Constant" on to "Addition".
Then drag the "Addition" onto the "Quantity" that is in the output destination schema of the right pane.


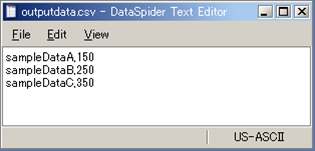
Save the script and execute.


See if the result in the /data/outputdata.csv.


Data retrieved from the /data/inputdata.csv is transformed and written to /data/outputdata.csv.

See Mapper for any details.
See Mapper , for any information regarding Variable Mapper.
See Merge Mapper for details regarding Merge Mapper.

Multi-Stream Converter (Join/Aggregate/Sort)

Unlike the logics in Mapper, exclusive components are used for join, aggregate, and sort operation.

These table-model-type-specialized components, which are executed in a high-speed engine optimized for conversions called Multi-Stream Converter (hereinafter referred as "MSC") are well-tuned for handling mass data. Especially, on multi-core CPUs, using the resources effectively and processing parallelly, MSC will be executed at a high speed with low memory usage (comparing to existing Mapper).
The characteristics of MSC is to manifest maximum effect as for the combination with the component that supports multi-thread processing.
Further, the exclusive UI prepared for each operation makes intuitive user operations and configurations possible.

Apart from that, the operations has features as below. By understanding these features well and using MSC appropriately, it is possible to develop scripts suitable for handling the mass data used in big data, IoT, and etc.

Moreover, adopting Mapper as the situation demands is also an option. The various uses of equivalent logics in Mapper is collectively listed below.

Component name Equivalent logics in Mapper Cases to adopt Mapper
Join
  • Would prefer to join three or more inputs in one processing
  • Would prefer to join XML type components
  • Would prefer to graphically define the I/O mapping of small data with exclusive GUI
Aggregate
  • Would prefer to aggregate XML type components
  • Would prefer to aggregate by combining with the logics of Mapper
Sort
  • Would prefer to sort XML type components
  • Would prefer to sort by combining with the logics of Mapper
  • Would prefer to sort by specifying the priority of upper case/lower case in the string order

Utilizing Global Schema

Global Schema is the function to register input/output schema of a component included in any projects or scripts and refer to from input/output schema of document mappers.

If developing standard is set and scripts are devided by each process, Script input/output variables is used to send and receive result data between scripts. On XML type script input/output variables or mainly XML type adapters you need to set schemas manually. So when the same structured schema has been set to multiple mappers manually in normal schema settings and input/output data structure is modified, you need to set each schema manually again.
In addition, it is neccesary to confirm information such as which schemas is used in which mapper in Specification documents in order to narrow down modifying target.

In such cases, setting can be performed more efficiently than usual schema settings, through Registering the schema as Global Schema and referring from multiple document mappers. Also, modification will be far smoother through modifying the source global schema and updating all referring schemas at once when structural modification occurs.
Information such as the structure of Global Schema, mapper usages etc., can be uniformly managed by using "Global Schema Settings" in the control panel.

To sum up, advantages of Global Schema are as follows. Utilizing Global Schema, we recommend you to develop scripts easy to modify.

Global Schema can only be used with document mapper.
For Global Schema overview, refer to "Global Schema".

Following is the method on how to register, refer to, update, and unlink of Global Schema.

Register Global Schema

Global Schema can be registered in the following screens.

How to register from script canvas

In Script canvas you can register Global Schemas from particular components.
For details, refer to "
Components from which you can register Global Schema in Script canvas".
Mapper schema cannot be registered from script canvas. Register from Mapper editor.
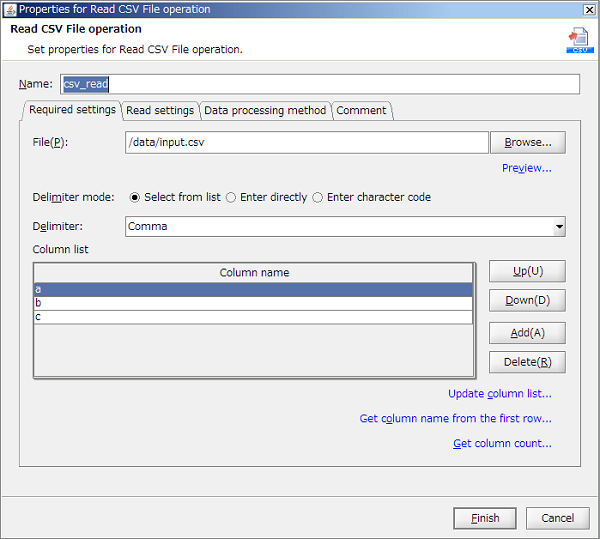
In this section, Read CSV file operation is taken as an example.

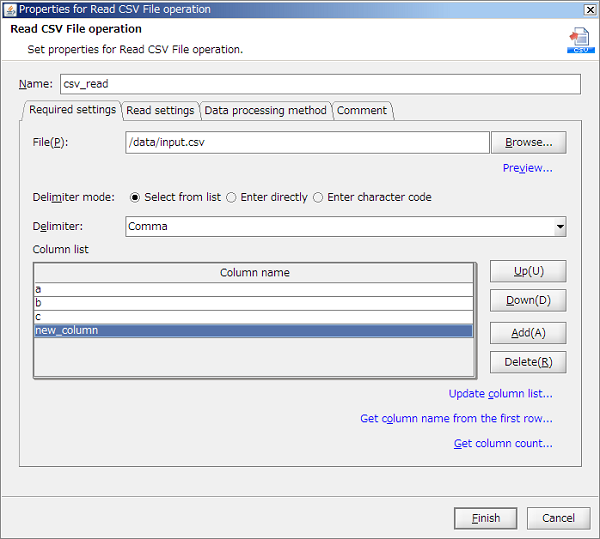
Put a Read CSV file operation in script canvas and set [Column list].


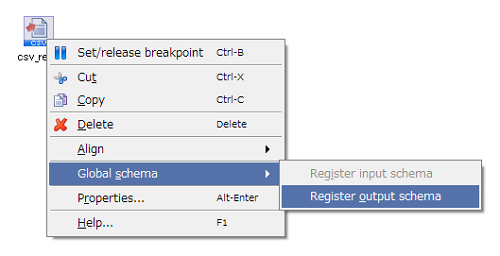
Select [Global schema]-[Register output schema] from right click menu of the Read CSV file operation.


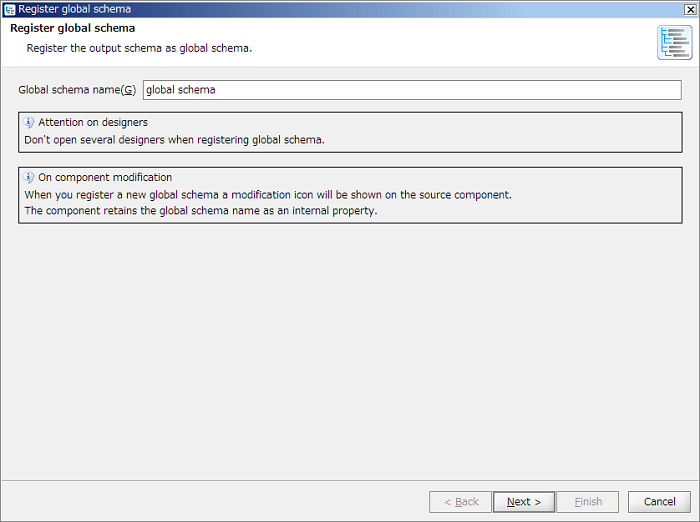
Enter a Global Schema name and click on [Next] button.
Global Schema is referred to by Global Schema name. For Global Schema name, use a unique name within DataSpiderServer.


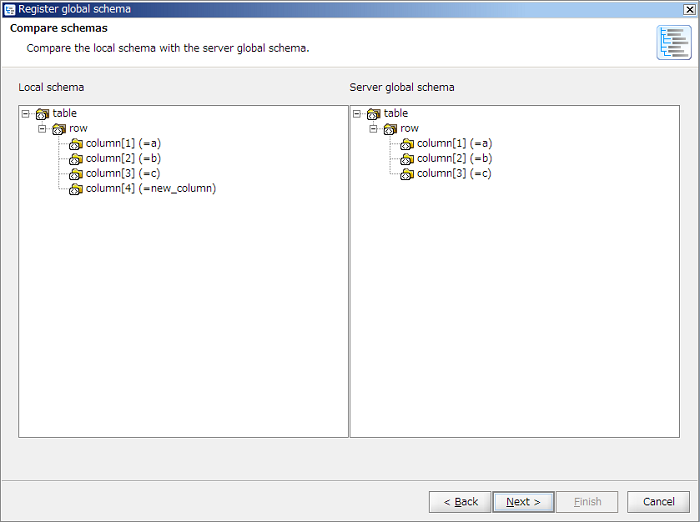
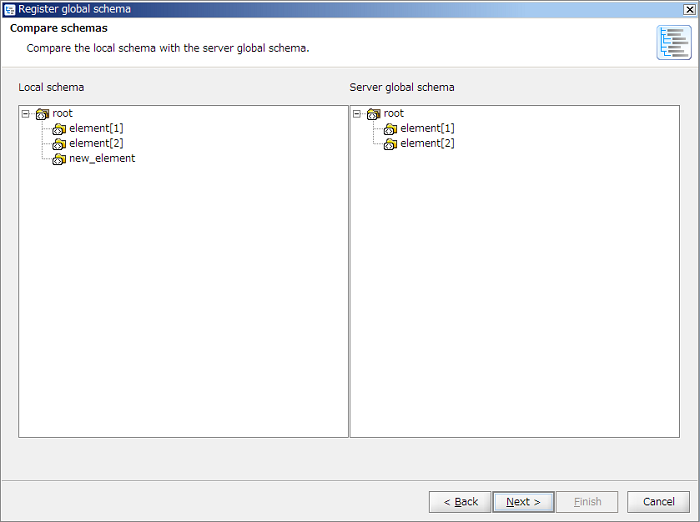
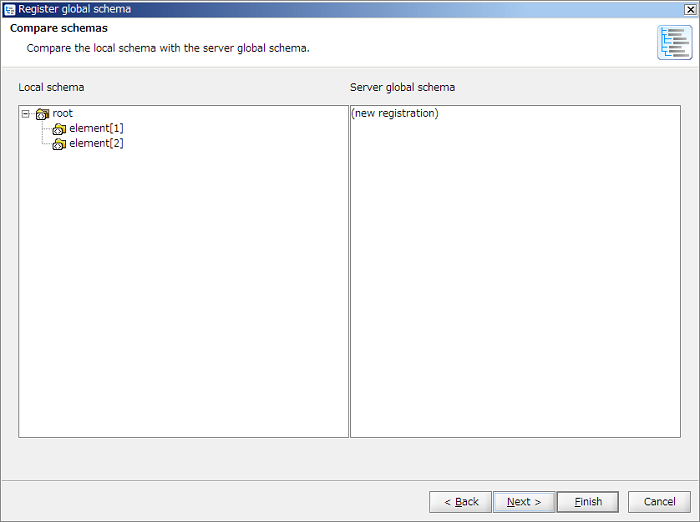
Confirm Local schema and click on [Finish] button.
In case of new registration, displayed as "(new registration)" since [Server global schema] does not exist.
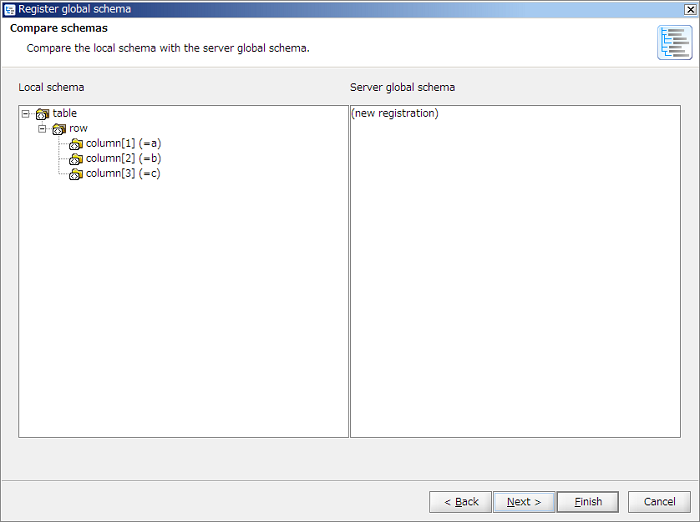
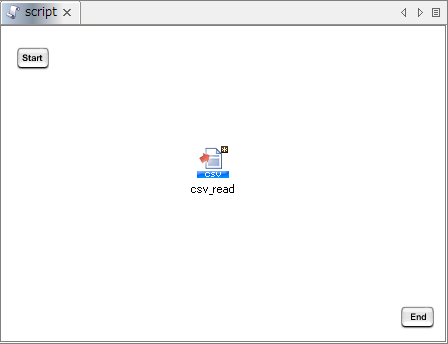

Global Schema is registered. In this case, the registered global schema name is saved as an inner property value of the component, so a modification icon is shown on the Read CSV file operation.


Registered Global Schema can be confirmed with the control panel "Global Schema Settings".

How to register from mapper editor

In mapper editor, Global Schema can be registered from editable input/output schema.
Input schema is taken as an example here to explain.
Registeration is only available from document mapper. Registeraion cannot be performed from variable mapper and merge mapper.
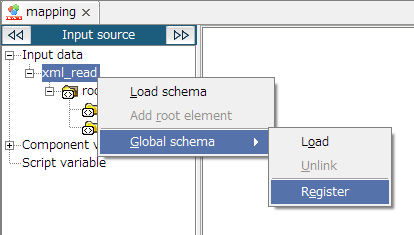
Select [Global schema]-[Register] from right click menu of a node under "Input data" of input schema.


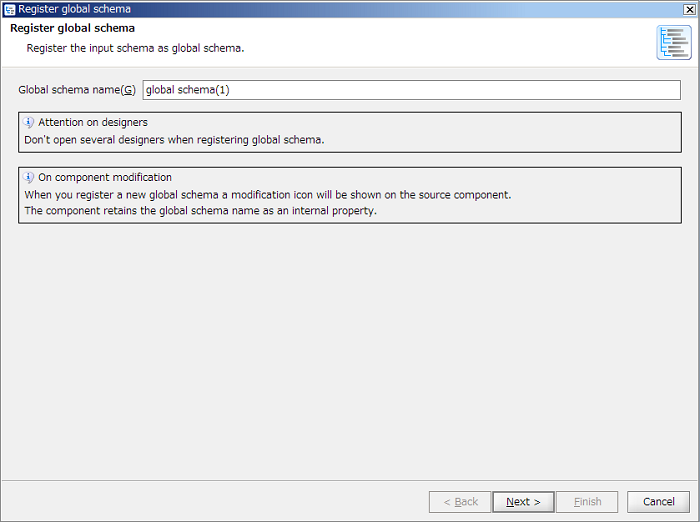
Enter a Global Schema name and click [Next]button.
Global Schema is referred to by Global Schema name. For Global Schema name, use a unique name within DataSpiderServer.


Confirm Local schema and click [Finish] button.
In case of new registration, displayed as "(new registration)" since [Server global schema] does not exist.
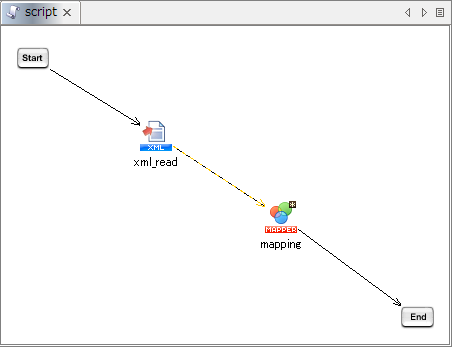
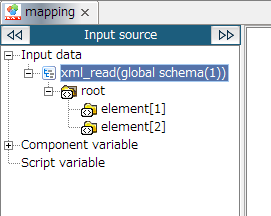
Global Schema is registered. In this case, the registered global schema name is saved as a property value of the component, so a modification icon is shown on the document mapper.


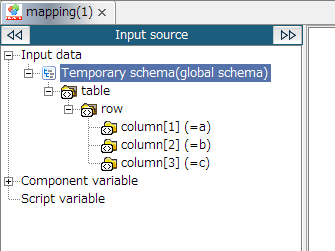
Also, Global Schema icon will appear to a node under mapper editor "Input data" and "<Node name>(<Global Schema name>)" will be displayed.


This indicates that the schema is referring to the Global Schema.
If a Global Schema is registered from mapper editor, then the schema starts to refer to Global Schema simultaneously.
Registered Global Schema can be confirmed in the control panel "Global Schema Settings".

Refer to Global Schema

Global Schema can be referred to from mapper editor.

How to refer to from mapper editor

In mapper editor, Global Schema can be referred to from editable input/output schema.
Input schema is taken as an example here to explain.
Reference is only available from document mapper. Reference cannot be performed from variable mapper and merge mapper.
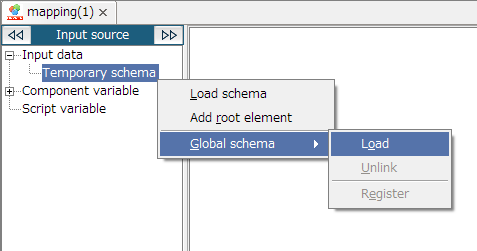
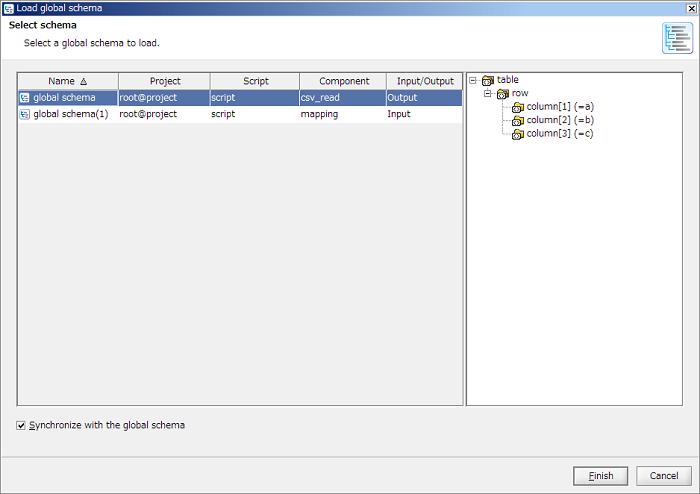
Select [Global schema]-[Load] from right click menu of a node under "Input data" of input schema.


Select a Global Schema and click [Finish] button.


The Global Schema is loaded. Then, Global Schema icon will appear to a node under mapper editor "Input data", and "<Node name>(<Global Schema name>)" will be displayed.


This indicates that you are referring to Global Schema.
If unchecked [Synchronize with the global schema] in "Select schema" screen and [Finish] button is clicked, only a schema is loaded and the global schema will not be referred to.
Update Global Schema

Global Schema can be updated from the screens below.

How to update from script canvas

In Script canvas, Global Schema can be updated from the same menu as Register Global Schema.
In this section, the Read CSV file operation of which the schema was registered as Global Schema in "How to register from script canvas" is taken as an example.

Open Properties for Read CSV file operation and modify [Column list].


Select [Global schema]-[Register output schema] from right click menu of the Read CSV file operation.


In [Global schema name], the global Schema name registered last time will appear. Then, click [Next] button.


Confirm the difference between Local schema and Server global schema, and if there is no problem, click [Next] button.


A list of components which refer to the Global Schema will appear. Confirm the list, and if there is no problem, click [Execute] button.
The list is created based on the project on a server. If Team Development function is enabled, targeted projects needs to be commited to a server in advance.
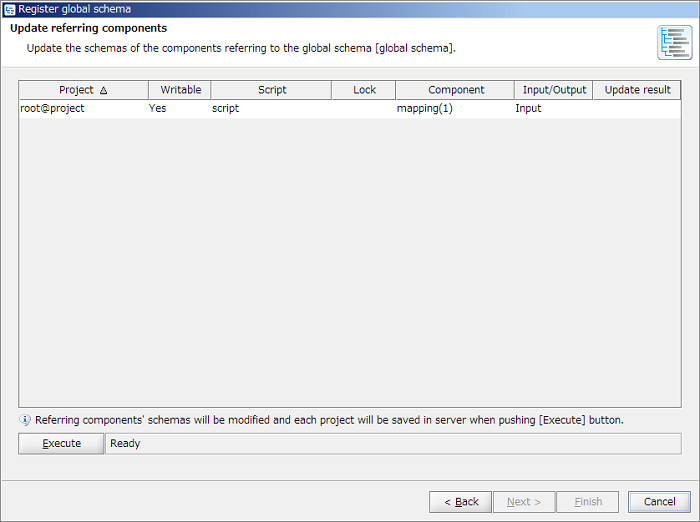


All the components' schemas referring to the Global Schema is updated and the projects are saved.
If Team Development function is enabled, projects are saved to local. Commitment to server is not performed.
If many referring components is to be updated, performance of the client machine is required. For details, refer to "Performance required to update referring components".
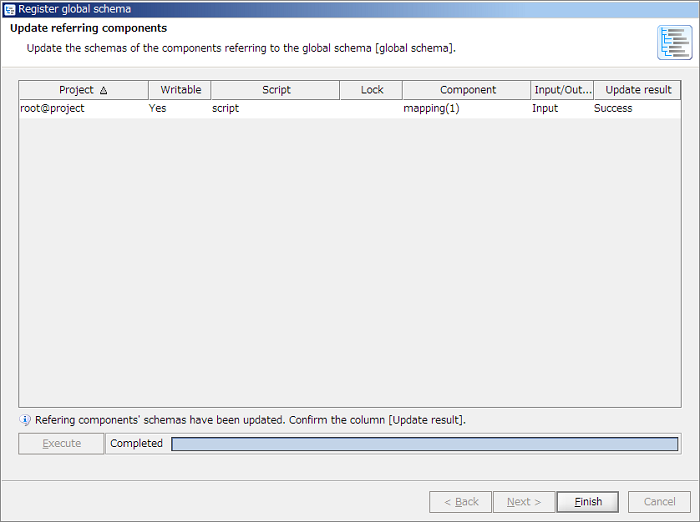


If you confirm the updated result and click [Complete] button, Global Schema is updated.
At this time, if you've opened the target projects to be updated, all scripts in the projects are closed.
How to update from mapper editor

In Script canvas, Global Schema can be updated using the same menu as Register Global Schema.
In this section, the input schema of which the schema was registered as Global Schema in "How to register from mapper editor" is taken as an example.

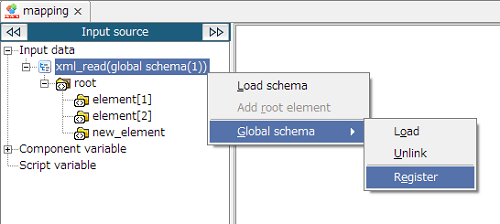
Edit input schema, and select [Global schema]-[Register] from right click menu of a node under "Input data" of input schema.


The Global schema name registered last time will appear in [Global schema name]. Then click [Next] button.


Confirm the difference between Source Schema and Target Global Schema, and if there is no problem, click [Next] button.


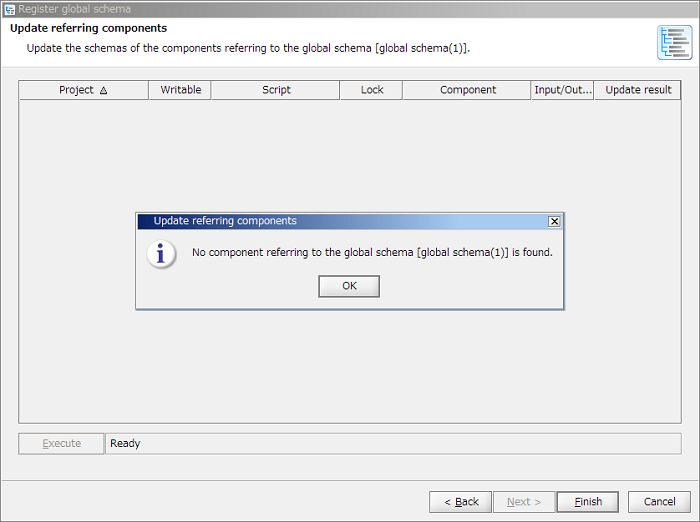
If any component that refers to the Global Schema does not exist, that note will appear as dialogue. Click [OK] button.
If some referring components exist, referring components' schemas are updated. The procedure is same as "How to update from script canvas".
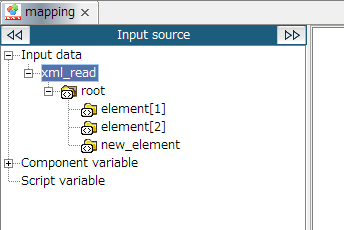
Then click [Finish] button and the Global Schema is updated.

Unlink Global Schema

You can unlink a Global Schema retaining the schema structure.
Input schema is taken as an example here to explain.

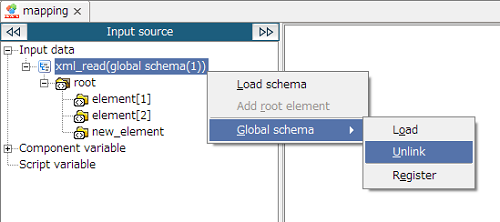
Select [Global schema]-[Unlink] from right click menu of a node under "Input data" of input schema.


The Global Schema will be unlinked.


When unlinked, the schema is not referring to a Global Schema, although the schema structure remains.

Loop log setting

In Loop processing (Loop processing, Loop (conditions specifying) processing, Loop (number of data) processing), you can set the logs individually.

Sicne loop processing is output together with the loops, the output capacity of XML Log increases corresponding to the number of loops.
If the disc capacity is oppressed due to the file ballooning, not only DataSpider Servista but also other systems are affected. Therefore you need to manage with assumptions of the operation from the developing stage.
The possible solutions are to change the "Log level" upon execution, or Log roll up. Moreover, if you set the log of loop processing, you can change only the components in the loop processing without changing the log levels of the whole script.
If you set a lower log level, or set the XML log not to output, not only are file capacity can be lowered, but also better performance due to the decrease of log output as the accesory result can be expected.

Access Log

Access Log is a function to output the process of accessing to DataSpiderServer from various clients/tools such as DataSpider Studio, DataSpider Studio for Web, CLI, Console, Script Runner and Trigger.
when Access Log is enabled, a log which covers the following will be output to a log file: "What has been done in what way , to which users, by which tool, and when".

Some of the ways of using the Access Log function are as below: By setting the function as enabled, whether it is in a development phase or in an production phase, you can log some variable information if necessary.
Although log files are rotated by date, they will not be deleted automatically. Therefore you need to manage the disk capacity.

Selecting Service Execution Tool

Scripts are registered as service and can be invoked from various execution tools.
According to the characteristics of the processes and requirements, which execution to be used is determined.
Here we will describe how to register them with the server as services and how to execute them using various tools.

Service registration

Scripts whose development is ongoing and scripts whose development has been completed are distinguished in DataSpider Servista.
A projects that is not yet registered as service are regarded as unfinished and they are only executable within from Designer.Once the project is registered as service, those scripts become executable by triggers and external systems.Projects can be unregistered from the server.

Service registration

The smallest unit that can be registered as service to the server is a project.

Public name

When registering a project as service, an unique public name must be allocated in order for the service to become available for external access.

Deploy

When project is registered as service, all of the scripts contained are compiled into Java class and are archived into a JAR module.
The JAR will be deployed in the directory which is accessible by trigger process, ScriptRunner process and external system.

Registering a service

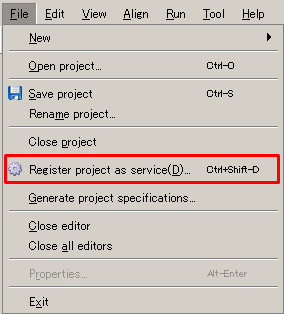
Select [Deploy Project as a Service] from [File] menu.


Service registration window opens.
Confirm the [Service Name] and click [Next] to continue.
A service name defaults to <user name>@<project name>.
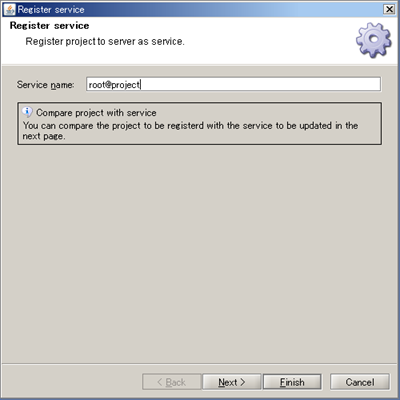


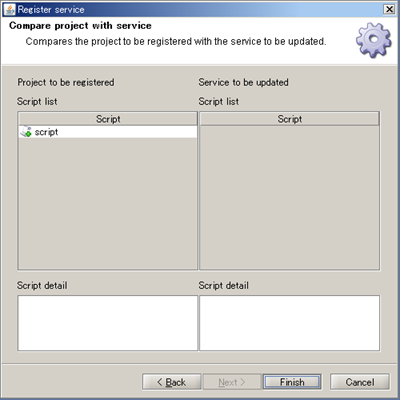
The comparison of the service entries is shown.
Check the entries and click [Finish] to continue.


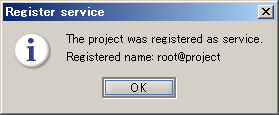
Service registration dialog opens. Click [OK] to finish.


The project has been registered as a service.

Trigger

Trigger is a mechanism which executes services automatically in response to application events or by which service executions are scheduled.
DataSpider Servista provides the following types of triggers.

Trigger types

Trigger name Description Remarks
Schedule Trigger Schedule trigger is the function to execute the Service in the specified date/time according to the timing of daily/weekly/monthly/yearly/and interval.  
File Trigger File trigger is a trigger function to execute scripts when a event of monitored file being created/updated/deleted occurs.  
HTTP Trigger HTTP trigger is a trigger function to run script by sending request from HTTP clients for specified URL.  
DB Trigger DB triggers is the trigger function to monitor the specified database table and execute script according to the status value the status column.  
FTP Trigger FTP trigger is trigger function to execute script detecting file up-loaded to FTP server that works on DataSpiderServer.  
Web Service Trigger Web Service Trigger executes its associated script when the web service requests are accepted on the URL specified.  
Amazon Kinesis Trigger Detect data transmission to the observing Amazon Kinesis stream, and then ignite it.  
Azure Service Bus Trigger Detect a message tramsmitted from a service hosted by Microsoft Azure via Microsoft Azure Service Bus, and then ignite it.  
SAP Trigger SAP trigger is a trigger function to run a script when monitor target messages occur.  
SAP BC Trigger SAP BC trigger is trigger function to execute script by outbound processing of SAP system by sending request to URL specified with SAP Business Connector.  
HULFT Script Trigger HULFT Script trigger is a trigger function to execute scripts, if detects the receiving/sending history of HULFT and meets the conditions.  

Setting Trigger

We will set a File Trigger which will act upon the update of the file, /data/inputdata.csv

Double click My Triggers in Studio.


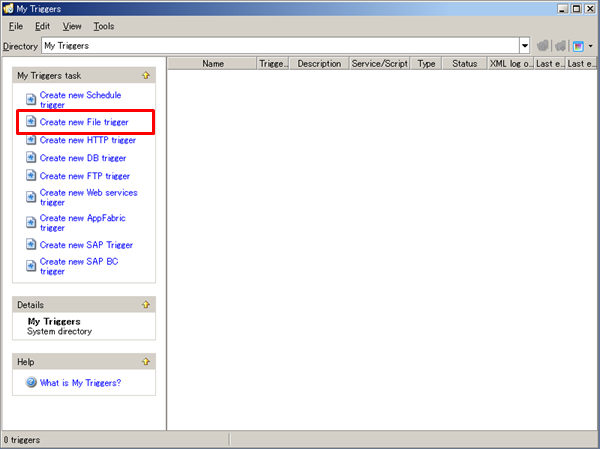
My Trigger opens and click [Create new File Trigger] in [My Triggers Tasks].


File Trigger widow opens.
Enter "Write CSV File" in the [Trigger Name].
Select "When updating file timestamp" for the [Watch event].
Enter "/data/inputdata.csv" in the [Watch file].
Alternatively, the file can be selected in the file Selectr that is launched by clicking [Browse] button.
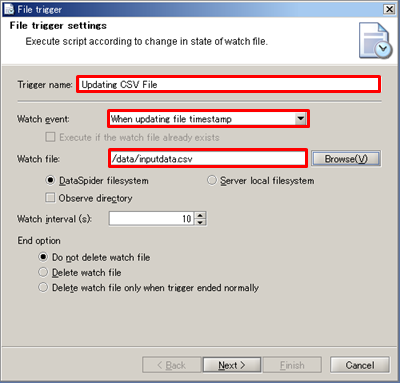
Click [Next] button to continue.


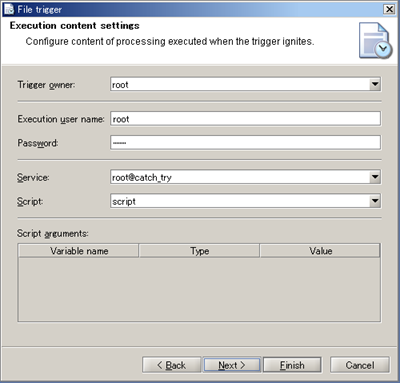
Execution result is displayed.
Make sure that "root@project" is selected for the [Service] and "script" is selected for the [Script] and click [Next] to continue.


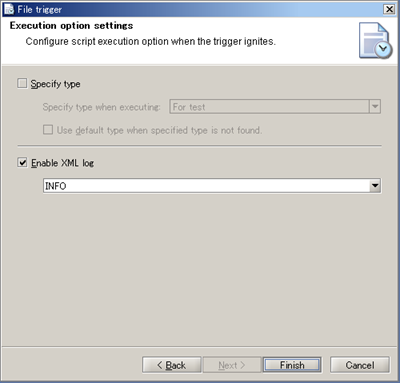
Execution option
Make sure [Enable XML log] is checked and "INFO" is selected for log level. Click [Finish] to finish.
See Log Level for any details regarding Log level.


"Trigger enabling confirmation" dialog is displayed.
Select [Yes] to enable the trigger upon its creation.
Trigger can be enabled afterwards even if you select [No].


Confirm that trigger has been fired as expected and script is also executed.
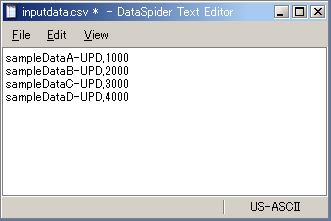
Open /data/inputdata.csv in Explorer, and modify the entries as follows then save it.


Wait until trigger is fired.(The file monitoring interval for File Trigger is 10 seconds)
The time and the result of the execution are show in the [Last executed] and the [Result of last executed] respectively.


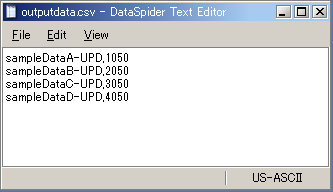
Open the /data/outputdata.csv file and see check the result.


We see that update made to the /data/inputdata.csv file has triggered the service and the /data/outputdata.csv was created consequently.

See Trigger for details regarding trigger settings.
See My Triggers for creating triggers.

ScriptRunner

ScriptRunner is a function to run services from external applications such as Windows Task Scheduler and an Operation Monitoring tool.
The service is run by specifying the configuration file as an argument and starting the run file.

See ScriptRunner for details regarding ScriptRunner.

ScriptRunnerProxy

ScriptRunnerProxy is a function to run services from Java programs.
Java API for accessing by Java programs is available.

See ScriptRunnerProxy for details regarding ScriptRunnerProxy.

Generating a Specification

You can output the contents of the script as a specification in HTML.
The documented process contents can be used for service development, documents for duty transfer, and operation manuals.
The specification can be output either by script or by project.
See "Designer" for any details.