Users
On the Users page, an administrator can manage users, such as inviting and deleting them.
The list of the HULFT Square users is displayed on this page, and detailed information about each user can be viewed. You can change personal settings and email addresses.
-
For customers whose HULFT Square contract began prior to December 14, 2025, the MFA settings and SSO setting values differ between customers who have not changed user email addresses and customers who have changed user email addresses.
To change email addresses, migration is required.
When you perform migration, be aware of the following:
-
If multifactor authentication (MFA) has been set, the setting is disabled. After migration, set MFA in your personal settings again when you log in.
For more details on how to set MFA, refer to Configure/reconfigure/disable multifactor authentication.
-
If SSO is in use, the administrator will need to change the setting values on the authenticating system.
For SSO that uses Microsoft ADFS (Active Directory Federation Service), refer to step 6 to 7 in Set up ADFS to log in with SSO to set the values.
For SSO that uses Microsoft Entra ID, refer to step 4 of (3) in Set up Microsoft Entra ID (formerly Azure Active Directory) to log in with SSO to set the values.
-
-
After you change an email address, select OK in the change confirmation dialog and wait until the progress bar reaches 100% before navigating to another screen.
-
The progress bar stays at 0% until migration is complete. The progress shown in the progress bar increases for each change of an email address.
When you change a large number of email addresses at the same time, it may take more than a few minutes for the progress bar to reach 100%.
Tutorials
For the method to invite users and to add users to groups, refer to the following tutorial:
Points for settings
This section explains the settings for users and some points to note about the settings.
For the names and functions of basic UI elements and other items of HULFT Square, refer to the following topic:
Users
In the navigation menu, select  > USER MANAGEMENT > Users to open this page.
On the Users page, you can manage users. You can perform operations such as creating and deleting users and viewing detailed information.
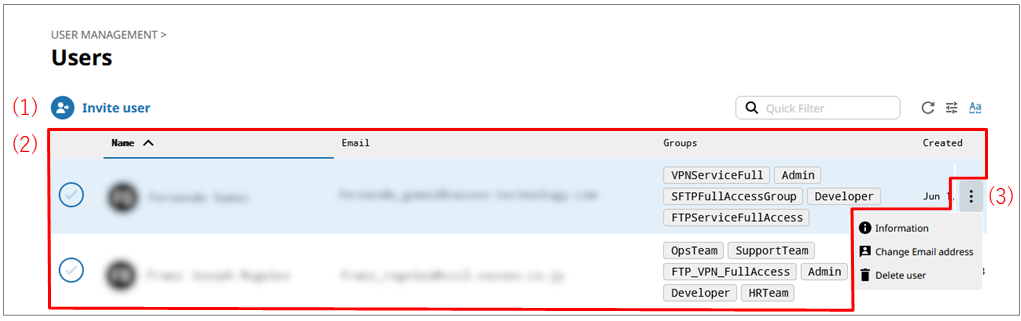
- (1) Invite user
-
Select this icon to invite a user.
For the screen displayed after selecting this icon, refer to Invite users.
NoteWhen users with SSO enabled log in to HULFT Square using SSO, user invitation is disabled.
For how to invite users when SSO is enabled, refer to Inviting users when SSO is enabled.
- (2) User list
-
Users are displayed in tabular form.
Selecting
 changes the button beside (1) to Change Email address. You can change the email addresses of all the users that you select at once.
When you select Change Email address, USER MANAGEMENT > Change Email address is opened.

- (3) Action menu
-
Select this icon to perform operations for users.
Selecting
 shows the menu of operations below.
- Information
-
Displays detailed information about the selected user.
When you select this menu item, Users > Username is opened.
- Change Email address
-
You can change the email address of the selected user.
When you select this menu item, USER MANAGEMENT > Change Email address is opened.
- Delete user
-
Deletes the selected user.
Note-
Once you delete a user, you can't undo it.
-
You can't delete the organization administrator. If you want to delete the organization administrator, designate a new administrator and then delete the old one.
-
For behaviors related to deletion of a user, refer to When a user is deleted.
-
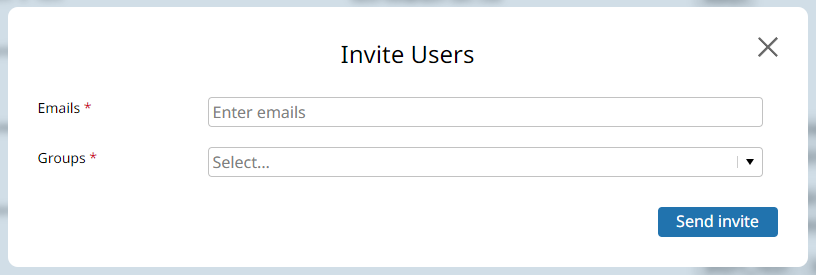
On the Users page, select Invite user to open this page.
To invite a user, select a group and enter the email address. To invite multiple users, select  and enter the email addresses.
Select a group and the domain of the email address from the dropdown list.
If there's no group that you want to select, create a group. For how to create groups, refer to Create groups in Set up users and groups.
If there's no domain that you want to select, set one in Allowed Email domains. For details about setting domains, refer to Access Control.
For how to invite users, refer to Invite users in Set up users and groups.
On the Users page, select Information from the action menu in the user list to open this page.
You can view detailed information about the selected user, change the registration information, and delete the user.
The contents of the detailed information about the user are the same as in My Profile.
For the explanation of the contents, refer to Personal settings.
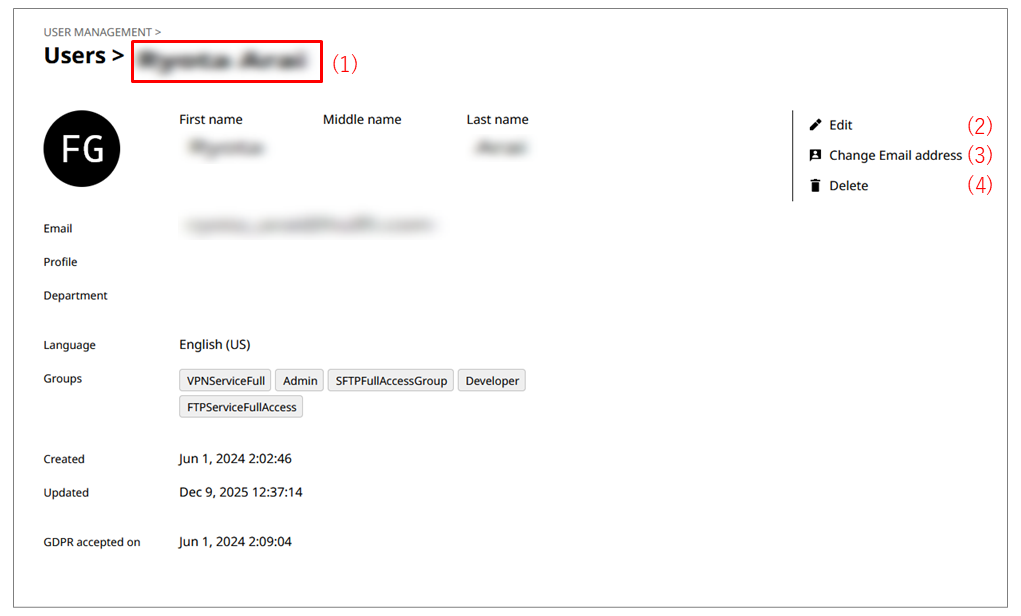
- (1) Username
-
In Username, the name of the user is displayed.
- (2) Edit
-
Edits the user profile.
- (3) Change Email address
-
You can change the email address of the user.
When you select this menu item, USER MANAGEMENT > Change Email address is opened.
- (4) Delete
-
Deletes the user.
Note-
Once you delete a user, you can't undo it.
-
You can't delete the organization administrator. If you want to delete the organization administrator, designate a new administrator and then delete the old one.
-
For behaviors related to deletion of a user, refer to When a user is deleted.
-
You can't access content in the deleted user's [Personal] workspace.
-
All jobs that were created by the deleted user continue to be executed, but the scripts fail to be executed. It's recommended to delete the jobs before you delete the user.
-
For resources that were created by the deleted user, if the resources are shared with other users, they can still use them after the user is deleted.
However, the deleted user is displayed as "(N/A)."
-
USER MANAGEMENT > Change Email address
On the Users or Users > Username page, select Change Email address to open this page.
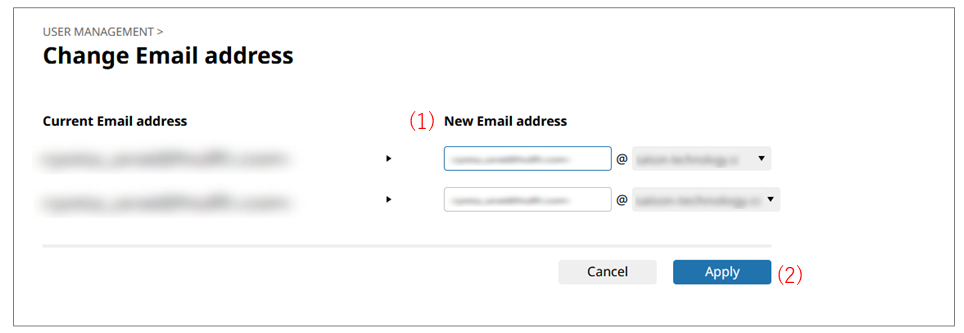
- (1) New Email address
-
Enter a new email address.
For the domain, the section following '@' (at mark), you can select only domains that were set in Allowed Email domains in Access Control.
For details about Allowed Email domains, refer to Access Control.
- (2) Apply
-
Applies any updates made and changes the email addresses. Once the email addresses are changed, notification emails are sent from info@hsq.saison-technology.com to the previous and new email addresses.
-
For customers whose HULFT Square contract began prior to December 14, 2025, the MFA settings and SSO setting values differ between customers who have not changed user email addresses and customers who have changed user email addresses.
To change email addresses, migration is required.
When you perform migration, be aware of the following:
-
If multifactor authentication (MFA) has been set, the setting is disabled. After migration, set MFA in your personal settings again when you log in.
For more details on how to set MFA, refer to Configure/reconfigure/disable multifactor authentication.
-
If SSO is in use, the administrator will need to change the setting values on the authenticating system.
For SSO that uses Microsoft ADFS (Active Directory Federation Service), refer to step 6 to 7 in Set up ADFS to log in with SSO to set the values.
For SSO that uses Microsoft Entra ID, refer to step 4 of (3) in Set up Microsoft Entra ID (formerly Azure Active Directory) to log in with SSO to set the values.
-
-
After you change an email address, select OK in the change confirmation dialog and wait until the progress bar reaches 100% before navigating to another screen.
-
The progress bar stays at 0% until migration is complete. The progress shown in the progress bar increases for each change of an email address.
When you change a large number of email addresses at the same time, it may take more than a few minutes for the progress bar to reach 100%.