Receive Config
Specify the detailed information of the files to be received with the HULFT Transfer service.
To receive files on HULFT Square using the HULFT Transfer service, be sure to set Receive Config according to the functions and operations that you are using.
Users can specify workspaces in the HULFT Transfer Receive configurations to share with other users or groups.
For more details about how to use workspaces to share settings, refer to Share settings with team members.
This section explains the key points about setting the HULFT Transfer Receive configurations.
Tutorials
For the entire operational flow of HULFT Square, including the setting procedures for the HULFT Transfer Receive configurations, refer to the following tutorial:
Points for setting the HULFT Transfer Receive configurations
This section explains the key points about setting the HULFT Transfer Receive configurations on each settings page.
For the names and functions of the basic UI elements and other items of HULFT Square, refer to the following topic:
Receive Config
To open this page, select  > HULFT TRANSFER > Receive Config in the navigation menu.
You can create and set up a new HULFT Transfer Receive configuration or update the information that is already set.
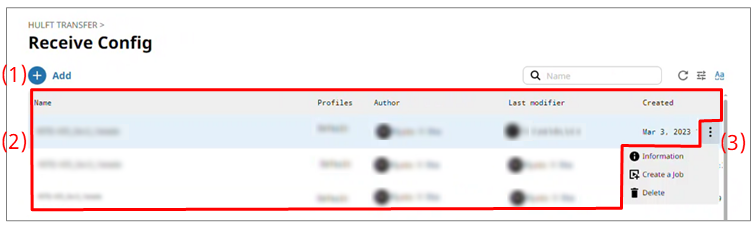
- (1) Add
-
Select this icon to create a new HULFT Transfer Receive configuration.
For the screen displayed after selecting this icon, refer to Receive Config > Add.
- (2) List of settings
-
The HULFT Transfer Receive configurations that are already created are displayed in tabular form.
For details on each field, refer to the explanation in Receive Config > Add.
= Remarks =You can register more than 5,000 HULFT Transfer Receive configurations, but the maximum number displayed for each workspace is 5,000. If you select multiple workspaces, the amount over 5,000 isn't displayed.
- (3) Action menu
-
Select this icon to perform an operation for a HULFT Transfer Receive configuration that is already created.
Selecting
 shows the menu of operations below.
- Information
-
The selected HULFT Transfer Receive configuration is displayed. In addition to editing and deleting the HULFT Transfer Receive configuration, you can also create jobs.
When you select this menu item, Receive Config > Transfer Receive configuration name is opened.
- Create a Job
-
Select this menu item to create a job using the selected HULFT Transfer Receive configuration.
When you select this menu item, HULFT Transfer Jobs> Add is opened.
- Delete
-
Deletes the selected HULFT Transfer Receive configuration.
However, you can't delete a HULFT Transfer Receive configuration specified for HULFT Transfer Receive for a HULFT Transfer job. To delete it, change the settings for the corresponding HULFT Transfer job, so that it isn't specified for HULFT Transfer Receive for the HULFT Transfer job.
To open this page, select Add on the Receive Config page.
You can set the information to create a HULFT Transfer Receive configuration by following the wizard-style pages step by step.
Step General
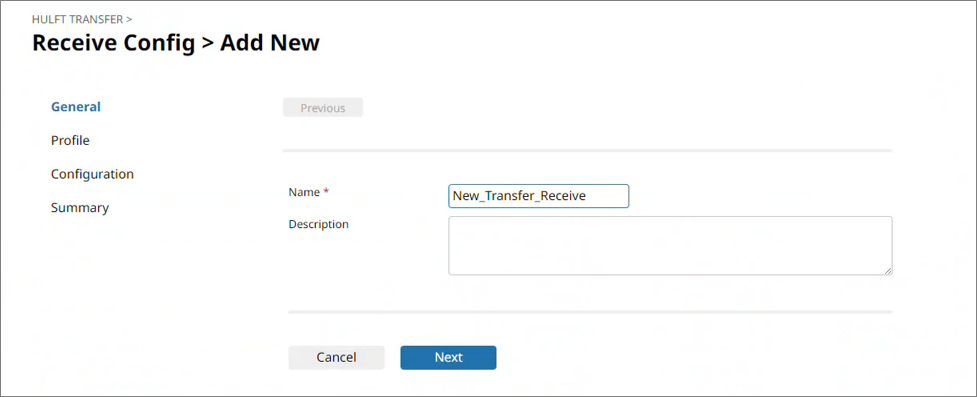
- Name
-
Specify the name of the HULFT Transfer Receive configuration that you create.
- Description
-
Specify comments to explain the HULFT Transfer Receive configuration that you want to set.
- Next
-
Displays the next page.
Step Profile
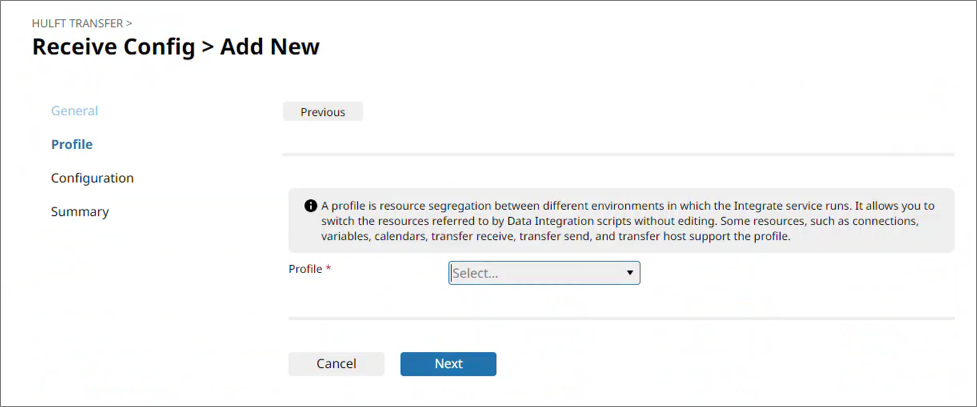
- Profile
-
Select a profile to link with the HULFT Transfer Receive configuration.
- Next
-
Displays the next page.
Step Configuration
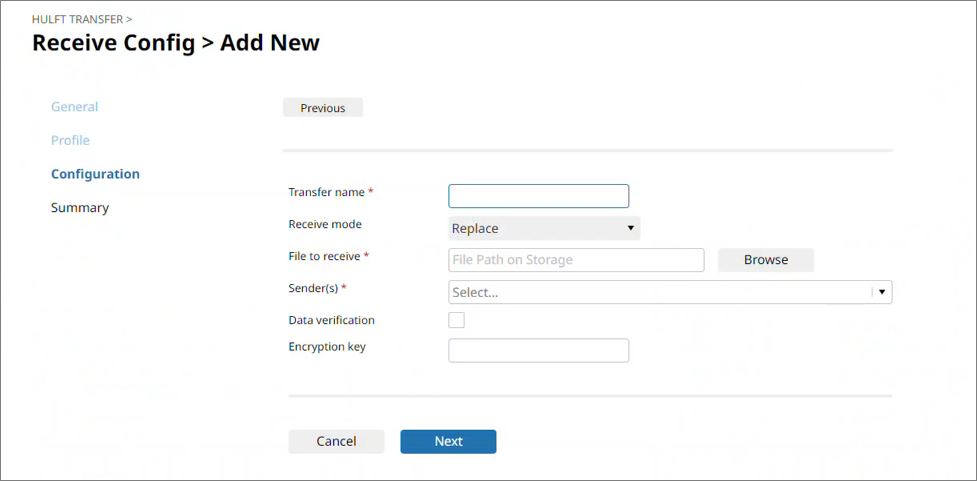
- Transfer name
-
Specify a name to identify the file to receive.
NoteThe transfer name _INSTANT_TRANSFER_ can't be registered.
- Receive mode
-
Select how to handle the receive file from the following:
- New
-
Creates a new receive file. An error occurs if a file with the same name already exists.
- Replace
-
Replaces the existing file contents with the received data. If the file doesn't exist, a new receive file is created.
- File to receive
-
Specify the name of the file to receive. Specify with an absolute path.
To specify a file by browsing the storage, select Browse.
If the path includes a folder that doesn't exist, regardless of the receive mode, a new folder is created.
- Sender(s)
-
From the list, select the sending-side host, which is the remote host when you receive a file.
The host names set in
> HULFT TRANSFER > Host Info of the navigation menu are displayed in the list. - Data verification
-
Select this checkbox to perform data verification for the receive file.
= Remarks =You can verify that the data received on the receiving-side host and the data that was sent from the sending-side host match. This function is called the "data verification function."
If you use the data verification function during system operation, when data verification determines that the data doesn't match the data that was sent from the sending side, it will be treated as an error, and the sending-side host will be notified with an error message.
Note that the period during which the veracity of transferred data is guaranteed by the data verification function is from the beginning to the end of transfer. Data isn't guaranteed after transfer is complete.
- Encryption key
-
Specify this field to decrypt the encrypted data.
Set the same encryption key as the one that is set in the HULFT Transfer Send configuration or the HULFT Send Management Information of the remote host. If you set a different encryption key, the data isn't decrypted correctly.
Even if an encryption key is specified on the receiving-side, if an encryption key isn't specified in the HULFT Transfer Send configuration on the sending-side, the encryption key setting on the receiving-side is ignored.
AES is applied for the encryption scheme, but if the on-premises sending-side client can't use AES, HULFT encryption is applied.
- Next
-
Displays the next page.
Receive Config > Transfer Receive configuration name
To open this page, select Information from the action menu in the list of settings on the Receive Config page.
The detailed information of the selected HULFT Transfer Receive configuration is displayed. You can also edit or delete the information, change the ownership, or create jobs.
By selecting Change ownership, you can change the ownership of the selected HULFT Transfer Receive configuration to another member. When you change the owner, the value of Author changes.
In order to change the ownership, in addition to permission to view the HULFT Transfer Receive configuration, you need the permission ChangeOwnership.
In Profiles, you can set the Receive configuration for each profile.
If information has been set on the profile, Clear is displayed, allowing you to clear the setting information. If information hasn’t been set on the profile, Copy Configuration From is displayed, allowing you to copy setting information from another profile that has already been set and use it for that profile. However, information that differs depending on the profile, such as the host name, isn’t copied.
When you create or update a job, the HULFT Transfer Receive configuration and the HULFT Transfer Host configuration linked to the HULFT Transfer Receive configuration are loaded to the HULFT Transfer service (HULFT Receiver) that you specify for the job.
If you modify the HULFT Transfer Receive configuration or the HULFT Transfer Host configuration linked to the HULFT Transfer Receive configuration, the job must be updated to reload them to the HULFT Transfer service.
For details about updating a job, refer to HULFT Transfer Jobs.
To open this page, select Create a Job from the action menu in the list of settings on the Receive Config page.
You can create a job using the selected HULFT Transfer Receive configuration.
For details on job creation, refer to > JOBS > HULFT Transfer Jobs.