Profiles
Profiles serve as a function to separate settings, such as the connection settings to which scripts refer, according to the environment for which an Integrate service runs.
By linking information about connections, variables, calenders, Receive configurations, Send configurations, and Host configurations with a profile, you can switch those setting values without editing the scripts.
On the Profiles page, you can create and change profiles, and you can check registered resources.
You can configure profiles from  > SYSTEM > Profiles in the navigation menu.
The key points about creating and setting profiles are explained in this section.
Tutorials
For how to use profiles, refer to the following tutorial:
Points for settings
To create a new profile, select Add on the Profiles page and enter resource information.
This section explains the screen transitions from the Profiles page and the operations for profiles.
For the names and functions of basic UI elements and other items of HULFT Square, refer to the following topic:
Profiles
In the navigation menu, select > SYSTEM > Profiles to open this page.
On the Profiles page, you can manage profiles by creating and deleting profiles and by viewing detailed information.
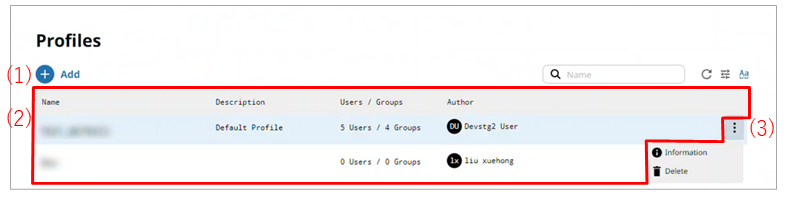
- (1) Add
-
Select this icon to create a new profile.
For the screen displayed after selecting this icon, refer to Profiles > Add.
- (2) List of settings
-
Profiles that have already been created are displayed in tabular form.
- (3) Action menu
-
Select this icon to perform operations for profiles that have been created.
Selecting
 shows the menu of operations below.
- Information
-
Displays detailed information about the selected profile.
For the screen displayed after selecting this menu item, refer to Profiles > Profile name.
- Change ownership
-
Changes the ownership of the selected profile to another member. When you change the owner, the value of Author changes.
In order to change the ownership, in addition to permission to view the profile, you need the permission ChangeOwnership.
- Delete
-
Deletes the selected profile.
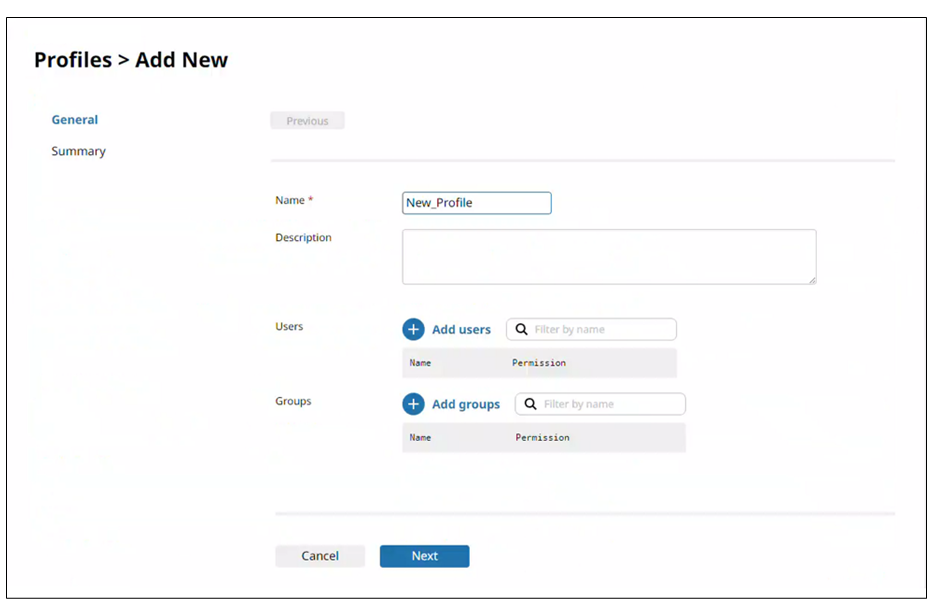
On the Profiles page, select Add to open this page.
Set the information to create a profile by following the wizard-style pages step by step.
For details about how to create profiles, refer to Creating a profile.
On the Profiles page, select Information from the action menu in the list of settings to open this page.
You can view detailed information about the selected profile.
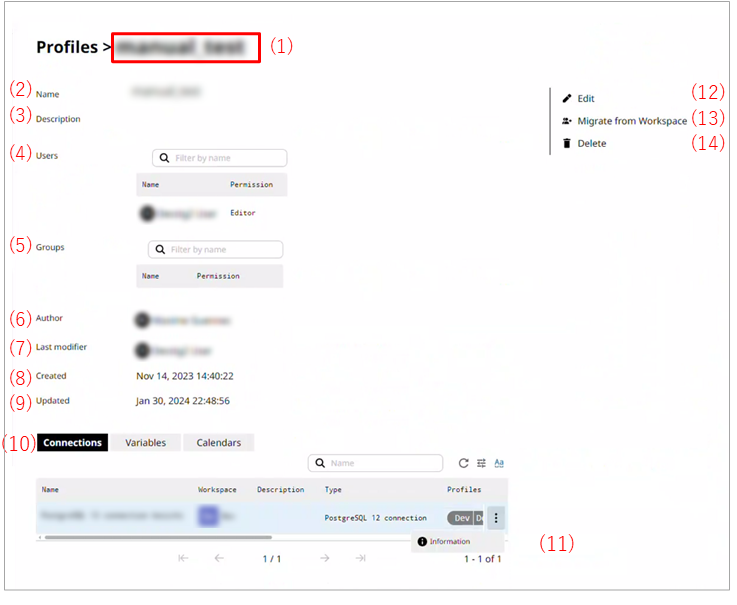
- (1) Profile name
-
In Profile name, the name of the profile is displayed.
- (2) Name
-
The name of the profile is displayed.
- (3) Description
-
The description of the profile is displayed.
- (4) Users
-
The users who can use the profile are displayed.
For each user, the following permissions are available to apply to them.
-
Viewer
The user can view the profile. They cannot change the settings.
-
Editor
The user can edit the profile.
= Remarks =Change the settings for permissions from Edit.
-
- (5) Groups
-
The groups who can use the profile are displayed.
For each group, the following permissions are available to apply to them.
-
Viewer
The user can view the profile. They cannot change the settings.
-
Editor
The user can edit the profile.
= Remarks =Change the settings for permissions from Edit.
-
- (6) Author
-
The creator of the profile is displayed.
- (7) Last modifier
-
The person who last modified the profile is displayed.
- (8) Created
-
The created date and time of the profile is displayed.
- (9) Updated
-
The last updated date and time of the profile is displayed.
- (10) Resource list
-
The resources registered to the profile are displayed in a list.
You can switch resources and check the registered information.
In Profiles, the names of the profiles those resources are registered to are displayed.
- (11) Information
-
Selecting this moves to the resource screen.
- (12) Edit
-
Edits the profile.
- (13) Migrate from Workspace
-
Imports the user and group settings of the selected workspace to the profile.
- (14) Change ownership
-
Changes the ownership of the selected profile to another member. When you change the owner, the value of Author changes.
In order to change the ownership, in addition to permission to view the profile, you need the permission ChangeOwnership.
- (15) Delete
-
Deletes the profile.