Use a single application for both the development environment and production environment by switching over the profile and settings
The development environment used by developers and the production environment used by Ops engineers may require different settings, such as data storage locations and connection settings for external services. In such cases, when you want to switch the settings between the environments, it's recommended to pack the created scripts into an application for developers and Ops engineers to share.
By configuring an application per profile, you can easily switch the storage for output data, enabling flexible operation tailored to the environment.
In this section, you will create a script and switch application settings between the development environment and production environment by using the application feature, without editing the script.
Description
Create an application (Create file list) containing a script that gets a list of the files in the storage.
Set a schedule trigger and deploy it as an application for development. Then, share the application after confirming that it works correctly.
Deploy the application for production using the same steps.
The applications are then executed by the schedule trigger and the file lists are created in CSV format in the storage for each environment.
Operation flow
Procedures
This tutorial uses the following workspaces:
-
Dev workspace
This workspace is used by developers in the development environment.
-
Production workspace
This workspace is used by Ops engineers in the production environment.
For the workspace creation method, refer to Create a workspace to work together.
This tutorial uses the following profiles:
-
Dev profile
This profile is used by developers in the development environment.
-
Production profile
This profile is used by Ops engineers in the production environment.
For details about how to create profiles, refer to Creating a profile.
Set the workspace name and profile name to be identical, because the profile name is used as the path for the storage (workspace).
The workspace name and profile name are case sensitive.
In this step, create an application to be used in both the development environment and production environment.
Create an application using the following steps:
Create a new application
-
Select
 > APPLICATIONS > All.
 -
On the All page, select Add.
-
In the step General, set the fields as shown below, and then select Next.
Field name
Setting (example)
Name
Create file list
Description
(Optional)
Version
0.0.1 (Appropriate version)
Tags
(Optional)
Re-distribution policy
On
-
Select Add Trigger in the step Trigger Conditions.
-
Set the fields as shown below.
Field name
Setting (example)
Method
Scheduler
Trigger Name
SCH01
Script
Create New
= Remarks =You can also specify an existing script for Script.
-
In the New Script dialog, set the fields as shown below, and then select OK.
Field name
Setting (example)
Name
Create file list script
Template
Empty Script
-
In the step Trigger Conditions, select Edit Script from
 in Contained scripts and depended resources.
Create a new script
-
In the Launch Designer dialog, set the fields as shown below, and then select Launch Designer.
Field name
Setting (example)
Profile
Dev
Integrate service
Select a HULFT Integrate service name.
-
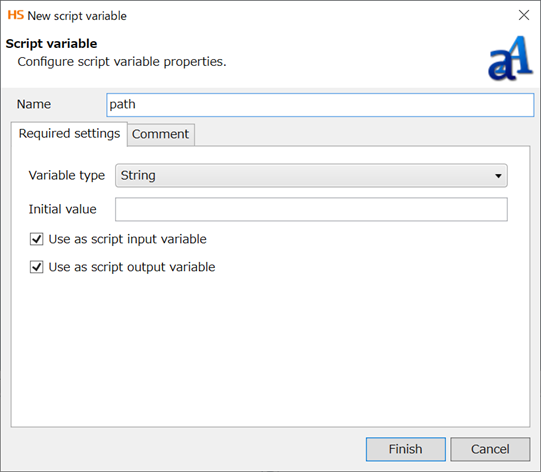
Right-click on the script name in the project explorer and select New > Script variable.
-
Configure the settings on the New script variable screen as shown below.
-
Open "Create file list script" from the project explorer.
-
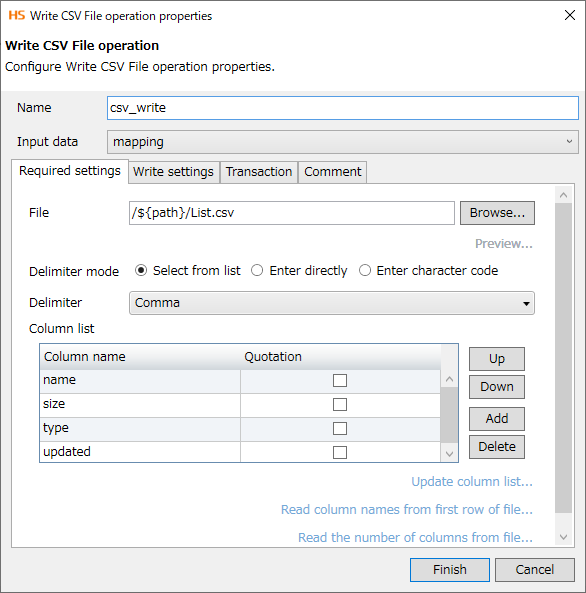
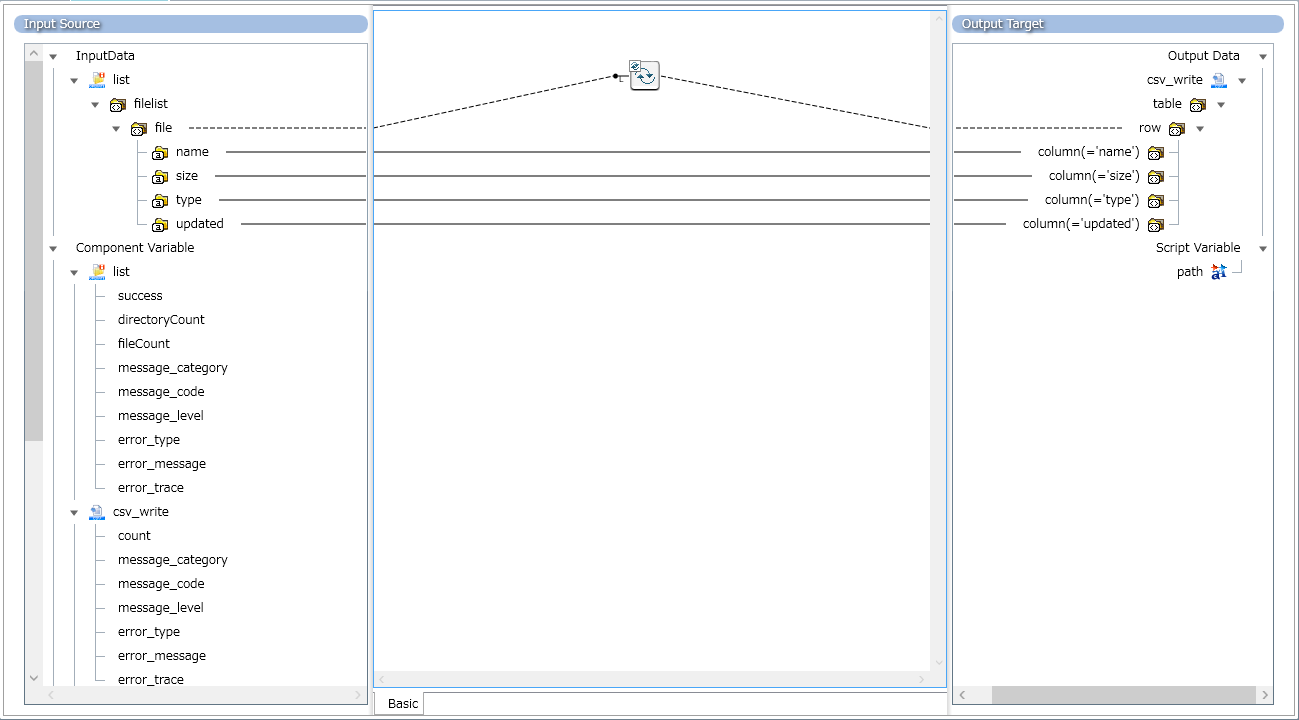
From the tool palette in Designer, drag File > CSV > Write CSV File onto the script canvas.
Configure the Write CSV File operation as shown below.
Field name
Setting (example)
File
/${path}/List.csv
Column list
name
size
type
updated
= Remarks =-
Add a column to the column list by selecting Add.
-
You can either enter the variable for the file path directly or select the variable from
 that is displayed after you select the text box.
-
-
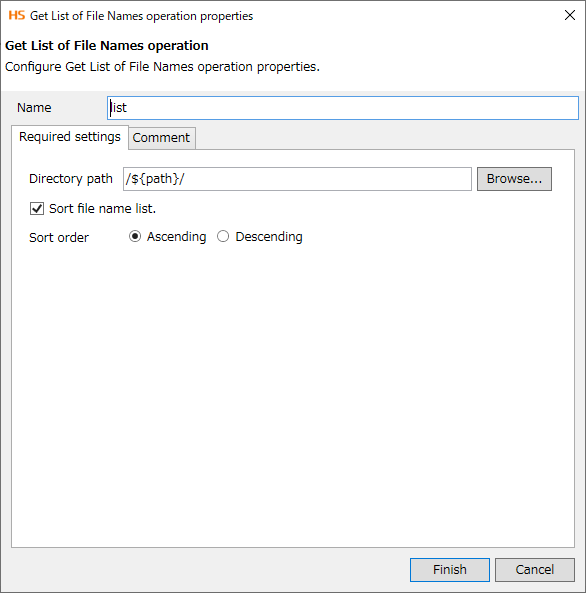
From the tool palette in Designer, drag File > File Operation > Get List of File Names onto the script canvas.
Configure the Get List of File Names operation as shown below.
Field name
Setting (example)
Directory path
/${path}/
-
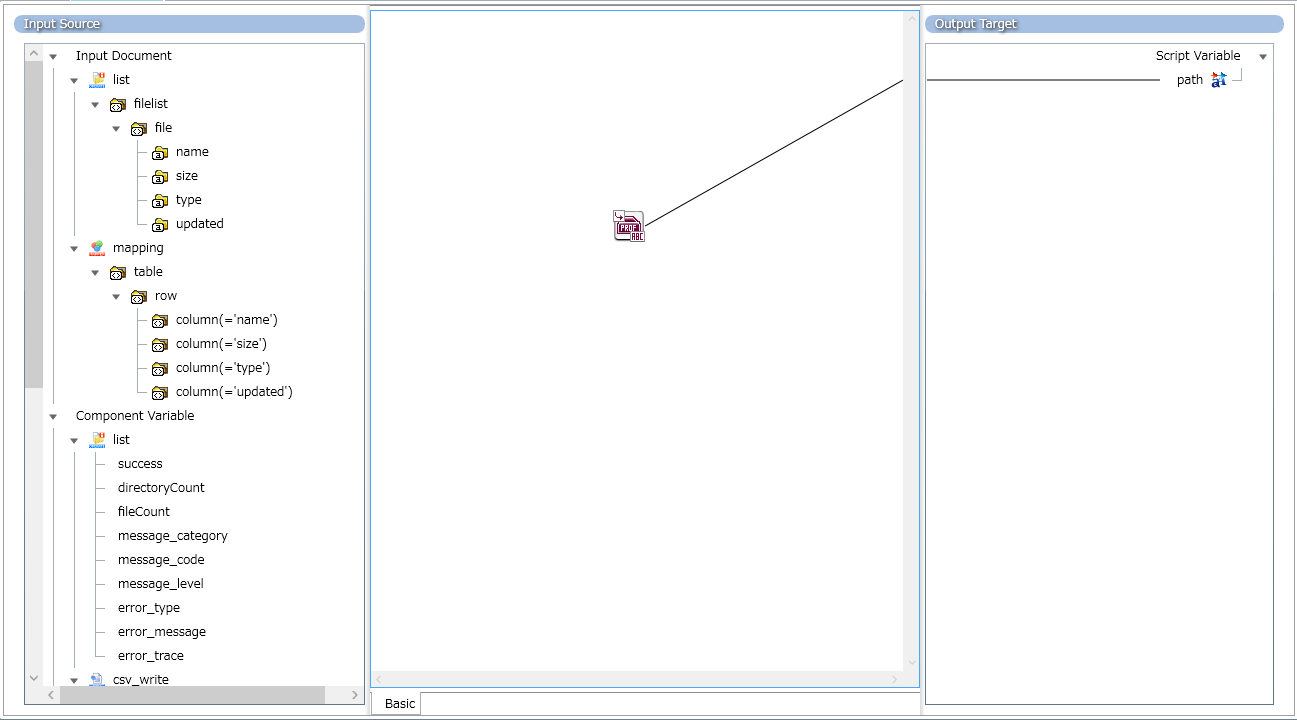
From the tool palette, drag Basic > Processing > Assign Variables onto the script canvas.
-
From the tool palette, drag Conversion > Basic > Mapping onto the script canvas.
-
Link the component icons as follows:

-
Double-click Assign Variables to open the mapping canvas, and map String > Basic > the Execution Profile logic to "path" under the output target.
Use the Execution Profile logic, because the profile name is used as the path for the storage to output data. When you execute the script using the profile for either development or production, the execution profile name is assigned to the variable, and it becomes the storage path for that profile.
NoteSet the profile name and workspace name to be identical, because the profile name is used as the path for the storage (workspace).
The profile name and workspace name are case sensitive.
-
Go back to the script canvas, double-click the mapping to open the mapping canvas, and map the data of the input source and output target. Use Loop > Basic > Iterate specified node to repeat until the end of the data.
-
Press Run script to confirm that the script works.
-
Save the script and close Designer.
Complete the application settings
-
Go back to the step Trigger Conditions on the All > Add page and select Next.
-
In the step Test, set the fields as shown below, and then select Build.
Field name
Setting (example)
Integrate service
Select a HULFT Integrate service name.
Profile
Dev
-
Select Test to perform test execution of the script.
-
Once the test is successfully completed, select Next.
-
In the step Summary, confirm that the settings are correct, and then select Finish.
(2) Deploy the application for development
With the following procedure, deploy the application for development.
-
Select
> APPLICATIONS > All. -
On the All page, select Detail for Create file list.
-
Display the Dev tab in Profile and select Configure.
-
Set the fields as shown below and select Test.
Field name
Setting (example)
Integrate service
Select a HULFT Integrate service name.
Recurrence
Minute
Interval
60
Start time
(Appropriate value)
End time
(Appropriate value)
Start date
Today (Appropriate date)
End date
Tomorrow (Appropriate date)
Time zone
(Appropriate value)
Calendars
(Optional)
-
Once the test is successfully completed, select Apply.
-
Select Deploy.
(3) View the execution results of the application for development
In this step, check the execution results of the application for development to make sure that the file list has been created in the storage for development.
Check the file list using the following procedure:
-
Select
> SERVICES > Storage. -
Display the Dev storage.
-
Download List.csv and check the contents.
Share the application using the following procedure:
-
Select
> APPLICATIONS > All. -
On the All page, select Detail for Create file list.
-
On the All > Create file list page, select Share from
. -
Select OK in the Share Application dialog.
Once the script is successfully updated, the developer's work is complete.
From here onward, an Ops engineer works on the production environment.
(1) Deploy the application for production
With the same procedure as Deploy the application for development, deploy the application using the Production profile.
(2) View the execution results of the application for production
With the same procedure as View the execution results of the application for development, check that List.csv has been created in the Production storage.
Even if you edit the original script, the deployed application is not affected.
To edit the script and apply it to the application, you must first undeploy the deployed application, press Configure, and then press Deploy.
This completes the procedure for switching the application settings between the development environment and production environment when executing an application.