Perform a loopback transfer of data on HULFT Square
This section describes how to set a loopback transfer that sends a file from HULFT Square and then receives that file with HULFT Square.
Description
The flow of loopback transfer
The following figure is an example of a loopback transfer. This tutorial explains the steps to perform this loopback transfer.
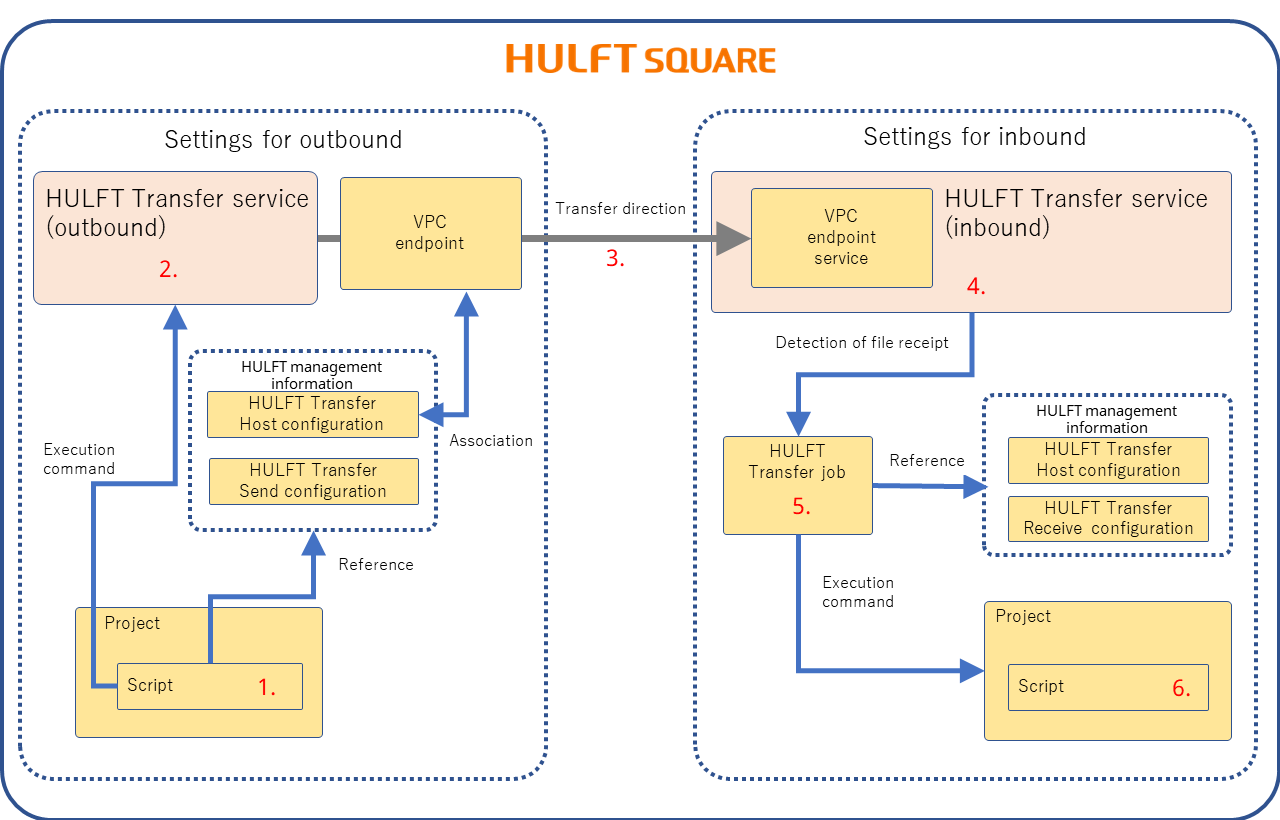
In the usual flow of operation, you run scripts from jobs associated with scripts, but in this tutorial on loopback transfer, the script for Send File is executed directly without going through a job.
On HULFT Square (outbound), a loopback transfer is performed in the following manner when you execute the script for Send File.
-
The script for Send File gives the command to HULFT Transfer to execute sending.
-
The HULFT Transfer service that receives the command to send, based on the HULFT management information, sends the file to the VPC endpoint.
-
The file is sent from HULFT Square (outbound) to HULFT Square (inbound) connected via PrivateLink.
-
HULFT Transfer service (inbound) gives a notification to the HULFT Transfer job when it detects the file receipt.
-
The HULFT Transfer job receives the file based on the HULFT management information and gives the command to run a script that waits for 10 seconds.
-
The script that waits for 10 seconds is executed.
HULFT Square settings and workflow
For the settings for loopback transfer, configure the inbound settings first, and then configure the outbound settings.
The following shows how to configure the settings required for loopback transfer.
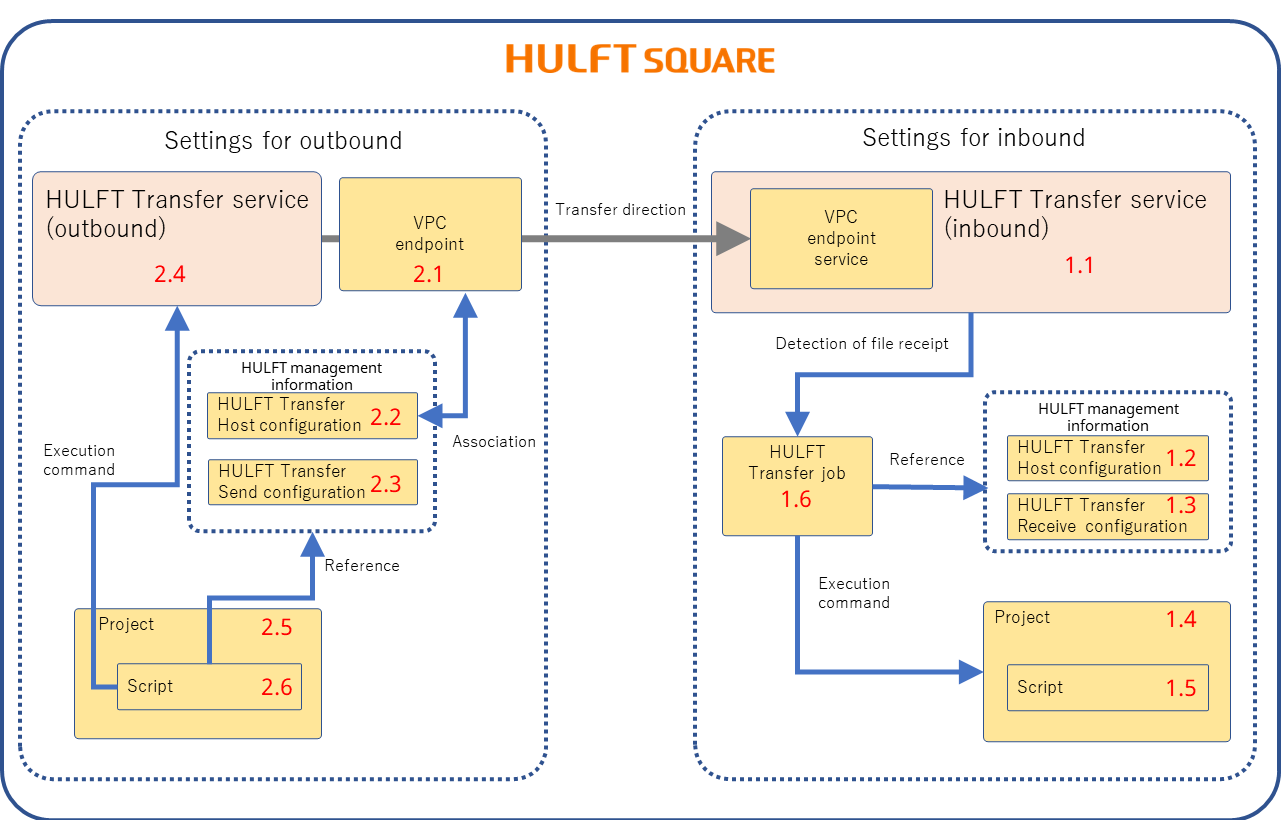
1. Settings for HULFT Square (inbound)
1. 1 Create a HULFT Transfer service (inbound)
1. 2 Set the HULFT Transfer Host configuration (inbound)
1. 3 Set the HULFT Transfer Receive configuration
1. 4 Create a HULFT Integrate project
1. 5 Create a script that waits 10 seconds after receiving a file
1. 6 Create a HULFT Transfer job
2. Settings for HULFT Square (outbound)
2. 2 Set the Transfer Host configuration (outbound)
2. 3 Set the HULFT Transfer Send configuration
2. 4 Create a HULFT Transfer service (outbound)
2. 5 Create a HULFT Integrate project
2. 6 Create a script for Send File in Designer
3. 1 Run the script for Send File
3. 2 Check that the receive file is updated
4. Checking of execution results
4. 1 Check the script event logs
4. 2 Check the status and execution history of the receive processing and send processing
4. 3 Check the status and execution history of the job executed in the receive processing
Procedures
Upload the send file and receive file to storage, and start the HULFT Integrate service to run the script.
(1) Upload the send file and receive file to storage
Place in the storage the send file to use for loopback transfer.
-
Select
 > SERVICES > Storage.
 -
On the Storage page, select the folder to upload the file to.
In this example, select the data folder under Personal.
-
Select Upload File, specify the send file to upload (for example, loopbacktest.csv), and then select Open.
-
Select Upload File, specify the receive file to upload (for example, Output.txt), and then select Open.
(2) Start the HULFT Integrate service to run the script
Start the HULFT Integrate service to run the script.
-
Select
> SERVICES > HULFT Integrate. -
On the HULFT Integrate page, select Add.
-
In step General on the HULFT Integrate > Add page, specify the information for the HULFT Integrate service.
The following values are specified in this example:
Field name
Setting content (example)
Name
Service_DFT
Description
(Optional)
CPU
1
Memory
2 GB
Scalability
1
Assigned group
Select the group with operation permissions.
Select Next.
-
In step Summary, confirm the settings and select Finish.
1. Settings for HULFT Square (inbound)
1. 1 Create a HULFT Transfer service (inbound)
1. 2 Set the HULFT Transfer Host configuration (inbound)
1. 3 Set the HULFT Transfer Receive configuration
1. 4 Create a HULFT Integrate project
1. 5 Create a script that waits 10 seconds after receiving a file
1. 6 Create a HULFT Transfer job
Here are the steps for the above tasks.
1. 1 Create a HULFT Transfer service (inbound)
To receive a file, you need to start the HULFT Transfer service for inbound transfer.
If you set Customer AWS account ID, you can configure the permission settings to connect to AWS for HULFT Square (outbound).
-
Select
> SERVICES > HULFT Transfer. -
On the HULFT Transfer page, select Add.
-
In step General on the HULFT Transfer > Add page, specify the information for the HULFT Transfer service (HULFT Receiver).
The following values are specified in this example:
Field name
Setting content (example)
Name
Service_IB
Description
(Optional)
CPU
500
Memory
1000M
Scalability
1
Transferring direction
Inbound
Socket timeout
3600
Strategy
Best Speed
Customer AWS account ID (*1)
Set the customer AWS account ID on the connection destination.
Assigned group
Select the group with operation permissions.
*1
:
For a loopback transfer, set your ID as the customer AWS account ID to connect to AWS for HULFT Square (outbound).
You can view the customer AWS account ID under AWS Account on ORGANIZATION > System Information.
Select Next.
-
In step Summary, confirm the settings and select Finish.
-
On the
> SERVICES > HULFT Transfer page, wait until the status is  (service is running).
 -
Confirm that the status is
(service is running), and then select Information from the action menu.By selecting
 for VPC Endpoint service name, you can copy the VPC endpoint service name.
You need the VPC endpoint service name to create a VPC endpoint on HULFT Square (outbound).
-
For details of the screens displayed during the operation, refer to HULFT Transfer.
-
The number possible to receive at the same time (receive multiplicity) is up to 10 for one HULFT Transfer service.
1. 2 Set the HULFT Transfer Host configuration (inbound)
When you use the HULFT Transfer service, set the detailed information about the remote host for the file transfer (Transfer Host configuration).
-
Select
> HULFT TRANSFER > Host Info. -
On the Host Info page, select Add.
-
In step General on the Host Info > Add page, set the Transfer Host configuration (remote host information).
The following values are specified in this example:
Field name
Setting content (example)
Name
HOST_IB
Description
(Optional)
Select Next.
-
In step Profile, set the information for the profile.
The following values are specified in this example:
Field name
Setting content (example)
Profile
Choose a profile.
Select Next.
-
In step Configuration, set the information for the remote host.
The following values are specified in this example:
Field name
Setting content (example)
Host type
UNIX/Linux
Character code
UTF-8
V7 compatible
Don't select.
Transfer direction
Inbound
Host name
LBHost
Select Next.
-
In step Summary, confirm the settings and select Finish.
-
In the list on the Host Info page, check that the host that you set has been added.
For details of the screens displayed during the operation, refer to Host Info.
1. 3 Set the HULFT Transfer Receive configuration
Specify the detailed information for the file to be received with the HULFT Transfer service.
-
Select
> HULFT TRANSFER > Receive Config. -
On the Receive Config page, select Add.
-
In step General on the Receive Config > Add page, set the HULFT Transfer Receive configuration.
The following values are specified in this example:
Field name
Setting content (example)
Name
RcvConf
Description
(Optional)
Select Next.
-
In step Profile, set the information for the profile.
The following values are specified in this example:
Field name
Setting content (example)
Profile
Choose a profile.
Select Next.
-
In step Configuration, set the information for receiving a file.
The following values are specified in this example:
Field name
Setting content (example)
Transfer name
LOOPBACK
Receive mode
Replace
File to receive
/Personal/data/Output.txt
Sender(s)
HOST_IB
Data verification
Don't select.
Encryption key
(Optional)
Select Next.
-
In step Summary, confirm the settings and select Finish.
-
In the configuration list on the Receive Config page, check that the HULFT Transfer Receive configuration that you set has been added.
For details of the screens displayed during the operation, refer to Receive Config.
1. 4 Create a HULFT Integrate project
Create a project to manage scripts.
-
Select
> HULFT INTEGRATE > Projects. -
On the Projects page, select Add.
-
In step General on the Projects > Add page, set the information for the project for receiving.
The following values are specified in this example:
Field name
Setting content (example)
Name
PRJ_IB
Workspace
Personal
Description
(Optional)
Create script
Select the checkbox.
Script name
Wait 10 seconds
Select Next.
-
In step Summary, confirm the project settings and select Finish.
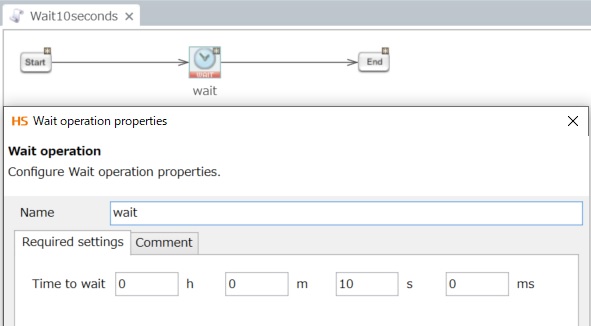
1. 5 Create a script that waits 10 seconds after receiving a file
-
Select the Open project icon for the project you created on the Projects page.
-
In the Edit PRJ_IB dialog, specify Profile and Integrate service.
-
Select Launch Designer.
If you cancel it, or when you edit a script in an existing project, select the Open project icon of
> HULFT INTEGRATE > Projects to launch Designer.NoteTo launch Designer, HULFT Square Designer.exe must be installed.
-
Designer is launched. Create a script that waits 10 seconds.
-
Save the created script and close Designer.
1. 6 Create a HULFT Transfer job
Create a job to link projects and scripts and various settings information to manage them as a package.
-
Select
> HULFT INTEGRATE > Projects. -
On the Projects page, select the Create new job icon for the PRJ_IB project to create a job.
-
On the Select a job type page, specify HULFT Transfer for the type.
-
Select Next on the bottom-right of the screen.
-
In step General on the HULFT Transfer Jobs > Add page, set the information for the job.
The following values are specified in this example:
Field name
Setting content (example)
Name
JOB_IB
Workspace
Personal
Profile
Choose a profile.
Description
(Optional)
Select Next.
-
In step Receive, specify the information for receiving a file.
The following values are specified in this example:
Field name
Setting content (example)
Receive Config
RcvConf
Trigger event
Succeed in receive
Transfer service
Service_IB
Select Next.
-
In step Project, specify the information for the project to link with this job.
The following values are specified in this example:
Field name
Setting content (example)
Project
PRJ_IB
Version
2
Script
Wait 10 seconds
Script version
Set the dependency relationship of scripts.
Mapping parameters to script variables
Do not add parameters.
Select Next.
-
In step Service to run scripts, specify the service to link with this job.
The following values are specified in this example:
Field name
Setting content (example)
Service to run scripts
Service_DFT
Select Next.
-
In step Summary, confirm the settings and select Finish.
-
Select
> JOBS > HULFT Transfer Jobs, and check that the job you created exists on the HULFT Transfer Jobs page.
When you create or update a job, the HULFT Transfer Receive configuration and the HULFT Transfer Host configuration linked to the HULFT Transfer Receive configuration are loaded to the HULFT Transfer service (HULFT Receiver) that you specify for the job.
If you modify the HULFT Transfer Receive configuration or the HULFT Transfer Host configuration linked to the HULFT Transfer Receive configuration, the job must be updated to reload them to the HULFT Transfer service.
For details about updating a job, refer to HULFT Transfer Jobs.
For details of the screens displayed during the operation, refer to HULFT Transfer Jobs.
2. Settings for HULFT Square (outbound)
In the settings for HULFT Square (outbound), start the service to send a file and set the HULFT management information.
2. 2 Set the Transfer Host configuration (outbound)
2. 3 Set the HULFT Transfer Send configuration
2. 4 Create a HULFT Transfer service (outbound)
2. 5 Create a HULFT Integrate project
2. 6 Create a script for Send File in Designer
Here are the steps for the above tasks.
Create a VPC endpoint to connect with HULFT Square (inbound) via AWS PrivateLink.
In advance, copy the VPC endpoint service name that has been created when you created the HULFT Transfer service (inbound).
-
Select
 > NETWORK > VPC Endpoint.
 -
On the VPC Endpoint page, select Add.
-
In step General on the VPC Endpoint > Add page, set the information for the VPC endpoint to create.
The following values are specified in this example:
Field name
Setting content (example)
Name
VPC_EP
Description
(Optional)
VPC Endpoint Service Name
Specify the VPC endpoint service name that has been created when you created the HULFT Transfer service (inbound).
NoteYou can't connect to a VPC endpoint service that's already connected to another VPC endpoint. Specify a VPC endpoint service name that's not connected from another VPC endpoint.
Select Next.
-
In step Summary, confirm the settings and select Finish.
When you select Finish, the VPC endpoint for HULFT Square (outbound) and the VPC endpoint service for HULFT Square (inbound) are connected by PrivateLink.
2. 2 Set the Transfer Host configuration (outbound)
When you use the HULFT Transfer service, set the detailed information about the remote host for the file transfer (Transfer Host configuration).
-
Select
> HULFT TRANSFER > Host Info. -
On the Host Info page, select Add.
-
In step General on the Host Info > Add page, set the Transfer Host configuration (remote host information).
The following values are specified in this example:
Field name
Setting content (example)
Name
HOST_OB
Description
(Optional)
Select Next.
-
In step Profile, set the information for the profile.
The following values are specified in this example:
Field name
Setting content (example)
Profile
Choose a profile.
Select Next.
-
In step Configuration, set the information for the remote host.
The following values are specified in this example:
Field name
Setting content (example)
Host type
UNIX/Linux
Character code
UTF-8
V7 compatible
Don't select.
Transfer direction
Outbound
VPC endpoint
VPC_EP
Receive Port
30000
Select Next.
-
In step Summary, confirm the settings and select Finish.
-
In the list on the Host Info page, check that the host that you set has been added.
For details of the screens displayed during the operation, refer to Host Info.
2. 3 Set the HULFT Transfer Send configuration
Specify the detailed information for the file to be sent with the HULFT Transfer service.
-
Select
> HULFT TRANSFER > Send Config. -
On the Send Config page, select Add.
-
In step General on the Send Config > Add page, set the HULFT Transfer Send configuration.
The following values are specified in this example:
Field name
Setting content (example)
Name
SndConf
Description
(Optional)
Select Next.
-
In step Profile, set the information for the profile.
The following values are specified in this example:
Field name
Setting content (example)
Profile
Choose a profile.
Select Next.
-
In step Configuration, set the information for sending a file.
The following values are specified in this example:
Field name
Setting content (example)
Transfer name
LOOPBACK
File type
Text
File to send
Personal/data/loopbacktest.csv
Receiver
HOST_OB
Compress
Don't select.
Code convert
Sender
Interval
0
Shift code
Select.
Encryption key
(Optional)
Select Next.
-
In step Summary, confirm the settings and select Finish.
-
In the configuration list on the Send Config page, check that the Transfer Send configuration that you set has been added.
For details of the screens displayed during the operation, refer to Send Config.
2. 4 Create a HULFT Transfer service (outbound)
To send a file, you need to start the HULFT Transfer service for outbound transfer.
-
Select
> SERVICES > HULFT Transfer. -
On the HULFT Transfer page, select Add.
-
In step General on the HULFT Transfer > Add page, specify the information for the HULFT Transfer service (HULFT Sender) that you want to create.
The following values are specified in this example:
Field name
Setting content (example)
Name
Service_OB
Description
(Optional)
Transferring direction
Outbound
Retry count
(Appropriate value)
Retry interval
(Appropriate value)
Socket timeout
(Appropriate value)
Socket error retry count
(Appropriate value)
Strategy
(Appropriate value)
Hostname
LBHost
Assigned group
Select the group with operation permissions.
Select Next.
-
In step Summary, confirm the settings and select Finish.
-
The created HULFT Transfer service (HULFT Sender) is added to the list on the HULFT Transfer page. Check that the service has been started up.
For details of the screens displayed during the operation, refer to HULFT Transfer.
2. 5 Create a HULFT Integrate project
-
Select
> HULFT INTEGRATE > Projects. -
On the Projects page, select Add.
-
In step General on the Projects > Add page, set the information for the project for sending.
The following values are specified in this example:
Field name
Setting content (example)
Name
LBTEST
Workspace
Personal
Description
(Optional)
Create script
Select the checkbox.
Script name
Send File
Select Next.
-
In step Summary, confirm the project settings and select Finish.
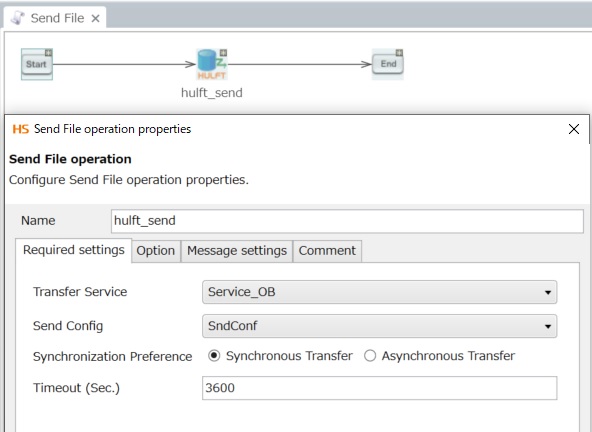
2. 6 Create a script for Send File in Designer
-
Select the Open project icon for the LBTEST project you created on the Projects page.
-
In the Edit LBTEST dialog, specify Profile and Integrate service.
-
Select Launch Designer.
If you cancel it, or when you edit a script in an existing project, select the Open project icon of
> HULFT INTEGRATE > Projects to launch Designer.NoteTo launch Designer, HULFT Square Designer.exe must be installed.
-
Designer is launched. Create a script that executes a send.
-
Save the created script.
3. 1 Run the script for Send File
3. 2 Check that the receive file is updated
3. 1 Run the script for Send File
Use Run script to run the script you created for Send File in Designer on HULFT Square (outbound).
When you run the script, Send File is executed for the HULFT Transfer service (outbound) according to the HULFT management information.
The HULFT Transfer service that receives Send File starts sending the file according to the Transfer Send configuration.
The HULFT Transfer service (inbound) receives the file, and the job (script that waits 10 seconds) set on HULFT Square (inbound) is executed.
3. 2 Check that the receive file is updated
-
Select
> SERVICES > Storage. -
On the Storage page, select the data folder under Personal.
Check that the updated date and time for Output.txt is the date and time that the script for Send File was executed.
-
On the Storage page, select Download from the action menu for Output.txt.
Open Output.txt in a text editor, and check that the contents have been replaced with those of loopbacktest.csv.
4. Checking of execution results
Check the execution results in one of these ways:
4. 1 Check the script event logs
4. 2 Check the status and execution history of the receive processing and send processing
4. 3 Check the status and execution history of the job executed in the receive processing
4. 1 Check the script event logs
-
Select
 > SERVICE EVENTS > HULFT Integrate.
 -
In the event log list on the HULFT Integrate page, check Status for the script Send File.
You can also check detailed information about event logs with Detail in the action menu.
4. 2 Check the status and execution history of the receive processing and send processing
-
Select
> SERVICE EVENTS > HULFT Transfer. -
Check Status of the log record with LOOPBACK for Transfer name in the event log list on the HULFT Transfer page.
You can check the execution history for both outbound and inbound.
You can also check trace logs with Detail in the action menu.