Connect to ServiceNow tables
This section describes how to read or write tables you create with ServiceNow.
HULFT Square can get table information only for tables with read and write permissions granted on ServiceNow.
Register tables you want to read and write in the table list on ServiceNow. HULFT Square gets the table information via the table list.

Description
- Preparation
-
Make the following preparations on ServiceNow in advance.
-
Create the target table
-
Create the staging table
-
Create the transform map
-
- Processing flow
-
(1) Register the tables you will use to the table list
(2) Create a ServiceNow connection on HULFT Square
- Key functions
-
-
The Export operation
Writes input data to a ServiceNow table.
You can set it with Cloud > ServiceNow > Export.
-
The Import multiple operation
Reads a ServiceNow table.
You can set it with Cloud > ServiceNow > Import multiple.
-
Procedures
(1) Register the tables you will use to the table list
-
On the upper-left of the screen on the ServiceNow website, enter table list in the filter navigator, and select tablelist from the search results.
-
Select New.
-
On the screen that is displayed, set the fields as shown below.
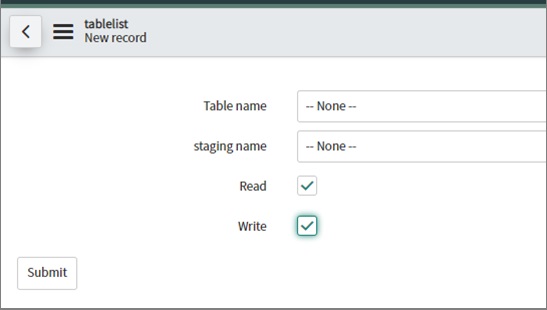
Field name
Setting
Table name
Select the target table to use.
Staging name
Select the staging table to use.
Read
Select the checkbox.
Write
Select the checkbox.
-
Select Submit.
Registration to the table list is now complete.
(2) Create a ServiceNow connection on HULFT Square
-
Select
 > HULFT INTEGRATE > Connections.
 -
On the Connections page, select Add New.
-
In step Type on the Connections > Add New page, search for the resource type.
Enter ServiceNow in the search box.
-
Select ServiceNow in Connector, and ServiceNow connection in Type.
-
Select Next.
-
In step General, set the fields related to connection resources as shown below.
Field name
Setting (example)
Name
ServiceNow connection
Workspace
Personal
Description
(Optional)
-
Select Next.
-
In step Settings, set the ServiceNow connection information.
-
Client ID
-
Client Secret
-
User name
-
password
-
Token endpoint
-
Common URI
= Remarks =After you set the token endpoint, select Issue token, and confirm that it's set as the refresh token.
-
-
Select Next.
-
In step Profiles, select a profile.
-
In step Summary, confirm the information and select Finish.
-
Launch Designer in HULFT Square.
For how to launch Designer, refer to Launching of Designer.
-
From the tool palette, drag Cloud > ServiceNow > Export onto the script canvas.
Configure the Export operation as shown below.
Required settings tab
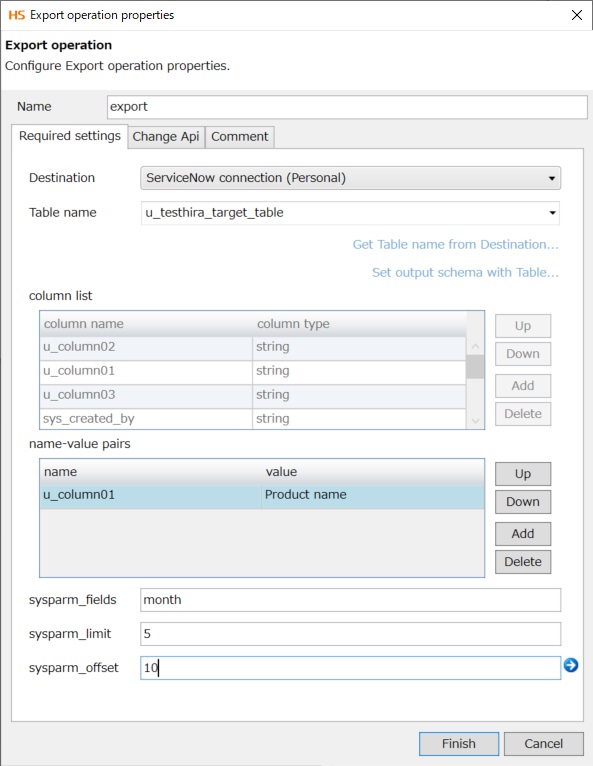
Field name
Setting value
Description
name-value pairs-name
Enter a column name.
Records that match the conditions are retrieved.
name-value pairs-value
Enter a value.
sysparm_fields
Column name,Column name
If you specify column names by separating with a comma (","), only the specified column names are obtained.
sysparm_limit
5
If you enter a numerical value, only the specified number of records is obtained.
sysparm_offset
10
If you enter a numerical value, the records after that record are obtained.
= Remarks =After you select the destination, by selecting Get Table name from Destination, you can confirm that a table is selected for the table name.
-
After the table name is set, select Set output schema with Table, and set the output schema.
-
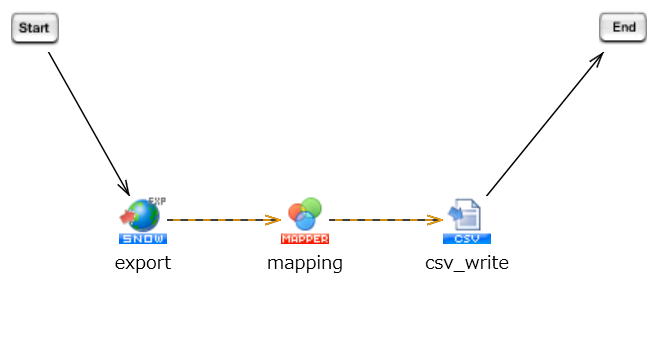
Link the component icons as follows:
(3) Create script (Import multiple)
-
Launch Designer in HULFT Square.
For how to launch Designer, refer to Launching of Designer.
-
From the tool palette, drag Cloud > ServiceNow > Import multiple onto the script canvas.
Configure the Import multiple operation as shown below.
Required settings tab
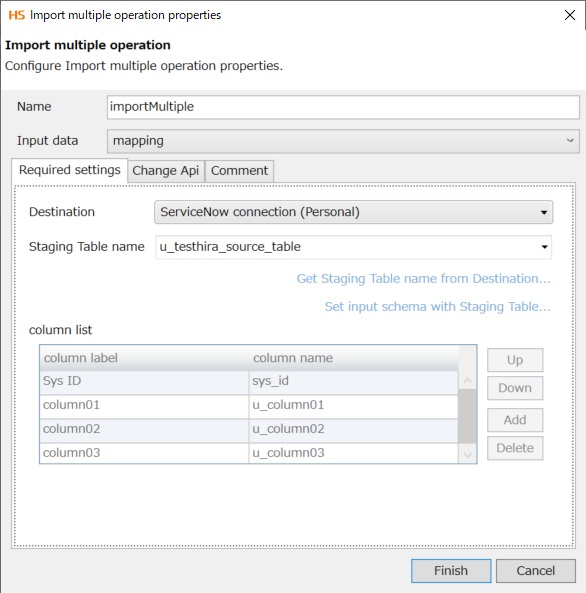 = Remarks =
After you select the destination, by selecting Get Staging Table name from Destination, you can confirm that a table is selected for the table name.
-
After Staging Table name is set, select Set input schema with Staging Table, and set the input schema.
-
Link the component icons as follows:
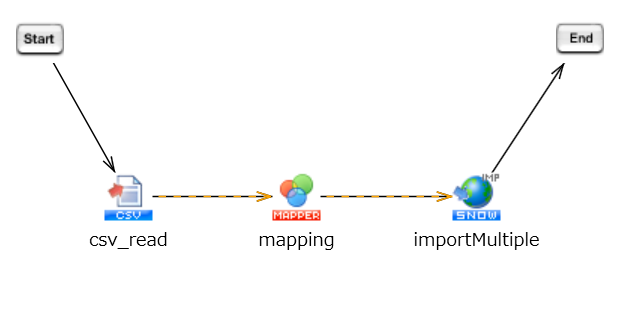
You can confirm that the executed script is successful if it doesn't log an error.
For details about how to execute scripts , refer to Execute the script in Create a script that processes a CSV file.