VPN
In HULFT Square, you can transfer files using an FTP connection via a VPN.
To use VPN services, a contract for HULFT Square VPN Option (available for purchase) is required. To create VPN services, you need to install the application from App Square. For detailed instructions, refer to Transfer files to HULFT Square with an FTP connection (via a VPN).
In VPN, you can create, restart, and delete VPN services, and manage the users who can connect to these services.
You can operate VPN from  > SERVICES > VPN in the navigation menu.
The key points about creating and configuring VPN services are explained in this section.
Points for settings
Grant permissions to the group that needs to operate the services. When you create VPN services, determine the allocation of CPU resources and the memory size depending on the scripts or data being handled.
-
To configure VPN service settings, either one of the following permissions is required:
-
VPNServiceFullAccess
-
VPNServiceAdminAccess
-
When there are multiple VPN services and you deploy multiple HULFT Transfer Apps, the VPN service settings configured in the HULFT Transfer App that was deployed last are used for the outbound VPN service.
As FTP services do not utilize outbound settings, deployment of HULFT Transfer App has no effect.
This section explains the screen transitions from the VPN page and the functions such as creating, restarting, and deleting VPN services.
For the names and functions of the basic UI elements and other items of HULFT Square, refer to the following topic:
VPN
In the navigation menu, select > SERVICES > VPN to open this page.
You can manage your VPN services here. You can perform operations such as creating, restarting, and deleting services and viewing detailed information.
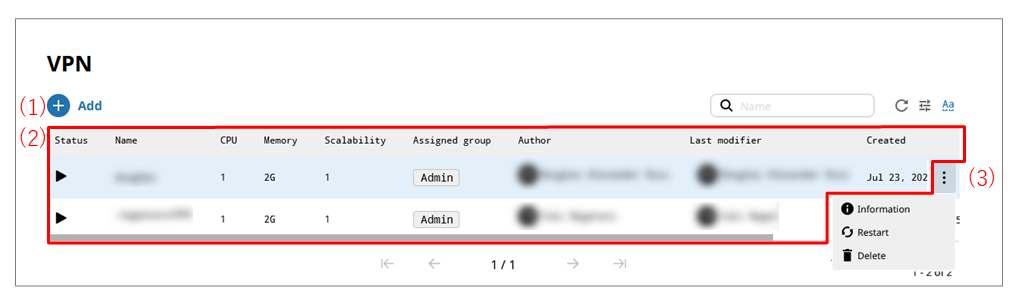
- (1) Add
-
Select this icon to create and set up a new VPN service.
For the settings of VPN services, refer to VPN > Add.
- (2) List of settings
-
VPN services that have been created are displayed in tabular form.

This icon indicates that the service is started (running).

This icon indicates that the service is stopped.

This icon indicates that the service is in the midst of starting up.

This icon indicates that the service is loading.
- (3) Action menu
-
Select this icon to perform operations on VPN services that have been created.
Selecting
 shows the menu of operations below.
- Information
-
Displays detailed information about the selected service. You can edit, restart, or delete the VPN service that is displayed.
When you select this menu item, VPN > VPN service name is opened.
- Restart
-
Restarts the selected service.
- Delete
-
Deletes the selected service.
NoteDelete all VPN services before you delete the VPN application.
On the VPN page, select Add to open this page.
To create a new VPN service, set information for the VPN service by following the wizard-style pages step by step.
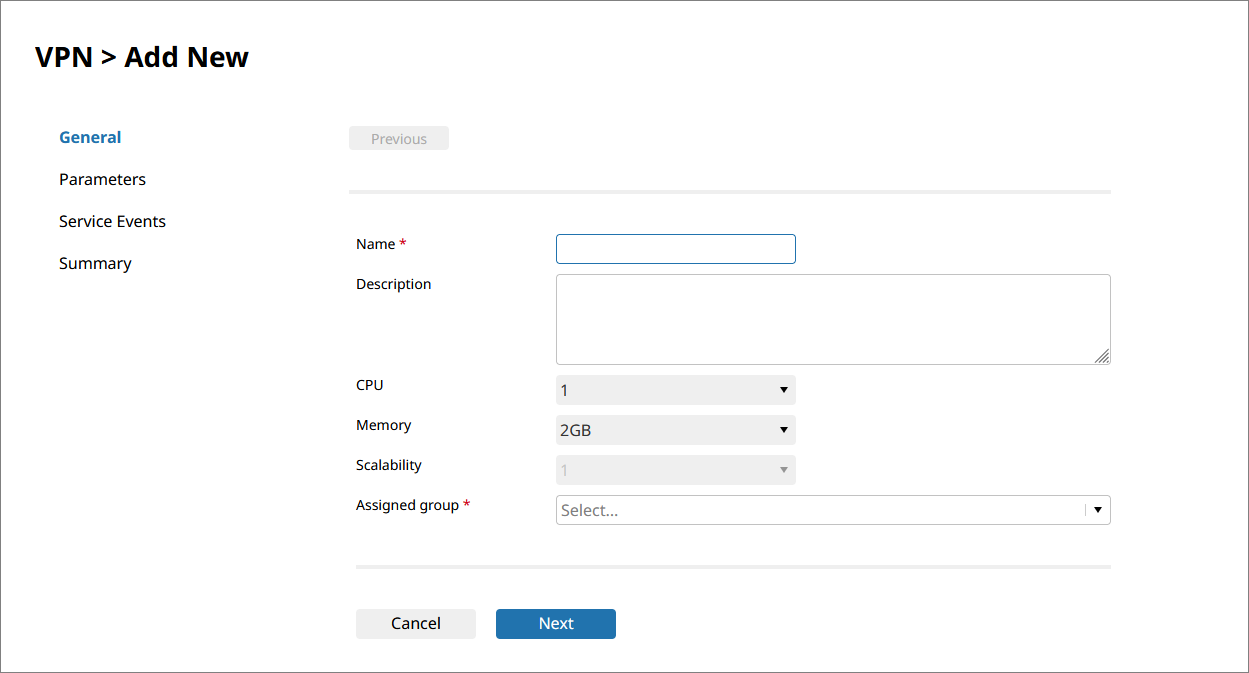
- Name
-
Specify an operating environment name for the VPN service.
- Description
-
Specify comments to explain the VPN service that you set.
- CPU
-
Select the allocation of CPU resources for the VPN service from the dropdown list.
- Memory
-
Select the memory size to use for the VPN service from the dropdown list.
The options in the dropdown list change depending on the setting for CPU.
- Scalability
-
Displays the scalability (the number of Pods) for the VPN service.
The scalability for any VPN service is "1". It can't be changed.
- Assigned group
-
Specify the group to which to grant permissions to operate the service.
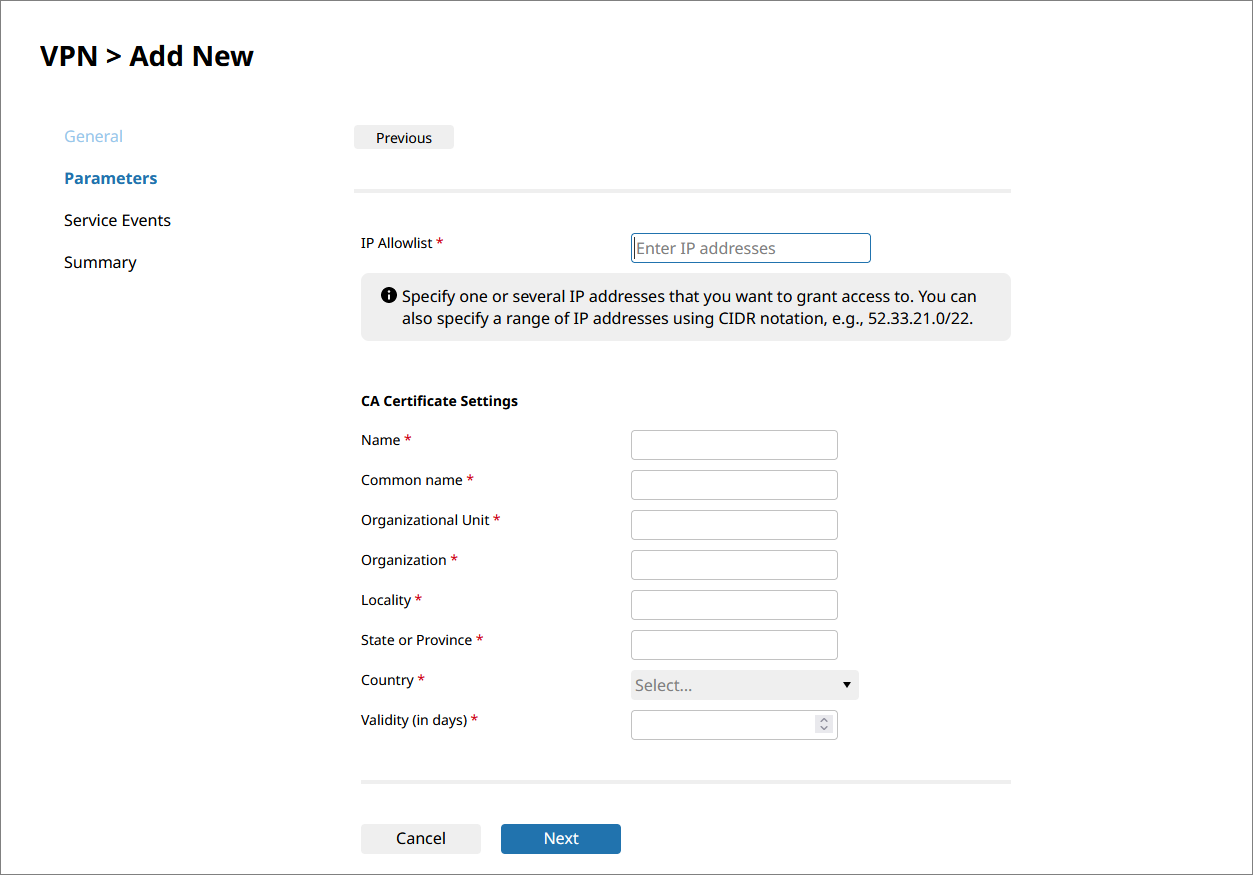
- IP allowlist
-
Specify the IP addresses to which to permit access.
Two or more IP addresses can be specified by pressing the Enter key after entering an IP address.
- CA Certificate Settings
-
Enter settings to issue a CA certificate.
NoteAfter the number of days set for Validity elapses, the certificate will expire and authentication won't be available.
When the expiration date is reached, VPN services need to be recreated.
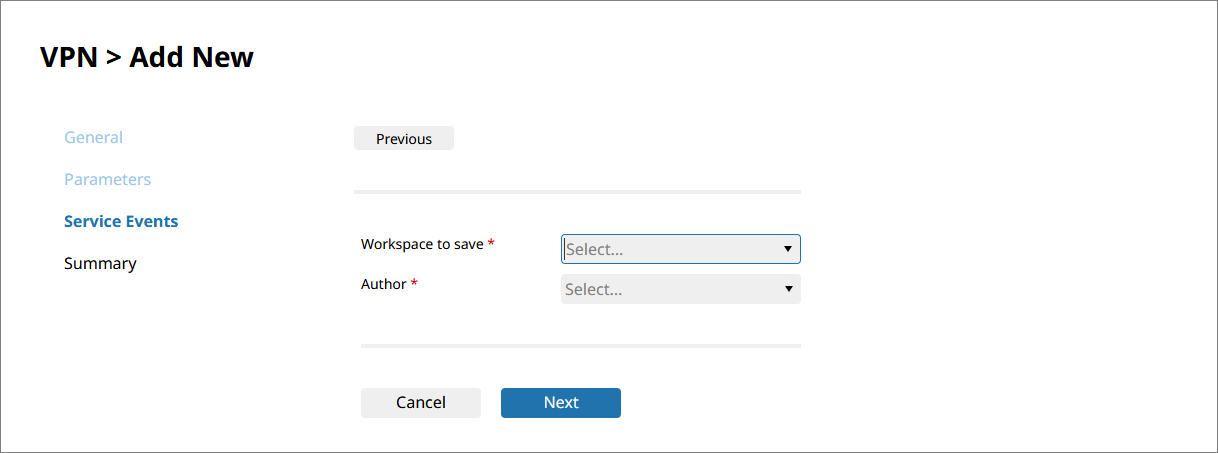
- Workspace to save
-
Select a workspace to store logs.
= Remarks =Create a workspace in advance to output logs to, and specify it for Workspace to save.
- Author
-
From the registered users of the workspace specified for Workspace to save, select the user who will be the author of log files.
- Next/Finish
-
Displays the next page.
On the VPN page, select Information from the action menu in the list of settings to open this page.
You can view detailed information about the selected VPN service.
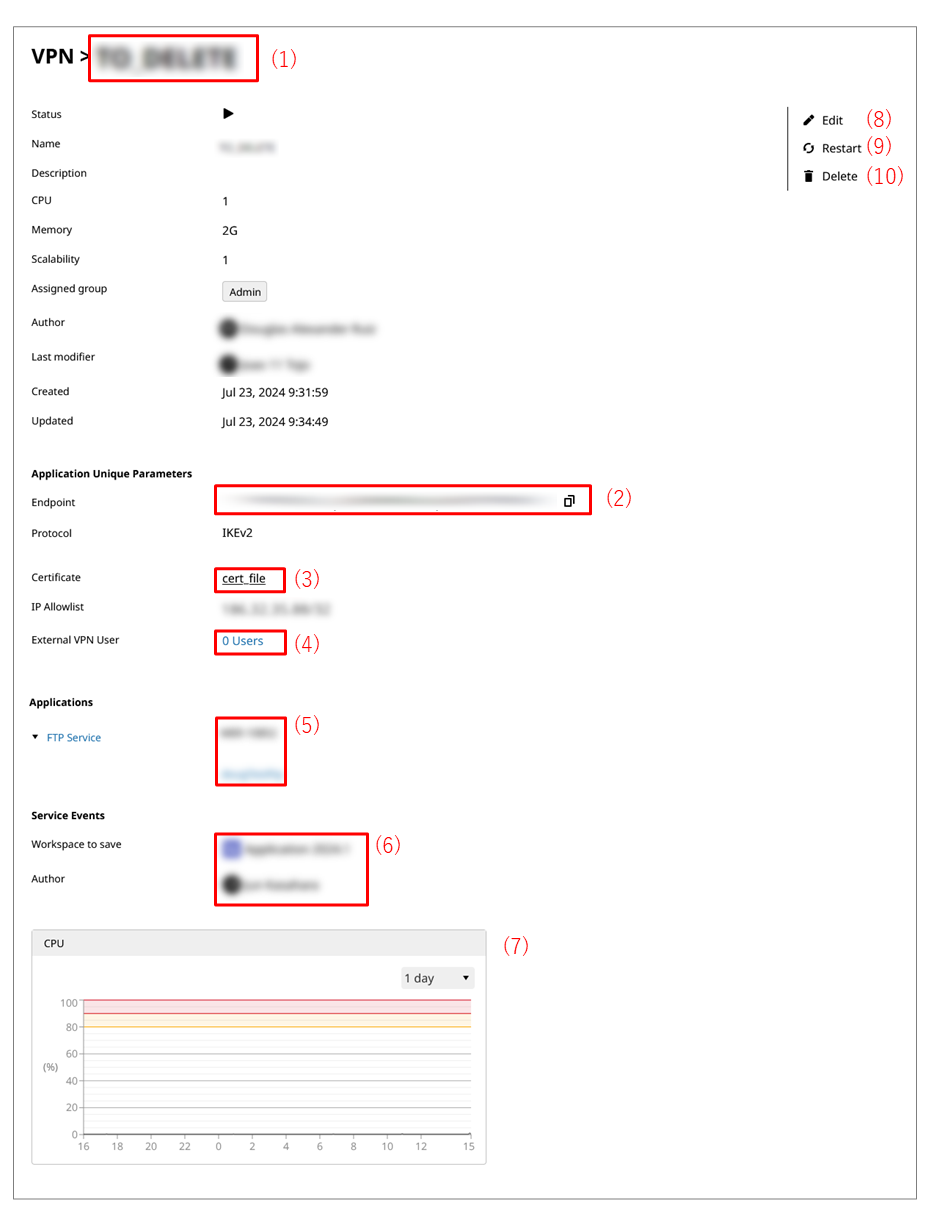
- (1) Service name
-
In Service name, the name of the VPN service is displayed.
- (2) Endpoint
-
The generated URL is displayed.
By selecting
 , you can copy the URL.
 - (3) Certificate
-
You can download the certificate.
- (4) External VPN user
-
The number of external users who can access the VPN service is displayed.
When you select the link, VPN > VPN service name > External Users is opened.
- (5) Service events
-
Workspace to save displays the workspace to store logs in.
Author displays the author of the log file.
- (6) FTP Service
-
The FTP services that use the VPN service are displayed.
- (7) Status
-
The CPU status information for the VPN service is displayed.
- (8) Edit
-
You can reconfigure and update information for the displayed VPN service.
NoteIf you change the VPN service settings, it may take some time to apply the settings to the service.
- (9) Restart
-
Restarts the service that is displayed.
- (10) Delete
-
Deletes the VPN service that is displayed.
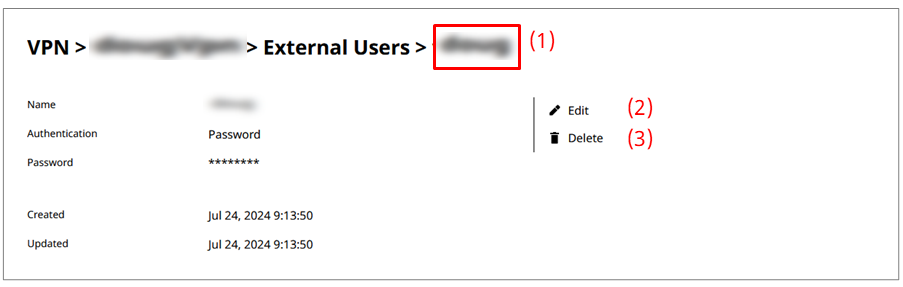
VPN > VPN service name > External Users
On the VPN page, select Information from the action menu, and then select the link beside External VPN user to open this page.
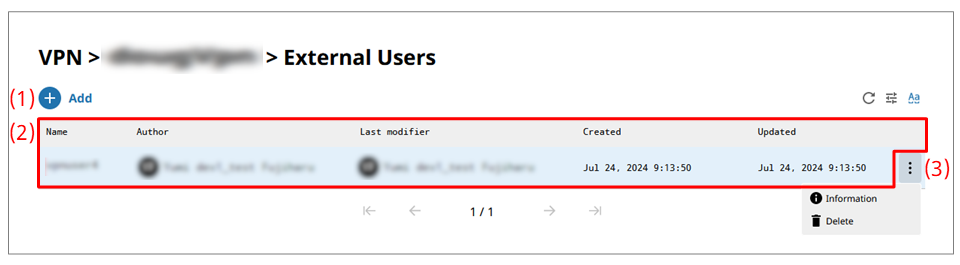
- (1) Add
-
Select this icon to add a new external user.
When you select this icon, VPN > VPN service name > External Users > Add is opened.
- (2) List of settings
-
The information about the external users that have been created is displayed in tabular form.
- (3) Action menu
-
Select this icon to perform operations for external users that have been created.
Selecting
shows the menu of operations below.- Information
-
Displays detailed information about the selected external user. You can edit or delete the external user that is displayed.
When you select this menu item, VPN > VPN service name > External Users > Name of external user is opened.
- Delete
-
Deletes the selected external user.
VPN > VPN service name > External Users > Add
To open this page, select Add on the VPN > VPN service name > External Users page.
You can set the information to add an external user by following the wizard-style pages step by step.
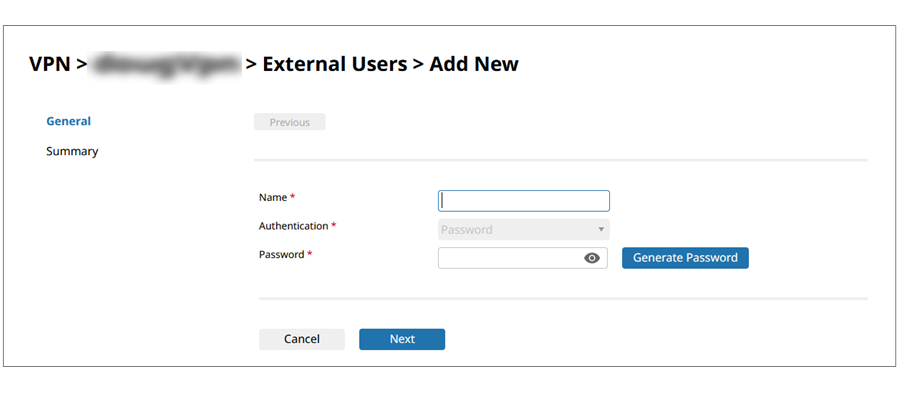
- Name
-
Specify the name of the external user to be added.
NoteExternal user names are case sensitive.
- Authentication
-
Select the authentication method. You can only select password authentication.
- Password
-
Add a password.
If you select Generate Password, a random password is generated.
- Next/Finish
-
Displays the next page.