Send Configs
Specify the detailed information for the file to be sent with the HULFT Transfer App service.
The transfer function of HULFT Transfer Application enables you to transfer files with more detailed settings than HULFT Transfer services.
Select HULFT Transfer Application or HULFT Transfer services according to your needs.
You can configure Send configurations by selecting  > HULFT TRANSFER APP > Send Configs in the navigation menu, or by using HULFT Transfer Migration.
This section explains the key points about setting Send configurations.
Points for settings
To create a new Send configuration, select Add on the Send Configs page and enter transfer information.
The maximum number of Send configuration records that can be registered is 10,000.
-
When "J" (Successful Job Completion) is specified for Notification (JOBWAIT) in HULFT on the receiving side, you may not receive a job completion notification as expected if you execute a job that takes 350 seconds or more to complete.
In this case, HULFT Square on the sending side logs a 525-000 error, and HULFT on the receiving side logs a 302-344 error.
-
To set Send configurations, either one of the following permissions is required:
-
AppTransferSendConfigFullAccess
-
AppTransferSendConfigEditAccess
-
This section explains the screen transitions from the Send Configs page and functions such as creating and deleting Send configurations.
For the names and functions of the basic UI elements and other items of HULFT Square, refer to the following topic:
Send Configs
To open this page, select > HULFT TRANSFER APP > Send Configs in the navigation menu.
- (1) Add
-
Select this icon to create and set up a new Send configuration.
For details about how to set Send configurations, refer to Send Configs> Add.
- (2) List of settings
-
The information about Send configurations that have been created is displayed in tabular form.
- (3) Action menu
-
Select this icon to perform operations for Send configurations that have been created.
Selecting
 shows the menu of operations below.
- Information
-
Displays detailed information about the selected Send configuration. You can edit or delete the Send configuration that is displayed.
When you select this menu item, Send Configs > Send configuration name is opened.
- Delete
-
Deletes the selected Send configuration.
On the Send Configs page, select Add to open this page.
To create a new Send configuration, set information for the Send configuration by following the wizard-style pages step by step.
Step General
- Name
-
Specify the name of the Send configuration.
- Description
-
Specify comments to explain the Send configuration that you want to set.
- Next
-
Displays the next page.
Step Profile
- Profile
-
Select a profile to link with the Send configuration.
- Next
-
Displays the next page.
Step Configuration
You can register information about the file to send.
Field list
This section explains the fields to be specified in HULFT Transfer Application.
The grayed-out rows in the table below indicate the fields that are supported by HULFT only. HULFT Transfer Application doesn't support these fields. Use this information to check compatibility with HULFT.
|
Field value |
Default value |
Setting value |
Optional |
Remarks |
|
|---|---|---|---|---|---|
|
Screen <HULFT screen> |
File |
||||
|
Transfer name <File ID> |
SNDFILE |
|
Uppercase alphanumeric characters |
- |
Within 50 bytes |
|
Description <Comment> |
COMMENT |
|
Characters |
✓ |
Within 60 bytes |
|
File to send <Send File Name> |
FILENAME |
|
Alphanumeric characters |
- |
Within 200 bytes |
|
File type <Transfer Type> |
TRANSTYPE |
|
Binary Text |
- |
|
|
Format/Multi Format ID |
FMTID |
|
Alphanumeric characters |
✓ |
Not supported by HULFT Square. |
|
Compression type <Compression Preference> |
COMP |
None |
None Horizontal Vertical DEFLATE |
- |
|
|
Compression block size <Compression Unit> |
COMPSIZE |
0 |
0, 1–32760 |
✓ |
Unit: bytes |
|
DEFLATE compressing strategy <DEFLATE Level> |
DEFLATELEVEL |
|
Speed Standard Compression ratio |
✓ |
Selectable when DEFLATE is specified for Compression type |
|
Code Conversion |
KJCHNGE |
|
Sender side Receiver side None |
- |
|
|
EBCDIC encoding <EBCDIC Set> |
CODESET |
0 |
(*1) |
✓ |
|
|
Send File Mode |
CLEAR |
Keep |
Keep Clear Delete Lock |
✓ |
|
|
Receivers <Transfer Group ID> |
GRPID |
|
Alphanumeric characters |
- |
Within 50 bytes |
|
Pre-send Job ID |
PREJOBID |
|
Alphanumeric characters |
✓ |
Not supported by HULFT Square. |
|
Successful Job ID |
JOBID |
|
Alphanumeric characters |
✓ |
Not supported by HULFT Square. |
|
Unsuccessful Job ID |
EJOBID |
|
Alphanumeric characters |
✓ |
Not supported by HULFT Square. |
|
Interface DBID |
DBID |
|
CSV |
✓ |
Not supported by HULFT Square. |
|
Transmitting time interval <Transfer Interval> |
INTERVAL |
0 |
0–32760 |
✓ |
Unit: milliseconds |
|
Transfer task priority <Transfer Priority> |
TRANSPRTY |
50 |
1–256 |
- |
|
|
Transfer Block Length |
BLOCKLEN |
0 |
0, 128–65520 |
- |
Not supported by HULFT Square. |
|
Transfer Block Count |
BLOCKCNT |
0 |
0–99 |
- |
Not supported by HULFT Square. |
|
Add shift code in code conversion for MF-IBMi <Shiftcode Mode> |
SHIFTTRANSACT |
On |
On: Add shift codes Off: Don't add shift codes |
✓ |
|
|
Mandate longer encryption key length (*2) |
|
Not selected |
Not selected: Disabled Selected: Enabled |
✓ |
(Available beginning April 20, 2025) |
|
Encryption key <Cipher Key> |
PASSWORD |
|
Alphanumeric characters |
✓ |
8–20 bytes |
|
Encryption key <Cipher Key> |
PASSWORD |
|
Hexadecimal character string |
✓ |
(Available beginning April 20, 2025) |
|
✓ |
: |
Omittable |
|
- |
: |
Mandatory |
|
*1 |
: |
For details on the field, refer to Explanation of each field. |
|
*2 |
: |
Set the same mode as the one you specified for Mandate longer encryption key length in the Security category in HULFT TRANSFER APP. |
|
*3 |
: |
You can set this field if you didn't select the checkbox for Mandate longer encryption key length. |
|
*4 |
: |
You need to set this field if you selected the checkbox for Mandate longer encryption key length. |
This section explains the fields to be specified in a Send configuration. The parenthesized strings are the names of each field. You can use them as field tags in a parameter file when registering the information.
- Transfer name (SNDFILE)
-
Specify an ID to identify the file to send.
- Description (COMMENT)
-
Specify comments for the file to send.
- File to send (FILENAME)
-
Specify the file name of the send file stored in the HULFT Square storage by specifying the path including the workspace.
- File type (TRANSTYPE)
-
Select the data type of the file to send.
-
Binary
-
Text
-
- Compression type (COMP)
-
Select the compression type that is used when a file is transferred.
-
None
-
Horizontal
-
Vertical
-
DEFLATE
-
- Compression block size (COMPSIZE)
-
Specify the processing unit of records when compressing binary files.
The higher the value, the faster the processing speed (however, if you set a higher value, compression will require more memory).
You can't omit this field in the following cases:
-
When File type is Binary and Compression type is Horizontal
-
When File type is Binary and Compression type is Vertical
-
- DEFLATE compressing strategy (DEFLATELEVEL)
-
Select the compression level for DEFLATE compression.
This field can be set only if DEFLATE is specified for Compression type.
-
Speed
-
Standard
-
Compression ratio
Omitting this field sets Standard.
-
- Code Conversion (KJCHNGE)
-
Select the code conversion method for the file to send.
-
Sender side
-
Receiver side
-
None
-
- EBCDIC encoding (CODESET)
-
Select the Type-EBCDIC code set that is used to convert single-byte codes.
Specify the same EBCDIC set as that used on the receiving-side host (remote host).
-
Auto
-
EBCDIC Katakana
-
EBCDIC Lowercase
-
EBCDIC ASCII
-
EBCDIC ASPEN
-
IBM - Japan (Latin)
-
IBM - Japan (Latin) Extended
-
NEC Katakana
-
IBM - Japan (Katakana) Extended
-
Simplified Chinese Extended
-
User table 1
-
User table 2
-
User table 3
Omitting this field sets Auto.
This setting is valid when the host on the receiving side is a Type MF-IBMi host and when you specify sending-side conversion.
-
- Send File Mode (CLEAR)
-
Specify the mode for exclusive control of the send file applied during the sending, and the handling of the file in the case where the sending ends successfully.
-
Keep
Don't lock the file while sending is in progress. The file is saved after the sending ends successfully.
-
Clear
Lock the file while sending is in progress. After the sending ends successfully, the file is cleared and the size of the file becomes 0 bytes.
-
Delete
Lock the file while sending is in progress. The file is deleted after the sending ends successfully.
-
Lock
Lock the file while sending is in progress. The file is saved after the sending ends successfully.
Omitting this field sets Keep.
-
- Receivers (GRPID)
-
Specify the ID of the record in which the send destination of the send file is registered.
For details on host group IDs, refer to Host Group Info.
- Transmitting time interval (INTERVAL)
-
Specify the interval per transfer unit (transfer block length x transfer block count).
Omitting this field sets "0."
- Transfer task priority (TRANSPRTY)
-
Specify the priority in the queue that is used when the file transfer starts.
A smaller number means a higher priority.
- Add shift code in code conversion for MF-IBMi (SHIFTTRANSACT)
-
Specify how to handle the shift code when code conversion to a Type MF-IBMi host is performed.
-
On
Add shift codes.
-
Off
Don't add shift codes.
Omitting this field sets On.
-
- Mandate longer encryption key length
-
Specify whether to handle the encryption key as a high-strength encryption.
Specify the same mode as the one you specified for Mandate longer encryption key length in the Security category in HULFT TRANSFER APP.
-
Not selected
Disables Mandate longer encryption key length. The encryption key will not be handled as a high-strength encryption.
-
Selected
Enables Mandate longer encryption key length. The encryption key will be handled as a high-strength encryption.
-
- Encryption key (PASSWORD) (when Mandate longer encryption key length is disabled)
-
Specify a key to encrypt the data.
You can apply security to the file to send. Specify the same key as the encryption key that is specified in the Receive configurations of the remote host.
If you omit this field, the file can't be encrypted.
- Encryption key (PASSWORD) (when Mandate longer encryption key length is enabled)
-
Specify the key for decrypting data.
You can apply security to the file to send. Specify the same key as the encryption key that is specified in the Receive configurations of the remote host.
Be sure to specify a value for Encryption key. A transfer error occurs if Mandate longer encryption key length isn't set on the sending side.
- Next
-
Displays the next page.
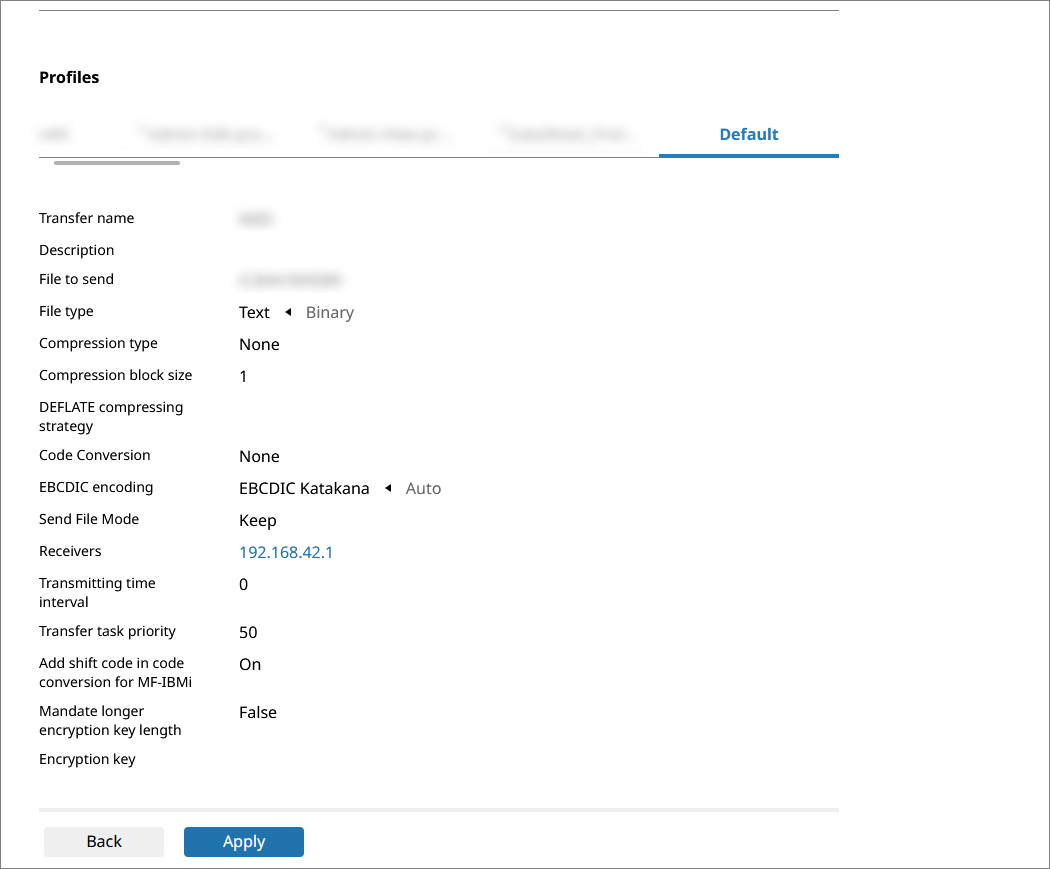
Send Configs > Send configuration name
On the Send Configs page, select Information from the action menu in the list of settings to open this page.
You can view detailed information about the selected Send configuration.
- (1) Send configuration name
-
In Send configuration name, the name of the Send configuration is displayed.
- (2) Profiles
-
Profiles for which you have the access permission are displayed in a list.
You can set the Send configuration for each profile.
- (3) Receivers
-
The host group ID that has been set is displayed. Selecting the link moves to the Host Group Info > Name of the record in the Host group information page.
- (4) Edit
-
You can edit the Send configuration.
Selecting the Send configuration from Copy Configuration From enables you to copy the Send configuration settings that have been configured.
After editing the settings, select Preview and check that the setting items are appropriate. If there are no problems, select Apply.
- (5) Change ownership
-
Changes the ownership of the selected Send configuration to another member. When you change the owner, the value of Author changes.
In order to change the ownership, in addition to permission to view the Send configuration, you need the permission ChangeOwnership.
- (6) Delete
-
Deletes all the settings of the Send configuration.