Receive Configs
Specify the detailed information for the file to be received with the HULFT Transfer App service.
The transfer function of HULFT Transfer Application enables you to transfer files with more detailed settings than HULFT Transfer services.
Select HULFT Transfer Application or HULFT Transfer services according to your needs.
You can configure Receive configurations by selecting  > HULFT TRANSFER APP > Receive Configs in the navigation menu, or by using HULFT Transfer Migration.
This section explains the key points about setting Receive configurations.
Points for settings
To create a new Receive configuration, select Add on the Receive Configs page and enter transfer information.
The maximum number of Receive configuration records that can be registered is 10,000.
To set Receive configurations, either one of the following permissions is required:
-
AppTransferReceiveConfigFullAccess
-
AppTransferReceiveConfigEditAccess
This section explains the screen transitions from the Receive Configs page and functions such as creating and deleting Receive configurations.
For the names and functions of the basic UI elements and other items of HULFT Square, refer to the following topic:
Receive Configs
To open this page, select > HULFT TRANSFER APP > Receive Configs in the navigation menu.
- (1) Add
-
Select this icon to create and set up a new Receive configuration.
For details about how to set Receive configurations, refer to Receive Configs> Add.
- (2) List of settings
-
The information about Receive configurations that have been created is displayed in tabular form.
- (3) Action menu
-
Select this icon to perform operations for Receive configurations that have been created.
Selecting
 shows the menu of operations below.
- Information
-
Displays detailed information about the selected Receive configuration. You can edit or delete the Receive configuration that is displayed.
When you select this menu item, Receive Configs > Receive configuration name is opened.
- Delete
-
Deletes the selected Receive configuration.
On the Receive Configs page, select Add to open this page.
To create a new Receive configuration, set information for the Receive configuration by following the wizard-style pages step by step.
Step General
- Name
-
Specify the name of the Receive configuration.
- Description
-
Specify comments to explain the Receive configuration that you want to set.
- Next
-
Displays the next page.
Step Profile
- Profile
-
Select a profile to link with the Receive configuration.
- Next
-
Displays the next page.
Step Configuration
You can register information about the file to receive.
Field list
This section explains the fields to be specified in HULFT Transfer Application.
The grayed-out rows in the table below indicate the fields that are supported by HULFT only. HULFT Transfer Application doesn't support these fields. Use this information to check compatibility with HULFT.
|
Field value |
Default value |
Setting value |
Optional |
Remarks |
|
|---|---|---|---|---|---|
|
Screen <HULFT screen> |
File |
||||
|
Transfer name <File ID> |
RCVFILE |
|
Uppercase alphanumeric characters |
- |
Within 50 bytes |
|
Description <Comment> |
COMMENT |
|
Characters |
✓ |
Within 60 bytes |
|
File to receive <Receive File Name> |
FILENAME |
|
Alphanumeric characters |
- |
Within 200 bytes |
|
Owner Name |
OWNER |
|
Alphanumeric characters |
✓ |
Not supported by HULFT Square. |
|
Group Name |
GROUP |
|
Alphanumeric characters |
✓ |
Not supported by HULFT Square. |
|
Permission |
PERM |
|
0, 1 |
✓ |
Not supported by HULFT Square. |
|
File receiving option <Registration Mode> |
TRANSMODE |
|
New Replace Append |
- |
|
|
Error handling <Error Handling> |
ABNORMAL |
|
Delete Keep Restore |
- |
|
|
Receive Mode |
RCVTYPE |
|
S, M |
- |
Not supported by HULFT Square. |
|
File backup <Generational Management> |
GENCTL |
Not selected |
Not selected: Generational management is disabled Selected: Generational management is enabled |
- |
Not supported by HULFT Square. |
|
No. of version history <No. of Generations> |
GENMNGNO |
|
0, 2–9999 |
✓ |
Not supported by HULFT Square. |
|
EBCDIC encoding <EBCDIC Set> |
CODESET |
0 |
(*1) |
✓ |
|
|
Successful Job ID |
JOBID |
|
Alphanumeric characters |
✓ |
Not supported by HULFT Square. |
|
Unsuccessful Job ID |
EJOBID |
|
Alphanumeric characters |
✓ |
Not supported by HULFT Square. |
|
Transaction <Notification> |
JOBWAIT |
Transfer |
Transfer Job |
✓ |
(Available beginning April 20, 2025) |
|
Notification level (*2) |
|
Component |
Job Script Component |
✓ |
(Available beginning April 20, 2025) |
|
Senders <Transfer Group ID> |
GRPID |
|
Alphanumeric characters |
- |
Within 50 bytes |
|
Verify received file <Verify Data> |
DATAVERIFY |
Not selected |
Not selected: Don't verify data Selected: Verify data |
✓ |
|
|
Mandate longer encryption key length (*3) |
|
Not selected |
Not selected: Disabled Selected: Enabled |
✓ |
(Available beginning April 20, 2025) |
|
Encryption key <Cipher Key> |
PASSWORD |
|
Alphanumeric characters |
✓ |
8–20 bytes |
|
Encryption key <Cipher Key> |
PASSWORD | Hexadecimal character string |
✓ |
(Available beginning April 20, 2025) |
|
|
✓ |
: |
Omittable |
|
- |
: |
Mandatory |
|
*1 |
: |
For details on the field, check Explanation of each field. |
|
*2 |
: |
You can set this field if you selected Job for Transaction. |
|
*3 |
: |
Set the same mode as the one you specified for Mandate longer encryption key length in the Security category in HULFT TRANSFER APP. |
|
*4 |
: |
You can set this field if you didn't select the checkbox for Mandate longer encryption key length. |
|
*5 |
: |
You need to set this field if you selected the checkbox for Mandate longer encryption key length. |
This section explains the fields to be specified in a Receive configuration. The parenthesized strings are the names of each field. You can use them as field tags in a parameter file when registering the information.
- Transfer name (RCVFILE)
-
Specify an ID to identify the file to receive.
- Description (COMMENT)
-
Specify comments for the file to receive.
- File to receive (FILENAME)
-
Specify the file name of the receive file stored in the HULFT Square storage by specifying the path including the workspace.
- File receiving option (TRANSMODE)
-
Select the registration method for the file to receive.
-
New
Creates a new receive file.
An error occurs if a file with the same name already exists.
-
Replace
Replaces the existing file contents with the received data.
If the file doesn't exist, a new receive file is created.
-
Append
Appends the received data to the end of the existing file.
If the file doesn't exist, a new receive file is created.
When Append is specified for File receiving option, if a problem occurs during receiving, the receive data up to the point where the error occurred will be appended to the file.
-
- Error handling (ABNORMAL)
-
Select the handling method for the receive file when the receiving-side transferring fails.
-
Delete
Deletes the receive file.
-
Keep
Keeps the receive file as it is when the receiving-side transferring fails.
-
Restore
Backs up the receive file before the receiving-side transferring starts and restores the backup file if the receiving-side transferring fails.
If the receive file doesn't exist before the receiving-side transferring starts, the operation is performed in the same way as when you specify Delete.
-
- EBCDIC encoding (CODESET)
-
Select the Type-EBCDIC code set that is used to convert single-byte codes.
Specify the same EBCDIC set as that used on the sending-side host (remote host).
-
Auto
-
EBCDIC Katakana
-
EBCDIC Lowercase
-
EBCDIC ASCII
-
EBCDIC ASPEN
-
IBM - Japan (Latin)
-
IBM - Japan (Latin) Extended
-
NEC Katakana
-
IBM - Japan (Katakana) Extended
-
Simplified Chinese Extended
-
User table 1
-
User table 2
-
User table 3
Omitting this field sets Auto.
This setting is valid when the host on the sending side is a Type MF-IBMi host and when you specify receiving-side conversion.
-
- Transaction (JOBWAIT)
-
Specify the type of the receive completion notification sent to the host on the sending side.
-
Transfer
Sends a notification upon completion of the receive processing.
-
Job
Sends a notification upon completion of the successful job (job to be executed in a normal situation) after the receive processing.
= Remarks =For HULFT Square, if Job is selected for Transaction (JOBWAIT), in addition to the job completion notification, the Job Execution Result Notification command (hulsndrc) is executed to relay the detailed job execution result.
NoteThe Job Execution Result Notification command (hulsndrc) behaves differently depending on the secure connection type of the network.
-
VPN
Returns notifications to the sending side just like the job completion notifications of on-premises HULFT. -
PrivateLink
Returns notifications to the Outbound side. Note that when using a relay for transfer, notifications are sent to the transfer destination.
-
- Notification level
-
Specify the level for job execution notifications.
You can set this field only if you selected Job for Transaction (JOBWAIT).
-
Job
Sends a notification containing the application name and whether the script was successful.
-
Script
Sends a notification containing the application name, whether the script was successful, and the script name.
-
Component
Sends a notification containing the application name, whether the script was successful, the script name, the component name, and the error message.
-
- Senders (GRPID)
-
Specify the host group ID of the receive file.
For details on host group IDs, refer to Host Group Info.
- Verify received file (DATAVERIFY)
-
Specify whether to verify data of the file to receive.
-
Not selected
Don't verify data.
-
Selected
Verify data.
When you omit this field, data verification isn't performed.
-
- Mandate longer encryption key length
-
Specify whether to handle the encryption key as a high-strength encryption.
Specify the same mode as the one you specified for Mandate longer encryption key length in the Security category in HULFT TRANSFER APP.
-
Not selected
Disables Mandate longer encryption key length. The encryption key will not be handled as a high-strength encryption.
-
Selected
Enables Mandate longer encryption key length. The encryption key will be handled as a high-strength encryption.
-
- Encryption key (PASSWORD) (when Mandate longer encryption key length is disabled)
-
Specify the key for decrypting data.
Specify this field to decrypt the encrypted data.
Specify the same key as the encryption key that is specified in the Send configurations of the remote host. If you set a different encryption key, the data isn't decrypted correctly.
The setting of the encryption key on the host on the receiving side is ignored when the field is not specified in the Send configurations of the host on the sending side, even if this field is specified on the host on the receiving side.
- Encryption key (PASSWORD) (when Mandate longer encryption key length is enabled)
-
Specify the key for decrypting data.
Specify this field to decrypt the encrypted data.
Specify the same key as the encryption key that is specified in the Send configurations of the remote host. If you set a different encryption key, the data isn't decrypted correctly.
Be sure to specify a value for Encryption key. A transfer error occurs if Mandate longer encryption key length isn't set on the sending side.
- Next
-
Displays the next page.
Receive Configs > Receive configuration name
On the Receive Configs page, select Information from the action menu in the list of settings to open this page.
You can view detailed information about the selected Receive configuration.
- (1) Receive configuration name
-
In Receive configuration name, the name of the Receive configuration is displayed.
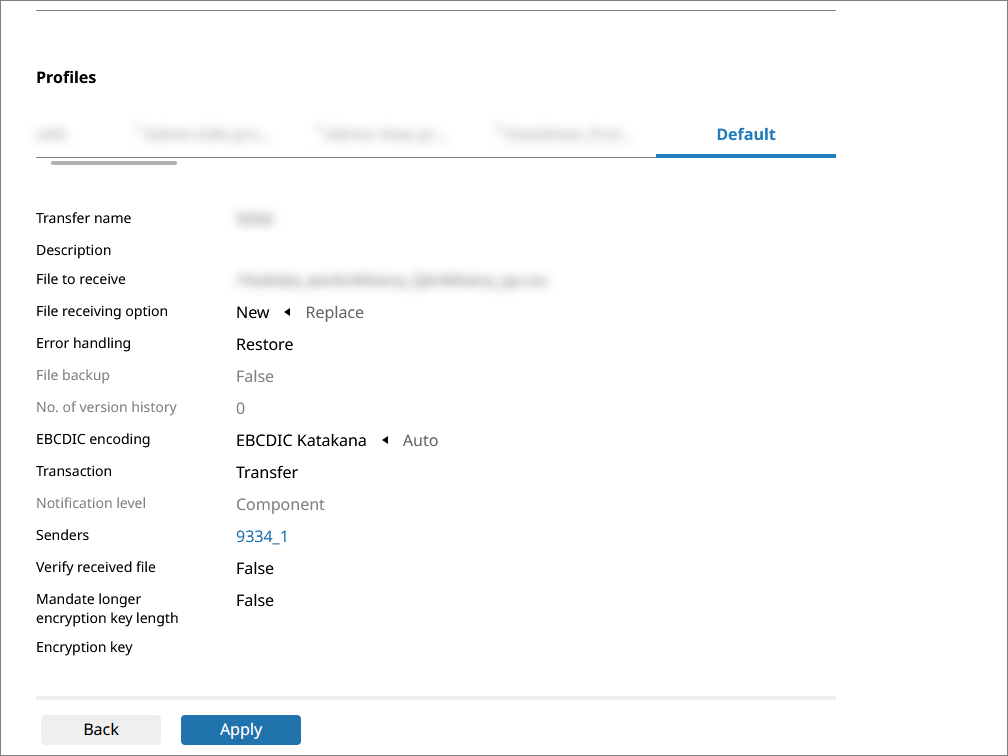
- (2) Profiles
-
Profiles for which you have the access permission are displayed in a list.
You can set the Receive configuration for each profile.
- (3) Senders
-
The host group ID that has been set is displayed. Selecting the link moves to the Host Group Info > Name of the record in the Host group information page.
- (4) Edit
-
You can edit the Receive configuration.
Selecting the Receive configuration from Copy Configuration From enables you to copy the Receive configuration settings that have been configured.
After editing the settings, select Preview and check that the setting items are appropriate. If there are no problems, select Apply.
- (5) Change ownership
-
Changes the ownership of the selected Receive configuration to another member. When you change the owner, the value of Author changes.
In order to change the ownership, in addition to permission to view the Receive configuration, you need the permission ChangeOwnership.
- (6) Delete
-
Deletes all the settings of the Receive configuration.