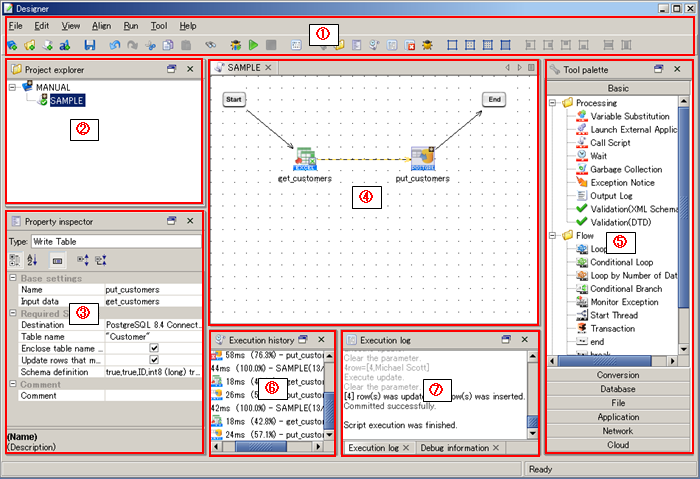
| Number in the image |
Name |
Description |
Remarks |
| (1) |
Menu |
Various menus and tools to perform basic operations in Designer are placed here. |
|
| (2) |
Project explorer |
Create projects, scripts and folders, and execute scripts here. |
|
| (3) |
Property inspector |
Configure various component icons on the script canvas here. |
|
| (4) |
Script canvas |
Place various component icons on the script canvas, and create flows by dragging and dropping them. |
|
| (5) |
Tool palette |
Component icons that are needed for creating flows on the script canvas are listed here. |
|
| (6) |
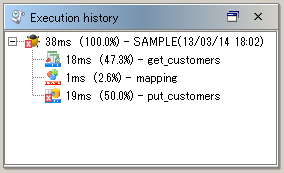
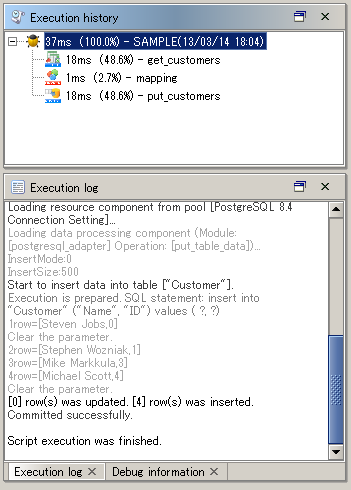
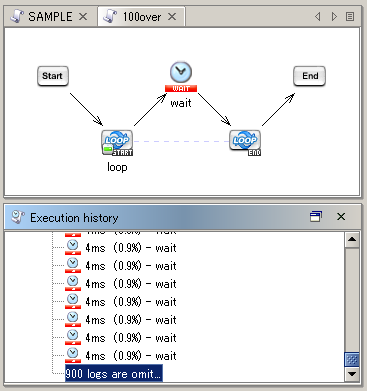
Execution history |
When a script is executed in debug mode, the processing time for the entire script and each component, and the processing ratio (%) for each component will be displayed here. |
|
| (7) |
Execution log |
An execution log will be displayed here when a script is executed in debug mode. |
- The log details will change depending on the Log Level.
|
| Debug information |
Values of script variables will be displayed here when a script is executed in debug mode. |
|
| Error log details |
Error details will be displayed here when a script is executed in debug mode. |
|
| Item name |
Description |
Remarks |
| New |
Project |
Create a new project. |
|
| Folder |
Create a new folder. |
|
| Script |
Create a new script. |
|
| Script variable |
Create a new “script variable”. |
|
| Open project |
Open an existing project. |
|
| Save project |
Save the project. |
 There are notes on saving projects. There are notes on saving projects.
 Refer to “Notes” for details. Refer to “Notes” for details. |
| Rename project |
Change the project name. |
|
| Close project |
Close the project. |
|
| Team development |
Commit |
Commit the local project to the server project.
Changes that collide will be detected as conflicts.
|
-
Displayed only when the team development function is enabled.
Refer to “Team Development” for more details.
|
| Update |
Update the local project with the server project.
Changes that collide will be detected as conflicts.
|
| Overwrite project with latest server version |
Discard the local project and overwrite with the latest server version. |
| Resolve project conflicts |
Menu related to resolving project conflicts will be displayed.
- [Check project conflict information]:
Open the project conflict information dialog.
- [Overwrite project with latest server version]:
Discard the local project and overwrite with the latest server version.
- [Prioritize local project]:
Prioritize the local project and resolve the project conflicts. You will be able to commit to the server after this.
- [Overwrite custom logic with latest server version]:
Overwrite the local project's custom logic with the latest server version and update the project.
- [Prioritize local custom logic]:
Prioritize the local custom logic and update the project.
|
| Register project as service |
Register the project you created to the server.
You can execute the projects registered to the server from triggers, ScriptRunner, or external systems. |
|
| Generate project specifications |
Generate project specifications in HTML format in the client OS local file system. |
|
| Close editor |
Close the “Script canvas” or “Mapper editor”. When multiple editors are opened, only the active editor will be closed. |
|
| Close all editors |
Close all the opened editors. |
|
| Properties |
Open the property dialog. |
|
| Exit |
Exit Designer. |
|
| Item name |
Description |
Remarks |
| Undo |
Cancel the last editing action and revert the script back to the previous status. |
- For details on the specification limits of Undo/Redo function, refer to here.
|
| Redo |
Re-execute the operation that was canceled with “Undo”. |
| Cut |
Cut the selected script or icons. |
|
| Copy |
Copy the selected script or icons. |
|
| Paste |
Paste the copied script or icons. |
|
| Delete |
Delete the selected script or icons. |
|
| Select all |
Select all the scripts or icons. |
|
| Search |
Open “Search component” dialog to search for components in the project currently opened. |
- If you press the Enter key in "Search component" dialog, it will close without searching.
Press [Search] button to search.
|
| Item name |
Description |
Remarks |
| Show process flow |
Show/Hide process flow (black line) on the script canvas. |
|
| Show PSP data flow |
Show/Hide PSP data flow (yellow thick line) on the script canvas. |
|
| Hide grid |
Hide grid on the script canvas. |
|
| Show 32x32 grid |
Display a 32x32 grid on the script canvas. |
|
| Show 16x16 grid |
Display a 16x16 grid on the script canvas. |
|
| Show 8x8 grid |
Display a 8x8 grid on the script canvas. |
|
| Show tool palette |
Show/Hide “Tool palette”. |
|
| Show project explorer |
Show/Hide “Project explorer”. |
|
| Show property inspector |
Show/Hide "Property inspector". |
|
| Show execution history |
Show/Hide “Execution history”. |
|
| Show build errors |
Show/Hide “Build errors”. |
- It is not displayed by default.
|
| Show execution log |
Show/Hide “Execution log”. |
|
| Show error log details |
Show/Hide “Error log details”. |
- It is not displayed by default.
|
| Show debug information |
Show/Hide “Debug information”. |
|
| Show test data view |
Show/Hide “Test Data View”. |
- It is not displayed by default.
|
| Show test result view |
Show/Hide “Test Result View”. |
- It is not displayed by default.
|
| Sort icon |
|
Sort the icons that are directly under the selected project/folder in project explorer.
They will not be sorted recursively, but the ones that are directly under the selected icon will be sorted.
|
|
| Name |
Sort the icons by name. |
|
| Date created |
Sort the icons by time created. |
|
| Date modified |
Sort the icons by time modified. |
|
| Initialize layout |
Reset the views/editors to its default state. |
|
| Maximize current view/editor |
Enlarge the selected frame to the maximum display size in Designer. |
|
| Switch editor |
Switch between the editors deployed on the script canvas. |
|
| Switch view |
Switch between the frames displayed in Designer. |
|
| Item name |
Description |
Remarks |
| Align left |
Align the selected icons to left.
If you align left, the x-axis of the selected icons will be aligned to the leftmost icon. |
|
| Align right |
Align the selected icons to right.
If you align right, the x-axis of the selected icons will be aligned to the rightmost icon. |
|
| Align top |
Align the selected icons to top.
If you align top, the y-axis of the selected icons will be aligned to the topmost icon. |
|
| Align bottom |
Align the selected icons to bottom.
If you align bottom, the y-axis of the selected icons will be aligned to the bottommost icon. |
|
| Align horizontally |
Align the selected icons horizontally at equal intervals. |
|
| Align vertically |
Align the selected icons vertically at equal intervals. |
|
| Item name |
Description |
Remarks |
| Start/Restart debug |
Execute the script in debug mode. The script will operate as follows.
- The operation will pause at an icon on which a breakpoint is set.
- Restart the operation when the script is paused at a breakpoint.
- The processing time for each icon will be displayed in execution history.
|
- There are notes on script execution.
Refer to “Notes” for details.
- Do not close Designer when the script is paused at a breakpoint. Restart the operation and end the script before closing Designer.
|
| Run |
Execute the script. The script will operate as follows.
- Even if breakpoints are set on icons in the script, the processing will operate until the END icon without pausing.
- The processing time for each icon will not be displayed in execution history.
|
- There are notes on script execution.
Refer to “Notes” for details.
|
| Stop |
Stop the script under execution. |
 It might take some time to stop the script. It might take some time to stop the script. |
| Build |
Compile the script. When validation on build is enabled, the script will be validated. |
|
| Set/Release breakpoint |
Set/Release breakpoints on the icons selected in the script canvas. |
|
| Release all breakpoints |
Release all the breakpoints set on icons in the script canvas. |
|
| Category |
Item name |
Description |
Remarks |
| Execution type |
Specify type |
Select whether or not to specify “Type” for script execution in Designer.
- [Checked]:
Specify type.
- [Not checked]: (default)
Do not specify type.
|
|
| Specify type for execution |
Select or enter a type for script execution in Designer. |
- Default value is “For test”.
- Enabled when [Specify type] is [Checked].
- User specified types will not appear in the drop-down list. Enter one of them directly in the input field.
Refer to User Specified Types for more details.
- If you click [OK] without inputting anything, [Specify type] will automatically be unchecked.
|
| Use default type when specified type is not found |
Select whether or not to use the default type when the specified type global resource is not found.
- [Checked]:
Use default type.
- [Not checked]: (default)
“PoolNotDefinedException” error will occur.
|
- Enabled when [Specify type] is [Checked].
|
| Display confirmation dialog when executing with types other than default |
Select whether or not to display the confirmation dialog before executing with types other than default.
- [Checked]: (default)
Confirmation dialog will appear.
- [Not checked]:
Confirmation dialog will not appear.
|
|
| Log |
XML log |
Select whether or not to output “XML log” when executing a script from Designer.
- [Checked]: (default)
Output XML log.
- [Not checked]:
Do not output XML log.
|
|
| Log level |
Select log level to output when a script is executed from Designer.
- [NOTICE]:
- [INFO]: (default)
- [FINFO]:
- [FINEST]:
- [DEBUG]:
|
|
| Build options |
Validation on build |
Select whether or not to perform validation when building the script.
- [Checked]:
Validation will be performed.
- [Not checked]: (default)
Validation will not be performed.
|
- If the validation fails when building a script in Designer, a build error will occur.
- If the validation fails when registering a project as service, the script will be displayed in red in the “Compare service details” screen.
- The following component will be validated.
|
| Category |
Item name |
Description |
Remarks |
| General |
Number of history stored for recently used projects |
Specify the number of history stored for recently used projects you want to display when opening the project. |
|
| Clear history |
Clear history of recently used projects. |
|
| Edit script |
Display mapping creation dialog when creating data flow |
Select whether or not to display the mapping creation dialog when creating a data flow.
- [Checked]: (default)
Mapping creation dialog will appear.
- [Not checked]:
Mapping creation dialog will not appear.
|
|
| Register service |
Display commit confirmation dialog when registering service |
Select whether or not to display the commit confirmation dialog when registering a service.
- [Checked]: (default)
Commit confirmation dialog will appear.
- [Not checked]:
Commit confirmation dialog will not appear.
|
-
Displayed only when the team development function is enabled.
Refer to “Team Development” for more details.
|
| Smart Compiler |
Use Smart Compiler when creating data flow |
Select whether or not to use Smart Compiler when creating data flow.
- [Checked]: (default)
Use Smart Compiler.
- [Not checked]:
Do not use Smart Compiler.
|
|
 Project auto-saving Project auto-saving |
Enable project auto-saving |
Select whether or not to save projects automatically.
- [Checked]: (default)
Projects will be auto-saved.
- [Not checked]:
Projects will not be auto-saved.
|
|
| Time until the start of auto-saving |
Specify the time (min) until the start of project auto-saving. |
- Enabled when [Enable project auto-saving] is [Checked].
- Default value is 15.
- You can specify the value within the range of 10 to 25.
|
| Item name |
Description |
Remarks |
| New |
Create a new folder or script in the project. |
|
| Paste |
Paste the copied folder or script. |
|
| Delete |
Delete the selected project. |
|
| Sort icon |
Sort icons that are directly under the selected project in the specified order. |
|
| Close project |
Close the selected project. |
|
| Team development |
Commit |
Commit the local project to the server project.
Changes that collide will be detected as conflicts.
|
-
Displayed only when the team development function is enabled.
Refer to “Team Development” for more details.
|
| Update |
Update the local project with the server project.
Changes that collide will be detected as conflicts.
|
| Overwrite project with latest server version |
Discard the local project and overwrite with the latest server version. |
| Resolve project conflicts |
Menu related to resolving project conflicts will be displayed.
|
| Register project as service |
Register the selected project as service to the server. |
|
| Restore project from server |
The project will be restored by referring to the version name, the user, and time of modification from backup files. |
|
| PSP data flow operation |
Enable at once |
Alter the changeable data flows that are in the scripts of the selected project to PSP data flows.
|
|
| Disable at once |
Change the PSP data flows in the scripts of the selected project to PSP data flows. |
| Generate project specifications |
Generate project specifications in HTML format in the client OS local file system. |
|
| Item name |
Description |
Remarks |
| New |
Create a new script variable to use in the selected script. |
|
| Open |
Open the selected script in the script canvas. |
|
| Cut |
Cut the selected script. |
|
| Copy |
Copy the selected script. |
|
| Paste |
Paste the cut/copied script. |
|
| Delete |
Delete the selected script. |
|
| Lock script |
Lock the selected script for the currently logged in user. |
|
| Unlock script |
Unlock the script. |
- Unlocking can be done by the following users.
- User with administrator rights
- Lock owner (user who locked the script)
- User with write permission for project
|
| Find script usages |
Find scripts which call the selected script. The following are searched.
- The project which contains the selected script
- Other projects
- Services
|
-
Names of other projects are displayed in the following formats.
- Normal project: <user name>@<project name>
- Shared project: <project name> (shared)
-
When the team development function is enabled, projects committed to the server are searched for other projects. Projects saved in your local system are not searched.
|
| Team development |
Overwrite script with latest server version |
Discard the local edits and overwrite them with the latest server version. |
-
Displayed only when the team development function is enabled.
Refer to “Team Development” for more details.
|
| Restore from local history |
Restore the script from local history. |
| Resolve script conflicts |
Menu related to resolving script conflicts are displayed.
|
| Output XML for executing script |
Output a ScriptRunner launch settings file to the client OS local file system. |
- The ssl element will not be output. Set it manually.
 If a password is encrypted in Studio, it can be decrypted only by the ScriptRunner of the client that encrypted the password. If a password is encrypted in Studio, it can be decrypted only by the ScriptRunner of the client that encrypted the password.- If encrypted in Studio for Web, it can only be decrypted by the ScriptRunner on the server.
|
| Restore script from server |
The script will be restored by referring to the version name, the user, and time of modification from backup files. |
|
| PSP data flow operation |
Enable at once |
Alter the changeable data flows in the selected script to PSP data flows.
|
|
| Disable at once |
Change the PSP data flows in the selected script to data flows. |
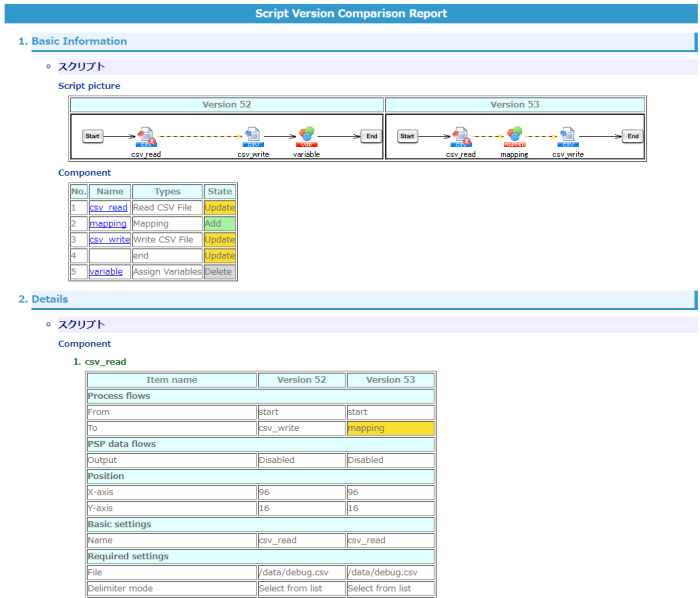
| Output version comparison report |
Compare two versions of scripts and output the difference report. |
|
| Generate script specifications |
Generate script specifications in HTML format in the client OS local file system. |
|
| Properties |
Open “Script properties”. |
|
| Item name |
Description |
Remarks |
| Variable name |
Enter variable name. |
|
| Variable type |
Select variable type.
- [String]: (default)
- [Integer]:
- [Decimal]:
- [Date/Time]:
- [Boolean]:
- [Binary]:
- [XML]:
|
- For details on each variable type, refer to “Script Variables”.
- Variables defined in XML type cannot be changed to other types. Also, variables defined in types other than XML type cannot be changed to XML type.
|
| Initial value |
Enter the initial value of variable. |
|
| Use as script input variable |
- [Checked]:
Set the script variable as an input variable.
- [Not checked]: (default)
Do not set the script variable as an input variable.
|
- You can also set this from [Input/Output] tab in script properties.
|
| Required |
- [Checked]:
Set the script input variable as required.
- [Not checked]: (default)
Do not set the script input variable as required.
|
- Enabled when [Use as script input variable] is checked.
|
| Use as script output variable |
- [Checked]:
Set the script variable as an output variable.
This will allow scripts outside the script to refer to the variable.
- [Not checked]: (default)
Do not set the script variable as an output variable.
|
- You can also set this from [Input/Output] tab in script properties.
|
| Item name |
Description |
Remarks |
| Conflict information |
Conflict information of local and server scripts are displayed. |
- Displayed only when the team development function is enabled and when a script conflict has occurred.
Refer to “Team Development” for more details.
|
| Last modified date/time of server project |
Last saved date/time of the server project. |
|
| User who last modified server project |
User who last committed to the server project. |
|
| Comment |
Comments on the latest version of the server project. |
|
| Last modified date/time of local project |
Last saved date/time of the local project. |
|
| Lock status |
Displays the lock status of the script.
The status will appear as “Locked.” when the script is locked, and as “Not locked.” when the script is not locked. |
|
| Lock owner |
Displays the user name of the lock owner. |
- Displayed when [Lock status] is “Locked”.
|
| Lock owner's host |
Displays the host name / IP address of the client of the lock owner. |
- Displayed when [Lock status] is “Locked”.
|
| Time when lock was acquired |
Displays the time when the lock was acquired. |
- Displayed when [Lock status] is “Locked”.
|
| Item name |
Description |
Remarks |
| Output destination |
Enter the directory path on the client OS local file system to output the specifications.
You can click [Browse] button to launch the directory chooser and find the directory. |
- Refer to “OS Local File System” for more details.
- In Studio for Web, the specifications will be compressed and downloaded as a ZIP file.
|
| Open in browser |
Select whether to open the specifications in browser after output. |
- Default browser of the client OS will be opened.
- In Studio for Web, the downloaded ZIP file will be extracted to the output destination.
|
| Display PSP data flow |
Select whether or not to display PSP data flow.
- [Checked]:
Output PSP data flow in a yellow thick line.
- [Not checked]: (default)
Output PSP data flow in a yellow dotted line.
|
|
| Expand nodes with no mapping links |
Select whether or not to expand child nodes of “Input data”, “Input document”, and “Output data” with no mapping links in the mapping canvas.
- [Checked]: (default)
Expand nodes with no mapping links.
- [Not checked]:
Do not expand nodes with no mapping links.
|
- As for “Input document” of Variable Mapper, even if this item is [Checked], only the schemas that include nodes with mapping links will be expanded.
- As for the child nodes of “Component variables” and “Script variables”, only nodes with mapping links will be expanded regardless of whether this item is checked or not.
|
| Output metrics |
Select whether or not to output metrics in the specifications.
- [Checked]:
Output metrics in the specifications.
- [Not checked]: (default)
Do not output metrics in the specifications.
|
- When generating project specifications, metrics of the project and each script will be output. When generating script specifications, metrics of the script will be output.
- The following four types of metrics will be output for a project and each script.
- Component icons
- Mapper total
- Each Mapper
- Custom logics
- The number of “Mapping links” output in “Mapping items” of “Mapper total” and “Each Mapper” shows the sum total of solid and dotted mapping links.
|
| Item name |
Description |
Remarks |
| Version list |
Script versions are listed.
Select the two versions to be compared with Ctrl+click. |
- The list is in time order. The latest version will be the top of the list.
- When opening dialog, the latest version and the next one are selected.
|
| Output directory |
Enter the directory path on the client OS local file system to output the comparison result.
You can click [Browse] button to launch the directory chooser and find the directory. |
- Refer to “OS Local File System” for more details.
- In Studio for Web, the reports will be compressed and downloaded as a ZIP file.
|
| Open in browser |
Select whether to open the specifications in browser after output. |
- Default browser of the client OS will be opened.
- In Studio for Web, the downloaded ZIP file will be extracted to the output directory.
|
| Item name |
Contents output |
Remarks |
| Script settings |
When you edited the script settings, the following information will be output.
- Transaction attribute
- Mass data processing
- Comment
- Script variable list
|
- The following setting changes are not detected as modification.
- Change in “Test execution” tab of script properties
- Change in grid settings
|
| Script variables |
Add / Update / Delete of script variable are output.
You can see the detailed information of each script variable in “Details” section. |
- Script variables are compared based on internal IDs. Therefore, changing names is detected as “Update”.
|
| Script picture |
Script picture is output. |
|
| Components |
Add / Update / Delete of component icons are output.
You can see the detailed information of each component icon in “Details” section. |
- Component icons are compared based on internal IDs. Therefore, changing names is detected as “Update”.
- Although the following modifications on component icons may be detected as “Update”, the details will not be output.
- Set/Release breakpoint
- [Move up evaluation order] or [Move down evaluation order] of Conditional Branch operation's [Condition].
- [Move up evaluation order] or [Move down evaluation order] of Monitor Exception operation's [Catch].
- Association with components, minimize/maximize, changing size, [Set font color], or [Set background color] of Memo
|
| Item name |
Description |
Remarks |
| Set/Release breakpoint |
Set/Release breakpoint on the selected icon. |
|
| Cut |
Cut the selected icon. |
|
| Copy |
Copy the selected icon. |
|
| Delete |
Delete the selected icon. |
|
| Align |
Align left |
Align the selected icons to left.
If you align left, the x-axis of the selected icons will be aligned to the leftmost icon. |
|
| Align right |
Align the selected icons to right.
If you align right, the x-axis of the selected icons will be aligned to the rightmost icon. |
|
| Align top |
Align the selected icons to top.
If you align top, the y-axis of the selected icons will be aligned to the topmost icon. |
|
| Align bottom |
Align the selected icons to bottom.
If you align bottom, the y-axis of the selected icons will be aligned to the bottommost icon. |
|
| Align horizontally |
Align the selected icons horizontally at equal intervals. |
|
| Align vertically |
Align the selected icons vertically at equal intervals. |
|
| Global schema |
Register input schema |
Register the input schema of the selected icon as global schema. |
|
| Register output schema |
Register the output schema of the selected icon as global schema. |
|
| Properties |
Open the properties screen of the selected icon. |
|
| Help |
Open the help page of the selected icon. |
|