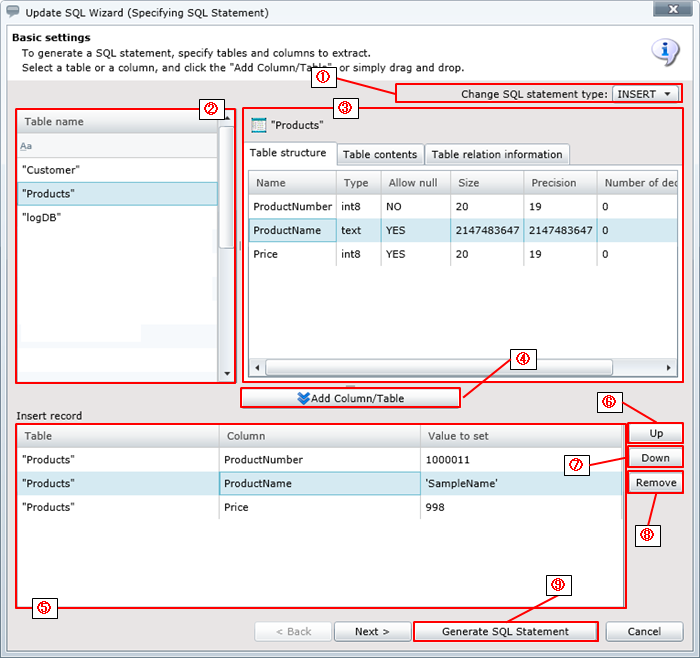
| Numbering in the figure |
Name |
Description |
Remarks |
| (1) |
Change SQL statement type |
Specifies SQL statement type.
- [INSERT]:(default)
Insert data.
- [UPDATE]:
Update data.
- [DELETE]:
Delete data.
|
|
| (2) |
Table list view |
Display a list of tables. |
- The maximum number of tables listed is determined by Global Resource settings.
|
| (3) |
Table Information pane |
Displays the information on the selected table. |
- Displays table structures, table data, and table related information
 For information displayed in the [Table structure] tab, refer to Table structure. For information displayed in the [Table structure] tab, refer to Table structure.- For information displayed in the [Table contents] tab, refer to Table contents.
- For information displayed in the [Table relation information], refer to Table relation information.
|
| (4) |
Add Column/Table |
Add the column selected in the [Table structure] tab in the Table Information Pane to the Insert Column Editor.
|
 By selecting the table in the table list view and clicking [Add Column/Table], you can set all columns read-only. By selecting the table in the table list view and clicking [Add Column/Table], you can set all columns read-only.- Multiple tables cannot be added to the insert column editor.
|
| (5) |
Insert Column Editor |
Set an insert value of the write column. |
- Depending on the data type of the write column, single quotes are automatically added to [Value to set].
For information on the data types applicable to automatic addition, refer to "Automatic Addition of Single Quotes".
-
If a SQL parameter is specified, no single quote will be added.
|
| (6) |
Up |
Move the write column up. |
|
| (7) |
Down |
Move the write column down. |
|
| (8) |
Remove |
Delete the write column. |
|
| (9) |
Generate SQL Statement |
Automatically generate a SQL statement based on settings. |
|
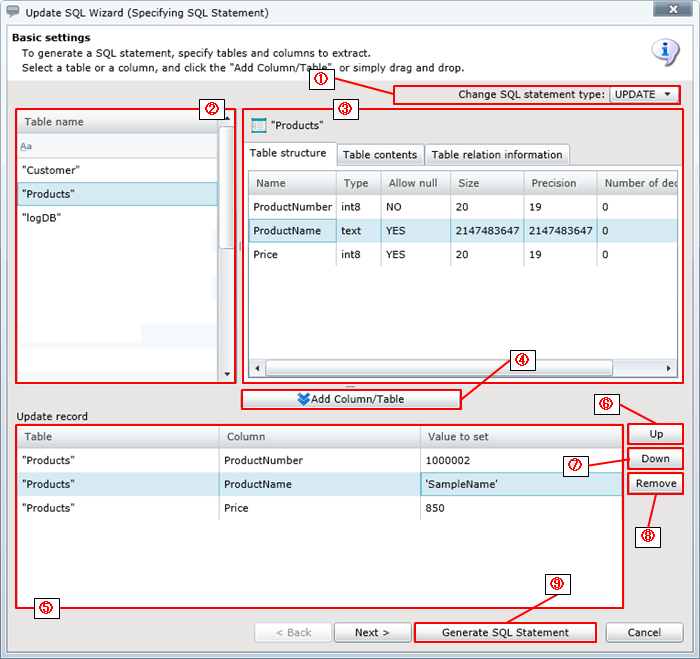
| Numbering in the figure |
Name |
Description |
Remarks |
| (1) |
Change SQL statement type |
Specifies SQL statement type.
- [INSERT]:(default)
Insert data.
- [UPDATE]:
Update data.
- [DELETE]:
Delete data.
|
|
| (2) |
Table list view |
Display a list of tables. |
- The maximum number of tables listed is determined by Global Resource settings.
|
| (3) |
Table Information pane |
Displays the information on the selected table. |
- Displays table structures, table data, and table related information
- For information displayed in the [Table structure] tab, refer to Table structure.
- For information displayed in the [Table contents] tab, refer to Table contents.
- For information displayed in the [Table relation information], refer to Table relation information.
|
| (4) |
Add Column/Table |
Add the column selected in the [Table structure] tab in the Table Information Pane to the Insert Column Editor.
|
- By selecting the table in the table list view and clicking [Add Column/Table], you can set all columns read-only.
- Multiple tables cannot be added to the update column editor.
|
| (5) |
Update column editor |
Set the update value of the write column. |
- Depending on the data type of the read column, single quotes are automatically added to [Value to set].
For information on the data types applicable to automatic addition, refer to "Automatic addition of Single Quotes".
-
If a SQL parameter is specified, no single quote will be added.
|
| (6) |
Up |
Move the write column up. |
|
| (7) |
Down |
Move the write column down. |
|
| (8) |
Remove |
Delete the write column. |
|
| (9) |
Generate SQL Statement |
Automatically generate a SQL statement based on the settings. |
|
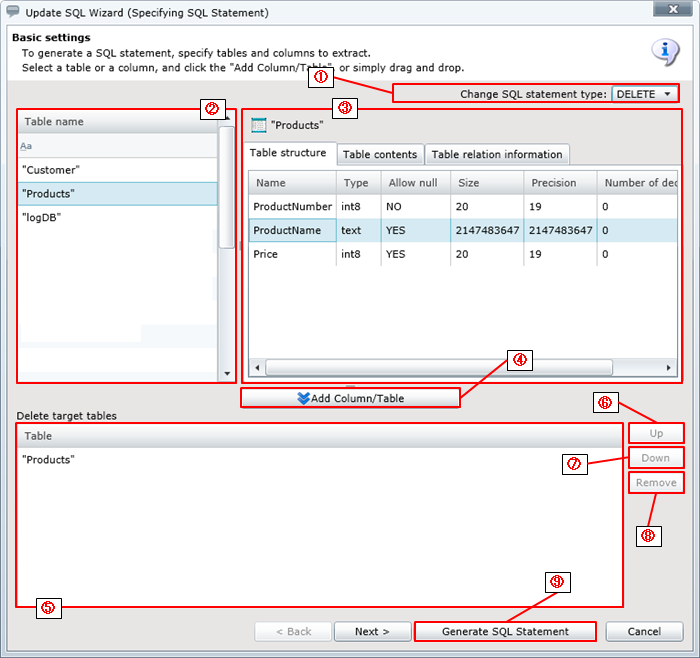
| Numbering in the figure |
Name |
Description |
Remarks |
| (1) |
Change SQL statement type |
Specifies SQL statement type.
- [INSERT]:(default)
Insert data.
- [UPDATE]:
Update data.
- [DELETE]:
Delete data.
|
|
| (2) |
Table list view |
Displays a list of tables. |
- The maximum number of tables listed is determined by Global Resource settings.
|
| (3) |
Table Information pane |
Displays the information on the selected table. |
- Displays table structures, table data, and table related information
- For information displayed in the [Table structure] tab, refer to Table structure.
- For information displayed in the [Table contents] tab, refer to Table contents.
- For information displayed in the [Table relation information], refer to Table relation information.
|
| (4) |
Add Column/Table |
Add the column selected in the [Table structure] tab in the Table Information Pane to the Insert Column Editor.
|
- By selecting the table from the table list view and clicking [Add Column/Table], you can add all columns to the delete column editor.
- Multiple tables cannot be added to the delete table editor.
|
| (5) |
Delete Table Editor |
Display the tables to be deleted. |
|
| (6) |
Up |
Since it is not possible to specify several tables to be deleted, it cannot be used if [DELETE] is selected. |
|
| (7) |
Down |
Since it is not possible to specify several tables to be deleted, it cannot be used if [DELETE] is selected. |
|
| (8) |
Remove |
Delete the table from the delete table editor |
|
| (9) |
Generate SQL Statement |
Automatically generate a SQL statement based on the settings. |
|
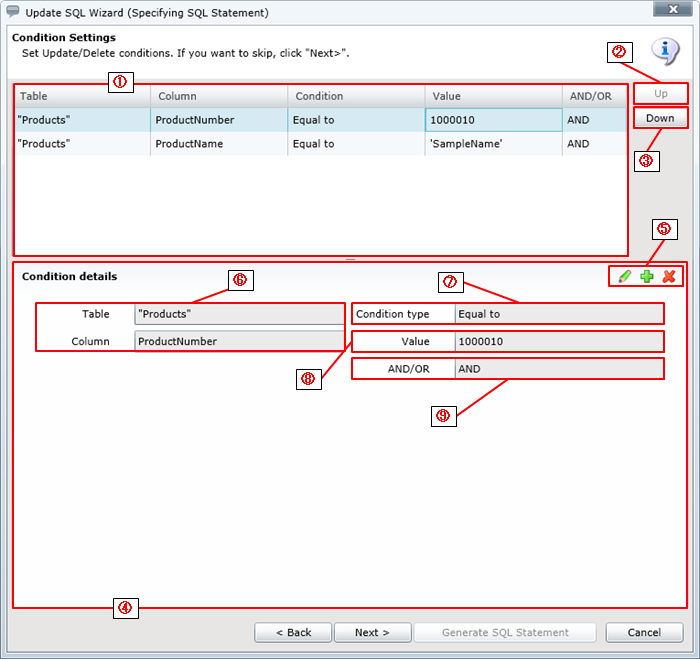
| Numbering in the figure |
Name |
Description |
Remarks |
| (1) |
Write Condition List View |
Display a list of update conditions or delete conditions for the write table. |
- SQL statements are generated in the listed order.
|
| (2) |
Up |
Move the write condition up. |
|
| (3) |
Down |
Move the write condition down. |
|
| (4) |
Write Condition Editor |
Configure the write conditions for a write table. |
- The write conditions are shown in the write condition list view.
|
| (5) |
Edit a write condition |
Add, edit and delete a write condition. |
- To edit a write condition, select the write condition in the write condition list view and click [Edit].
- To add a new write condition, click [Add].
- To delete a write condition, select the write condition in the write condition list view and click [Delete].
|
| (6) |
Table, Column |
Set a name for the table and the column in which you specify write conditions. |
|
| (7) |
Condition Type |
Configures the types of extraction conditions.
- [(Enter directly)]
- [Equal to]
- [Not equal to]
- [Greater than]
- [Less than]
- [Greater than or equal to]
- [Less than or equal to]
|
- If [(Enter directly)] is selected, the contents entered in the [Value] are directly added in a SQL statement.
- If [Equal to] is selected, conditions are added to the SQL statement in the "[Table].[Column] =[Value]" format.
- If [Not equal to] is selected, conditions are added to the SQL statement in the "[Table].[Column] !=[Value]" format.
- If [Greater than] is selected, conditions are added to the SQL statement in the "[Table].[Column] >[Value]" format.
- If [Less than] is selected, conditions are added to the SQL statement in the "[Table].[Column] <[Value]" format.
- If [Greater than or equal to] is selected, conditions are added to the SQL statement in the "[Table].[Column] <=[Value]]" format.
- If [Less than or equal to] is selected, conditions are added to the SQL statement in the "[Table].[Column] >=[Value]" format.
|
| (8) |
Value |
Specify the condition for update and delete. |
- Depending on the data type of the read column, single quotation mark is automatically added to [Value].
For information on the data types applicable to automatic addition, refer to "Automatic addition of Single Quotes".
-
If SQL parameter is specified, no single quote will be added.
-
If [(Enter directly)] is selected for [Condition type], please use the consistent format for each database.
Example:
- If you want to read the records in which the value of the condition column is "Product A", set as "='Product A'"
- If you want to read the records in which the value of the condition column is "Product A" or "Product B", set as "IN('Product A', 'Product B'".
|
| (9) |
AND/OR |
Specify the logic operator of multiple conditions.
|
|
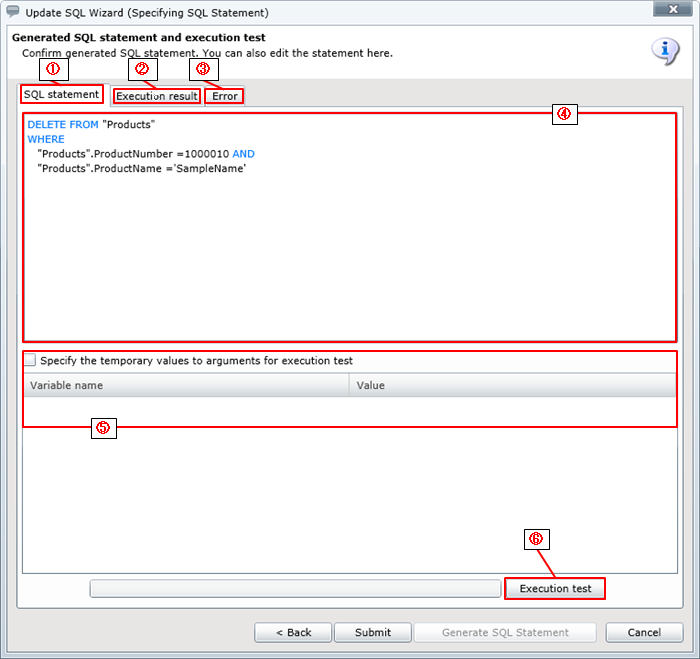
| Numbering in the figure |
Name |
Description |
Remarks |
| (1) |
SQL statement tab |
Display an automatically generated SQL statement. |
|
| (2) |
Execution result tab |
Display the result of test execution. |
|
| (3) |
Error tab |
If an error occurs during test execution, the error is displayed in the error tab. |
|
| (4) |
SQL Statement Editor |
You can edit an automatically generated SQL Statement.
Also possible to write SQL functions which cannot be generated in the SQL Wizard. |
 If a SQL Statement is edited manually, it is not possible to edit in the Wizard. If a SQL Statement is edited manually, it is not possible to edit in the Wizard. |
| (5) |
Set a formal parameter |
If a script variable is used in the write condition, you can replace the script value to the set [Value] and execute a test to the SQL statement.
Enabled if [Specify the temporary values to arguments for execution test] is checked.
|
- It is not possible to specify a formal parameter to an environmental variable or a SQL parameter.
|
| (6) |
Execution test |
Execute a SQL statement. |
|