 For DataSpider Studio for Web, see here.For DataSpider Studio for Web, see here.
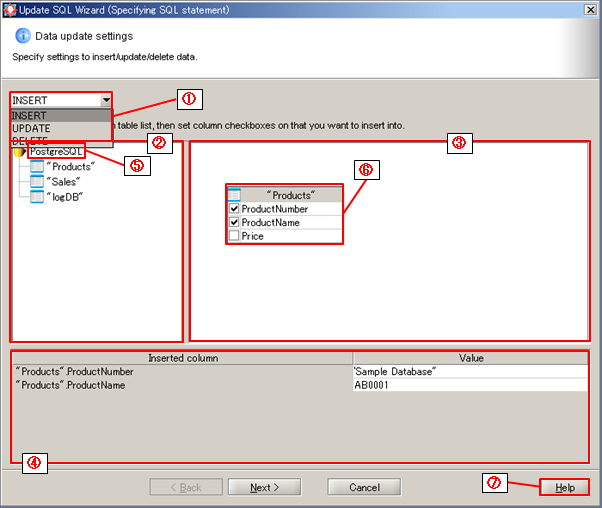
| Numbering in the figure | Name | Description | Remarks |
|---|---|---|---|
| (1) | DML | Specifies DML.
|
|
| (2) | Table list view | Display a list of tables. |
|
| (3) | Table canvas | Configure the definition of inserting a write table. |
|
| (4) | Insert column editor | Set the insert value of the write column. |
|
| (5) | Root elements | Display a database name of the connecting destination. |
|
| (6) | Write Table | Tables as writing destinations. Configure which column to set as a writing destination. |
|
| (7) | Help | Start Help and display the SQL Wizard (Updating SQL Statement) page. |
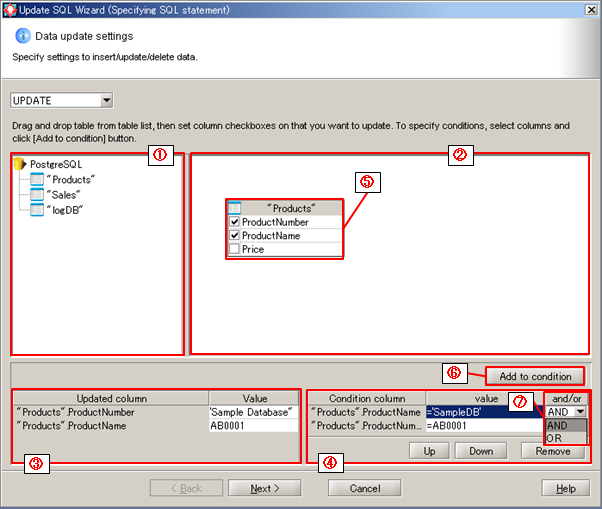
| Numbering in the figure | Name | Description | Remarks |
|---|---|---|---|
| (1) | Table list view | Display a list of tables. |
|
| (2) | Table canvas | Configure the definition of inserting a write table. |
|
| (3) | Update Column Editor | Set the update value of a write column. |
|
| (4) | Condition Column Editor | Set conditions of a write column. |
|
| (5) | Write Table | Tables as writing destination. Configure which column to set as writing destination. |
|
| (6) | Add to condition | Add the column selected in the write table to the condition column. | |
| (7) | and/or | Logic operators for multiple conditions.
|
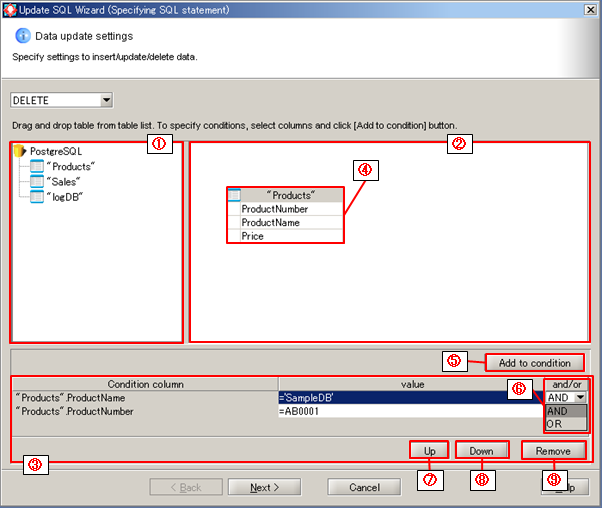
| Numbering in the figure | Name | Description | Remarks |
|---|---|---|---|
| (1) | Table list view | Displays a list of tables. |
|
| (2) | Table canvas | Configure the definition of inserting to a write table. |
|
| (3) | Condition column editor | Set the update value of a write column. |
|
| (4) | Write Table | Tables as writing destination. Configure which column to set as writing destination. |
|
| (5) | Add to condition | Add the column selected in the write table to the condition column. | |
| (6) | and/or | Logic operators for multiple conditions.
|
|
| (7) | Up | Move up the write column. | |
| (8) | Down | Move down the write column. | |
| (9) | Remove | Delete s write column from the condition column. |
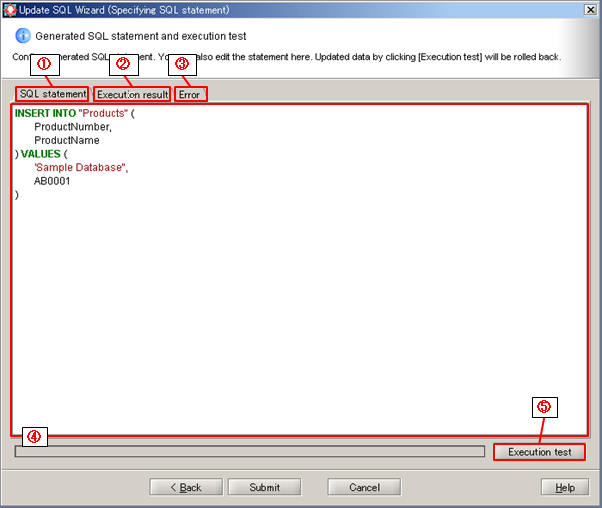
| Numbering in the figure | Name | Description | Remarks |
|---|---|---|---|
| (1) | SQL statement tab | Displays the automatically generated SQL statement. | |
| (2) | Execution result tab | Displays the result of the test execution. | |
| (3) | Error tab | If an error occurs during test execution, the error is displayed. | |
| (4) | SQL statement editor | It is possible to edit the automatically generated SQL Statement. Also possible to write SQL functions which cannot be generated in the SQL Wizard. |
|
| (5) | Execution test | Execute the SQL statement. |
 If already selected, no need to reselect DML.
 If the SQL Statement is manually edited, it is not possible to edit in the SQL Wizard.
If a SQL Statement is manually edited, it is not possible to edit in the SQL Wizard.
If the SQL Statement is manually edited, it is not possible to edit in the SQL Wizard.
If the SQL Statement is manually edited, it is not possible to edit in the SQL Wizard.
If a SQL Statement is manually edited, it is not possible to edit in the SQL Wizard.