PrivateLink
On the PrivateLink page, you can create PrivateLink settings to connect HULFT Square to your AWS environment via AWS PrivateLink.
To use PrivateLink, you need to install the HULFT Square Link application from App Square.
Installing the HULFT Square Link application requires a contract for HULFT Square Link Ver.2 (available for purchase).
After creating PrivateLink settings, you can, for example, establish an SFTP connection via PrivateLink by specifying PrivateLink for Secure connection in SFTP.
You can also connect to connectors that support PrivateLink.
HULFTSquare Link Ver.2 can't be used for the HULFT Transfer service.
To use PrivateLink for the HULFT Transfer service, purchase the HULFT Square Link add-on and configure a VPC endpoint.
Points for settings
This section explains the settings for PrivateLink and some points about the settings.
To configure PrivateLink settings, either one of the following permissions is required:
-
PrivateLinkFullAccess
-
PrivateLinkAdminAccess
For the names and functions of the basic UI elements and other items of HULFT Square, refer to the following topic:
In the navigation menu, select  > NETWORK > PrivateLink to open this page.
You can configure PrivateLink settings and check the destination URL.
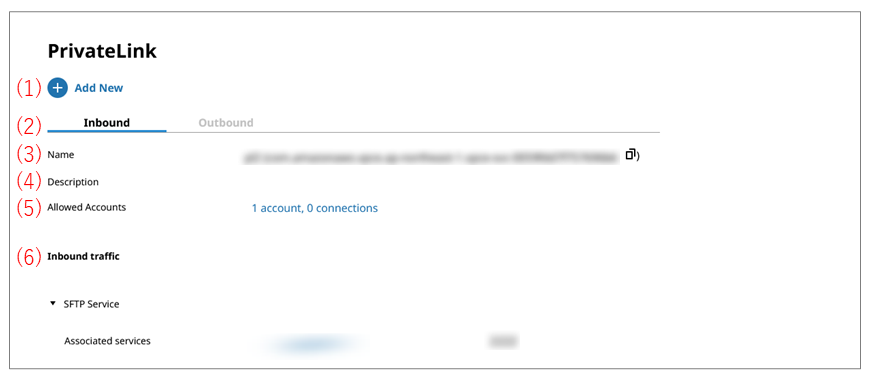
- (1) Add (common)
-
Select this icon to create connection settings for PrivateLink.
For the screen displayed after selecting this icon, refer to PrivateLink > Add.
- (2) Inbound/Outbound (common to both)
-
Information about the PrivateLink settings that have been configured is displayed for each transfer direction. Select Inbound or Outbound to switch which information is displayed.
For details about the screen items when you select Outbound, refer to Outbound.
- (3) Name
-
By selecting
 in the Name field, you can copy the PrivateLink inbound name (VPC endpoint service name).
Immediately after you create a service, "Creating..." is displayed.
- (4) Description (common)
-
The detailed information you entered when configuring the PrivateLink settings is displayed.
- (5) Allowed Accounts
-
The number of accounts and the number of connections are displayed. For the screen displayed after selecting the number of accounts and the number of connections, refer to PrivateLink > Approval Requests.
- (6) Inbound traffic
-
The SFTP services that the secure connection is set for are displayed.
You can view an SFTP service by selecting the service.
For an explanation of the items in common, refer to Inbound.
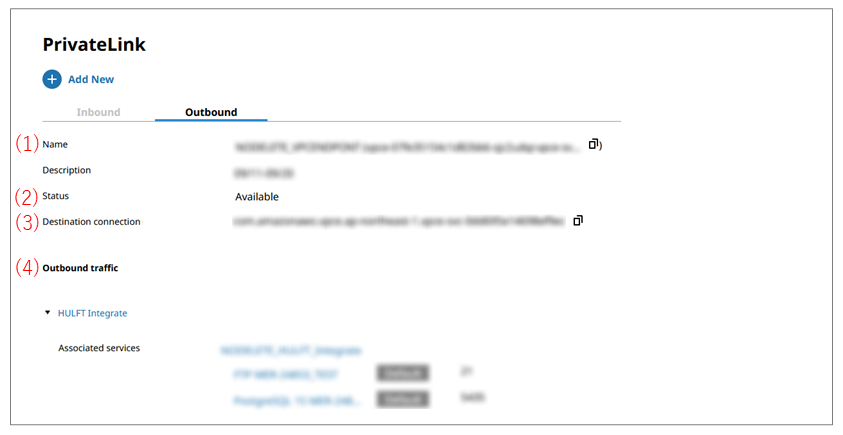
- (1) Name
-
By selecting
in the Name field, you can copy the PrivateLink outbound name (VPC endpoint DNS).Immediately after you create a service, "Creating..." is displayed.
- (2) Status
-
When the direction of the connection is outbound, whether a PrivateLink connection is available or not is displayed.
- (3) Destination connection
-
By selecting
beside the VPC endpoint service name in the Destination connection field, you can copy the URL. - (4) Aliases
-
Specify the URL provided by the destination in order to resolve DNS when connecting via AWS PrivateLink.
For details about Snowflake, refer to Support for closed network connection for Snowflake.
- (5) Outbound traffic
-
The names of services that are in use and settings such as connections are displayed.
This item is displayed when a connection (project) that uses outbound transfer is linked with a job.
By selecting a link, you can view the details of the settings.
On the PrivateLink page, select Add to open this page.
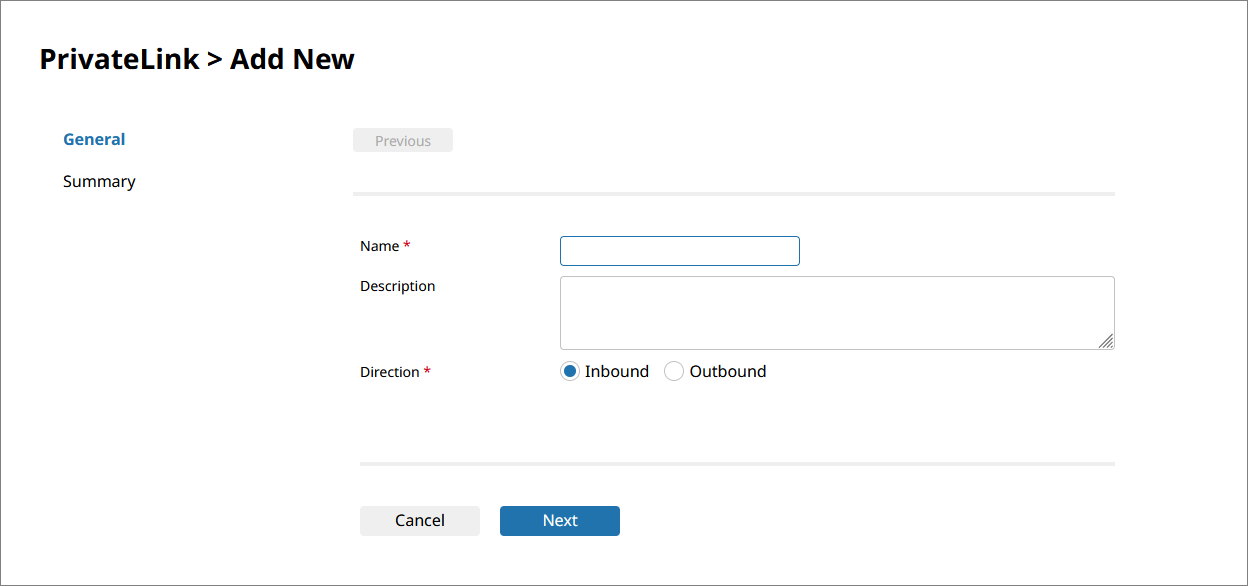
- Name
-
Specify a name for the PrivateLink connection that you want to create.
The PrivateLink connection you create here can be used with the following services for which secure connections can be set.
-
 > SERVICES > SFTP
 -
> SERVICES > HULFT Transfer App
-
- Description
-
Specify comments to explain the PrivateLink connection that you are configuring.
- Direction
-
Select the transfer direction (Inbound or Outbound).
- Next/Finish
-
Displays the next page.
PrivateLink > Approval Requests
On the PrivateLink page, select a link indicating the numbers of accounts and connections to open this page.
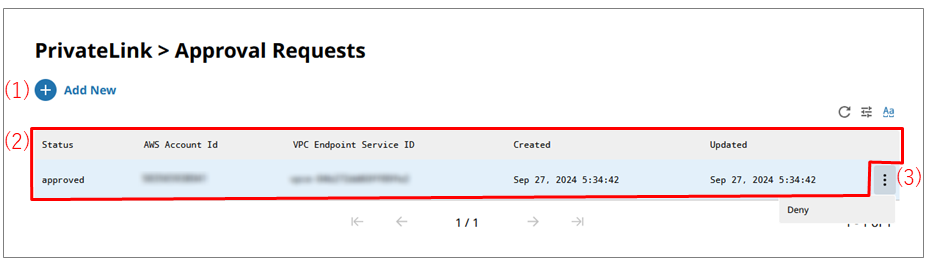
- (1) Add
-
Select this icon to add a new AWS account ID that is approved for the PrivateLink connection.
When you select this icon, PrivateLink > Approval Requests > Add is opened.
- (2) List of settings
-
The information about approval requests is displayed in tabular form.
- (3) Action menu
-
Select this icon to perform operations for requests.
Selecting
 shows the menu of operations below in accordance with the status.
- Approve
-
Approve the request.
- Remove
-
Remove the request.
- Deny
-
Reject the approved request.
PrivateLink > Approval Requests > Add
To open this page, select Add on the PrivateLink > Approval Requests page.
You can set the information to add an AWS account ID by following the wizard-style pages step by step.
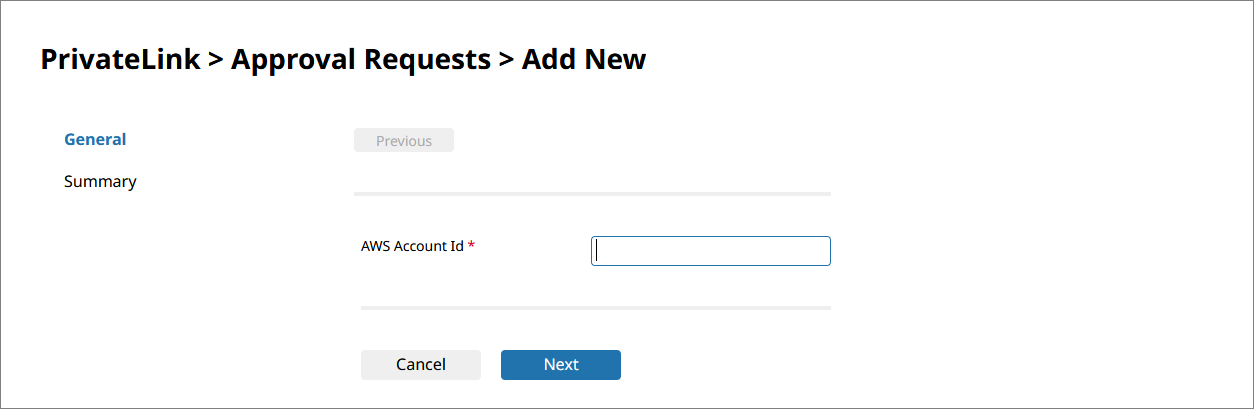
- AWS Account Id
-
Specify the AWS account ID that will make the approval request.
- Next/Finish
-
Displays the next page.