Update SQL Wizard
SQL Wizard
SQL statements can be easily created with the wizard.
Starting Update SQL Wizard
To start SQL Wizard, click SQL Wizard in the properties settings dialog in Execute Update SQL in the database connector.
Screen elements of Update SQL Wizard
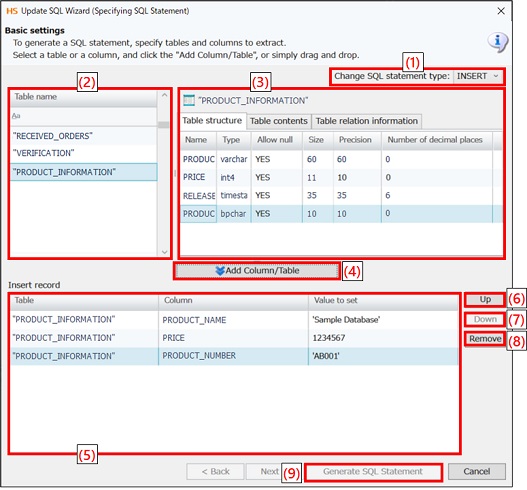
Data update setting screen (INSERT)
|
Numbering in the figure |
Name |
Description |
Remarks |
|---|---|---|---|
|
(1) |
Change SQL statement type |
Specifies a type of writing.
|
|
|
(2) |
Table list view |
Displays a list of tables. |
|
|
(3) |
Table Information pane |
Displays the information on the selected table. |
|
|
(4) |
Add Column/Table |
Adds the column selected in the Table structure tab in the table information pane to the insert column editor. |
|
|
(5) |
Insert Column Editor |
Set an insert value for the write column. |
|
|
(6) |
Up |
Moves the selected column up. |
|
|
(7) |
Down |
Moves the selected column down. |
|
|
(8) |
Remove |
Deletes the selected column. |
|
|
(9) |
Generate SQL Statement |
Automatically generates a SQL statement based on the settings. |
|
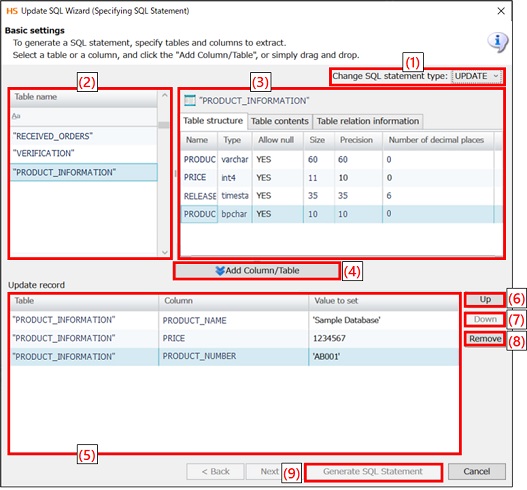
Data update setting screen (UPDATE)
|
Numbering in the figure |
Name |
Description |
Remarks |
|---|---|---|---|
|
(1) |
Change SQL statement type |
Specifies a type of writing.
|
|
|
(2) |
Table list view |
Displays a list of tables. |
|
|
(3) |
Table Information pane |
Displays the information on the selected table. |
|
|
(4) |
Add Column/Table |
Adds the column selected in the Table structure tab in the table information pane to the update column editor. |
|
|
(5) |
Update column editor |
Set the update value of a write column. |
|
|
(6) |
Up |
Moves the selected column up. |
|
|
(7) |
Down |
Moves the selected column down. |
|
|
(8) |
Remove |
Deletes the selected column. |
|
|
(9) |
Generate SQL Statement |
Automatically generates a SQL statement based on the settings. |
|
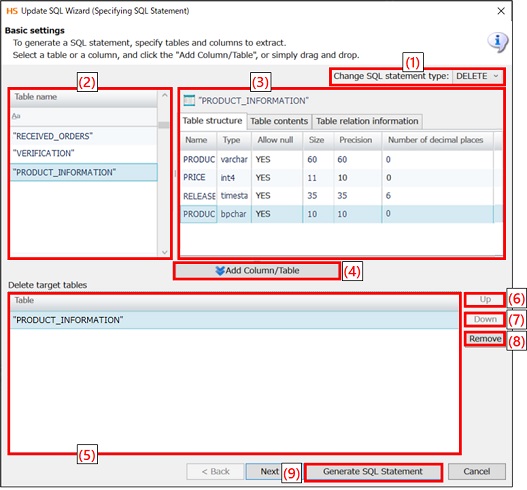
Data update setting screen (DELETE)
|
Numbering in the figure |
Name |
Description |
Remarks |
|---|---|---|---|
|
(1) |
Change SQL statement type |
Specifies a type of writing.
|
|
|
(2) |
Table list view |
Displays a list of tables. |
|
|
(3) |
Table information pane |
Displays the information on the selected table. |
|
|
(4) |
Add Column/Table |
Adds the column selected in the Table structure tab in the table information pane to the delete table editor. |
|
|
(5) |
Delete table editor |
Displays the tables to be deleted. |
|
|
(6) |
Up |
Since it isn't possible to specify several tables to be deleted, this can't be used if DELETE is selected. |
|
|
(7) |
Down |
Since it isn't possible to specify several tables to be deleted, this can't be used if DELETE is selected. |
|
|
(8) |
Remove |
Deletes the table from the delete table editor. |
|
|
(9) |
Generate SQL Statement |
Automatically generates a SQL statement based on the settings. |
|
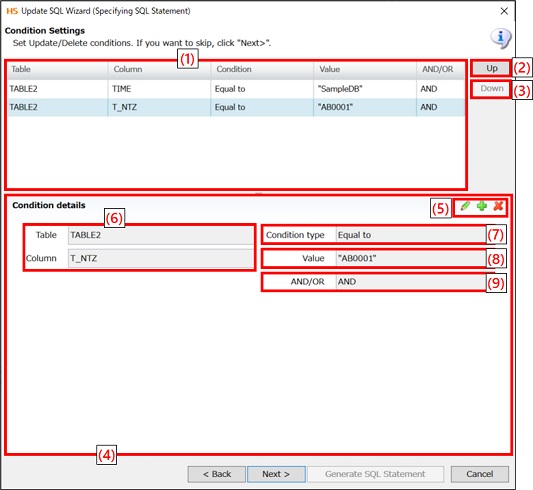
Write condition setting screen (UPDATE and DELETE)
|
Numbering in the figure |
Name |
Description |
Remarks |
|---|---|---|---|
|
(1) |
Write condition list view |
Displays a list of update conditions or delete conditions for a write table. |
|
|
(2) |
Up |
Moves a write condition up. |
|
|
(3) |
Down |
Moves a write condition down. |
|
|
(4) |
Write condition editor |
Configure write conditions for a write table. |
|
|
(5) |
Edit a write condition |
Add, edit and delete write conditions. |
|
|
(6) |
Table, Column |
Set the name for the table and the column for which to specify write conditions. |
|
|
(7) |
Condition Type |
Configure a type of write conditions.
|
|
|
(8) |
Value |
Specify the conditions to update or delete. |
|
|
(9) |
AND/OR |
Specify a logic operator for multiple conditions.
|
|
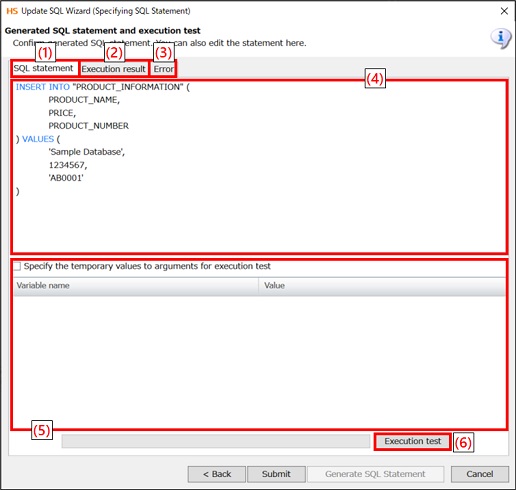
Generated SQL statement and execution test screen
|
Numbering in the figure |
Name |
Description |
Remarks |
|---|---|---|---|
|
(1) |
SQL statement tab |
Displays an automatically generated SQL statement. |
|
|
(2) |
Execution result tab |
Displays the result of test execution. |
|
|
(3) |
Error tab |
Displays errors if errors occur during test execution. |
|
|
(4) |
SQL statement editor |
You can edit an automatically generated SQL statement. You can also write SQL functions which can't be generated in SQL Wizard. |
Note
If a SQL statement is edited manually, it can't be re-edited in the wizard. |
|
(5) |
Setting of formal parameters |
If a script variable is used in a write condition, you can replace the script value with the value that is set in Value and execute a test of the SQL statement. This is enabled if Specify the temporary values to arguments for execution test is selected. |
Note
It isn't possible to specify a formal parameter to an environmental variable or a SQL parameter. |
|
(6) |
Execution test |
Executes a SQL statement. |
|
Generating a SQL statement
To generate a SQL Statement, follow the steps below.
-
Select INSERT from the Change SQL statement type list.
= Remarks =If it is already selected, you don't need to reselect it.
-
Select the table you want to write to in the table list view and click Add Column/Table. (To specify a write column, select the column in the table information pane.)
-
Set an insert value in the insert column editor.
-
To generate a SQL statement with the settings configured so far, click Generate SQL Statement.
-
A SQL statement generated in the SQL statement editor in the SQL statement tab is displayed.
Click Submit to save the SQL statement and end SQL Wizard.
-
To execute the SQL statement, click Execution test.
= Remarks =If a script variable is specified in the SQL statement, you can enter values for the variable and execute the statement.
-
It is executed with empty characters if no value is entered.
-
Entered values don't affect the script execution.
-
-
The results are shown in the Execution result tab.
-
If an error occurs during test execution, the error is displayed in the Error tab.
-
Click Submit to save the SQL statement and end SQL Wizard.
-
To edit a SQL statement, click SQL Wizard in the properties settings dialog in Execute Select SQL to start SQL Wizard.
NoteWhen a SQL statement created by SQL Wizard has been manually edited, it can't be re-edited in the wizard. Start the wizard by selecting in the dialog whether to create a new SQL statement or edit a SQL statement that was created in the wizard.
-
Select UPDATE from the Change SQL statement type list.
= Remarks =If it is already selected, you don't need to reselect it.
-
Select the table you want to write to in the table list view and click Add Column/Table. (To specify a write column, select the column in the table information pane.)
-
Set an update value in the update column editor.
-
To generate a SQL statement with the settings configured so far, click Generate SQL Statement.
= Remarks =To specify update conditions, click Next and refer to Specify Condition.
-
A SQL statement generated in the SQL statement editor in the SQL statement tab is displayed.
Click Submit to save the SQL statement and end SQL Wizard.
-
To execute the SQL statement, click Execution test.
= Remarks =If a script variable is specified in the SQL statement, you can enter values for the variable and execute the statement.
-
It is executed with empty characters if no value is entered.
-
Entered values don't affect the script execution.
-
-
The results are shown in the Execution result tab.
-
If an error occurs during test execution, the error is displayed in the Error tab.
-
Click Submit to save the SQL statement and end SQL Wizard.
-
To edit a SQL statement, click SQL Wizard in the properties settings dialog in Execute Select SQL to start SQL Wizard.
NoteWhen a SQL statement created by SQL Wizard has been manually edited, it can't be re-edited in the wizard.
Start the wizard by selecting in the dialog whether to create a new SQL statement or edit a SQL statement that was created in the wizard.
-
Select DELETE from the Change SQL statement type list.
= Remarks =If it is already selected, you don't need to reselect it.
-
Select the table you want to write to in the table list view and click Add Column/Table.
-
To generate a SQL statement with the settings configured so far, click Generate SQL Statement.
= Remarks =To specify delete conditions, click Next and refer to Specify Condition.
-
A SQL statement generated in the SQL statement editor in the SQL statement tab is displayed.
Click Submit to save the SQL statement and end SQL Wizard.
-
To execute the SQL statement, click Execution test.
= Remarks =If a script variable is specified in the SQL statement, you can enter values for the variable and execute the statement.
-
It is executed with empty characters if no value is entered.
-
Entered values don't affect the script execution.
-
-
The results are shown in the Execution result tab.
-
If an error occurs during test execution, the error is displayed in the Error tab.
-
Click Submit to save the SQL statement and end SQL Wizard.
-
To edit a SQL statement, click SQL Wizard in the properties settings dialog in Execute Select SQL to start SQL Wizard.
NoteWhen a SQL statement created by SQL Wizard has been manually edited, it can't be re-edited in the wizard.
Start the wizard by selecting in the dialog whether to create a new SQL statement or edit a SQL statement that was created in the wizard.
To set conditions for updating and deleting, follow the steps below.
-
In the Condition settings screen, click Add.
-
In the write condition editor, specify the column for the condition in Table/Column.
-
In the write condition editor, specify Condition type and Value.
-
If conditions for multiple columns are required, set logic operators (AND/OR).
Select AND or OR from the AND/OR column list.
Automatic Addition of Single Quotes
If the data type of the column is one of the below, single quotes are automatically added to the value that is set for Value in the insert column editor, the update column editor, or the write condition editor.
-
CHAR
-
NCHAR
-
VARCHAR
-
NVARCHAR
-
VARCHAR2
-
NVARCHAR2
-
TEXT
-
MEDIUMTEXT
-
LONGTEXT
Specification limits
-
When the connection resource is XAResource, testing can't be executed.
-
Tables which include "." in the schema name or the table name on the database can't be used.
-
SQL statements can be re-edited only if the tables in the SQL statement exist.
-
In connection resources for JDBC connector, when Execute transaction processing is not selected, rollback isn't performed in test execution, and the data is updated.