Service Basics

This page describes basic concepts, functions, terminology, and way to create a simple script, which are required to develop service in DataSpider Servista.

Basic Elements of Service

Basic elements of service are as follows.

Script

Script is description of a series of operations which constitutes service to be published/executed on DataSpider Server. It is just like source code in programming languages.
Script is designed and developed in Designer. Also, you can call a script from another script. In that case, the callee script is called "child script" and the caller script is called "parent script".

Project

In a project, you can put related scripts together. In DataSpider Servista, loading/saving is performed on a per-project basis.
You can find projects saved in server from My Projects. Service registration to server is also performed on a per-project basis.

Service

Service is a script registered in server. You can call service from another project's script or execution tools such as Trigger, ScriptRunner, and ScriptRunnerProxy.
Services are managed in My Services.

Operation

Operation is a unit which performs processing such as reading, converting, or writing data. On Designer, an operation is displayed as one icon, which is called component icon.
To create a process or data flow between operations, associate them by dragging a component icon in the direction where you want to create the flow. In DataSpider Servista, process flow and data flow can be defined separately. Thus the result data of a reading operation can be reused in multiple operations, and you do not need to execute the reading operation several times.

Component

Component is collection of operations.
The categories of components are the following.

Adapter

Adapter is component mainly to read and write data from external system such as database.
Adapters of DataSpider Servista are categorized into the following categories on the tool palette of Designer.

Category Description
Basic Category where adapters such as Validate and Assertion belong.
Database Category where adapters to connect to databases such as RDB and XMLDB belong.
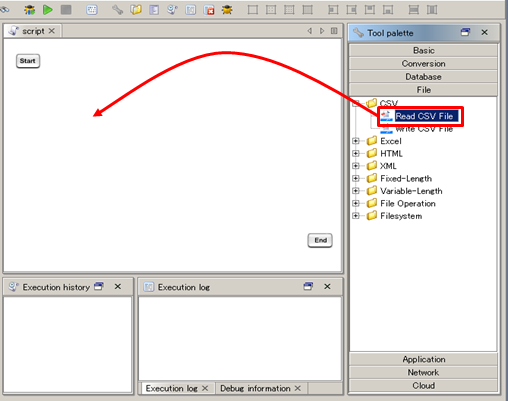
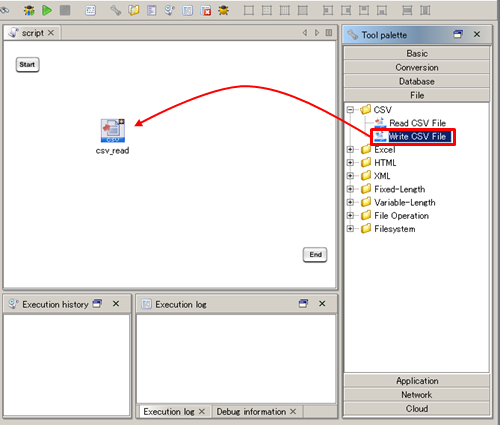
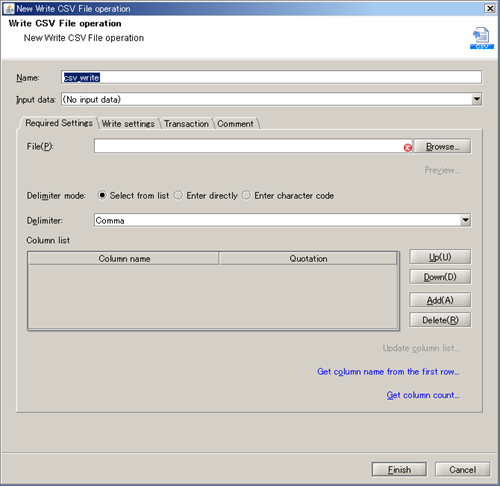
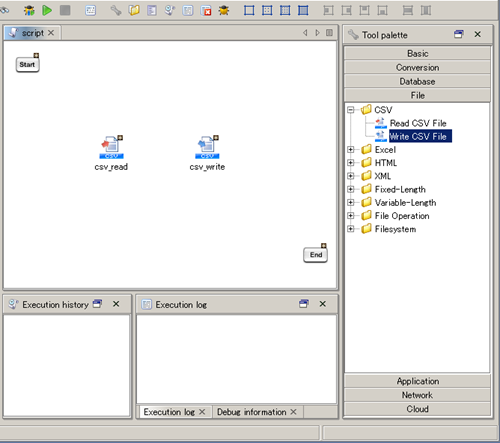
File Category where adapters to handle files like CSV and XML belong.
Application Category where adapters to connect to applications such as BI tools, group wares, and ERP packages belong.
Network Category where adapters to connect to network services such as Mail and FTP belong.
Directory service Category where adapters to use directory services belong.
Cloud Category where adapters to connect to cloud services belong.

Converter

Converter is component to convert result data read by adapters and variables.
They mainly belong to "Convert" category on the tool palette of Designer.
The following types of converters are provided in DataSpider Servista. For Mapper, you can use the dedicated editor called Mapper editor to configure conversion processing in GUI.

Converter name Name Operation name Category
Mapper Variable Mapper Assign Variables Basic/Processing
Document Mapper Mapping Conversion/Basic
Merge Mapper Merge Conversion/Basic
Character Character Converter Convert CP932 to SJIS Conversion/Character
Convert SJIS to CP932 Conversion/Character
Ignore Invalid Char Filter Remove Invalid XML Characters Conversion/Character
XSLT Convert XSLT Structure Conversion/XSLT

Script component

Script component is component that that covers necessary functions to create script, such as flow controls and memo.
They mainly belong to "Basic" category on the tool palette of Designer.
Mainly the following types of script components are provided in DataSpider Servista.

Sub category Description
Processing Launch External Application, Wait, etc.
Flow Loop, Monitor Exception, etc.
Others Group, Memo, etc.

Flow

There are two types of flow in script, that is, "Process flow" and "Data flow". Process flow and data flow are collectively called "Flow".
In DataSpider Servista, by separating process flows from data flows, processed data can be reused several times in subsequent operations.

Process flow

Process flow shows processing flow. Script is executed in the order of connected process flows.
Process flow starts from "start" component and ends at "end" or "break" component.

Data flow

Data flow shows how data flows.
Data flow can be drawn from adapters to read data or converters to adapters to write data or converters.

Result data

Operation result of component is called "result data".
Mainly adapters to read data and converters generate result data. Adapters to write data and converters use the data as "input data".

Variables

In DataSpider Servista, four types of variables are available: "Script variables", "Component variables", "Environment variables", and "Trigger variables".

Name Scope Description Value modification in script Usage Example Remarks
Script variables Script Variables to use in script.
Users can create and add arbitrarily.
Yes
(Using Variable Mapper)
${ScriptVariableName} ${var}
Component variables Script Variables predefined in advance for components.
You can get an error occurred in component, the number of processed data, etc.
No
(Assigned automatically when executing component)
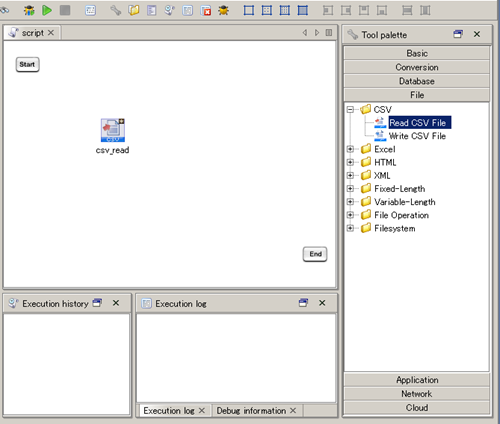
${ComponentName.ComponentVariableName} ${csv_read.count}
  • It will be initialized with the default value when executing component.
  • For more details, refer to the help page of each adapter's operation.
Environment variables DataSpiderServer Variables that are available in the DataSpiderServer.
Users can create and add arbitrarily.
No %{EnvironmentVariableName} %{DB_HOST}
Trigger variables Trigger Variables predefined in advance for triggers. No ${trigger.TriggerVariableName} ${trigger.projectName}
  • For more details, refer to "Trigger" and trigger guides.

Input/Output

Input/Output means arguments (script input variables) and return values (script output variables) of script. Input/Output is implemented by adding attributes for input/output to script variables defined in script.
Script of DataSpider Servista can take multiple arguments and return multiple return values. Script input variables and script output variables, which are input/output, are collectively called "input/output interface".

Input/Output are configured in create/edit script variables screen and [Input/Output] tab of script property settings.

Exit status

Exit status is a value returned to the tool which executed a script when the script ends.
Refer to "Exit Status" for more details.

Execution ID

One unique ID in DataSpiderServer is assigned to one script. This is called "Execution ID".
Execution ID is required to identify a script in Log or Task Manager.

Execution environment ID (VMID)

Execution environment ID is the unique ID which is assigned internally for DataSpiderServer process when starting DataSpiderServer.
This is used to distinguish DataSpiderServer process in DataSpiderServer Settings, Execution environment ID of Mapper logic, and exec log.

User Management

DataSpider Servista manages users on its own system independently of OS user management.
The user management system is operated with two concepts, user and group. Based on information about user and group, operations such as creating/editing project, accessing files, are permitted.
When DataSpider Servista is installed newly, only the root user (administrator) exists. The user management can be performed in "
User Accounts" of the control panel.
When repository DB is not available, you cannot add user and group.

User and group

Home directory

Every user in DataSpider Servista has its own home directory. /home/<user name> is the home directory.
In home directory, projects created by each user are saved.

Creating and Executing Script

The following sections will give you a simple tutorial which covers creation of a simple script and running it from Designer.
We are going to create a script that reads the contents of an existing CSV file and writes them to another CSV file.

Start DataSpiderServer

Start DataSpiderServer with one of the following ways. When DataSpiderServer is started successfully, the following messages are output in server.log and server launch console (only in the case the server was registered as Windows service when installing DataSpiderServer).

--- |INFO|
--- |INFO|*****************************************************************
--- |INFO|*********************** DataSpider Server ***********************
--- |INFO|*****************************************************************
--- |INFO|Starting DataSpider Server...
--- |INFO|Loading system. System name: [DataSpider Server]
--- |INFO|System was successfully loaded.
--- |INFO|Loading modules...
(omitted)
--- |INFO|Starting service of module [ScriptRunner Container]...
--- |INFO|Starting service of module [DataProcessingComponent Manager]...
--- |INFO|Service of module [DataProcessingComponent Manager] was successfully started.
--- |INFO|Service of module [ScriptRunner Container] was successfully started.
--- |INFO|System service was successfully started.
--- |NOTICE|DataSpider Server was successfully started.
--- |INFO|*****************************************************************

Start DataSpider Studio and login

In Windows Start menu, select "All Programs" - "DataSpider Servista <version>" - "DataSpider Studio" to start it.
When Studio is started successfully, the login screen appears.


Enter "root" in [User], which is configured initially, and enter the password specified during installation in [Password], then click [Login] button.
If you did not set password during installation, enter the default password "password".
Refer to "User Accounts" for how to change password.

After logging in successfully, Studio Desktop will be displayed.

Start Designer

Select [Designer] from Studio menu.


Designer starts.

Create a project and a script

Click "Create new project" icon on the tool bar.


"New project" screen will open. Click [Next] button.


Click [Finish] button.


The created project and script will be displayed in the project explorer, and the script will be opened in the script canvas.


In the project explorer, states of projects and scripts are noticed with icons.

Icon Description Remarks
It means that the project/script has been modified.
  • The same is meant on component icons in script canvas and mapping canvas.
  • It will disappear when saving the project.
  • When you close the project or the designer without saving it while this icon is displayed, the modifications will be discarded.
It means that the script is being edited (the contents are displayed) in script canvas.  
It means that the project/script is being loaded.  
It means that the script is locked.

Create input data

Select [Explorer] from the Studio menu and start Explorer.


Select "data" directory from the left pane tree.

From right-click menu of right pain blank space, select [New]-[Text file].


Rename the file to "inputdata.csv".


The text editor will open by double-clicking the file.


Enter the following contents and save it.

sampleDataA,100
sampleDataB,200
sampleDataC,300

Place component icons

Drag "Read CSV File" from "File" category of the tool palette and drop into the script canvas.


The properties window of Read CSV File operation will open.


Enter "/data/inputdata.csv" in [File] field, which is the absolute path of the created file.
You can launch file chooser with [Browse] button to choose a file.
Click [Add] button, and enter "ProductName" in [Column name] field.
Click [Add] button once again, and enter "OrderAmount" in [Column name] field.


Click [Finish] button and close the properties window, then component icon will be placed in the script canvas.


Then, Drag "Write CSV File" from "File" category of the tool palette and drop into the script canvas.


The properties window of Write CSV File operation will open.


Enter "/data/outputdata.csv" in [File] field, and click [Finish] button.

Draw flows

Right-click the component icon "csv_read" and drag it onto "csv_write".
From pop-up menu displayed after dropping, select [Draw process flow and data flow].

"Add mapping" dialog will appear. Click [No] button this time.


Process flow is shown in black solid line.
Data flow is shown in yellow dashed line.

Drag the component icon "csv_read" and drop it onto "csv_write".
Drag "csv_write" and drop it onto "End" as well.


Now you've finished creating a script.

Execute the script

Click [Run script] button in the tool bar.


The script is executed.
When finished successfully, "Run script" dialog appears.


The elapsed time is displayed In the execution history view.
When running in debug mode, elapsed time of each icon is displayed in addition to the total elapsed time.

See the execution result

Open Explorer and confirm that "outputdata.csv" exists in "data" directory.


Double-click "outputdata.csv" to open and see the contents that you wrote.


You confirmed that the operations had been executed successfully.

Save the script

Select [Save project] from [File] menu.


If you restart server or the network between client and server is cut while saving a project, the project might be saved in an invalid state and it might not be able to be opened again.

We've reached the end of this tutorial.
For more practical concepts and functions, refer to "Service Development".