The Basic Knowledge of Service

Follow along with the tutorial below, which will show the procedure to create a simple script, to learn the concepts, functions and terminology that are necessary to understand when developing service using DataSpider Servista.

Basic elements of service

Basic elements of service

Script

A script is a graphical representation of series of computational and data mapping processes for business logics described using icons. One or more of this smallest executable unit constitute a service hosted by DataSpiderServer.A script is therefore equivalent to a source code script in a programming language.
A script is designed and developed using Designer,A script can also be included in other scripts,When a script is used by other scripts, it becomes a "child script" to the "parent script" which invoked the child script from within.

Project

A project encompass the scripts that are relevant to each other.Scripts are maintained by a project which can be saved to or loaded from an repository.
Projects that are persisted to the server can be viewed in My Projects. It is also a unit which can be registered to the server as a service.

Service

Service is a project registered to the server and is prepared to be executed by other scripts in other projects, by triggers, by ScriptRunner, or by ScriptRunnerProxy.
Service can be managed from My Service.

Operation

Operations perform reading data from a source, converting to an expected output format, or writing out to a destination.When working with Designer, a operation appears as a component icon
can be connected by selecting it and dragging the cursor to the next icon to build a process or a data flow in between.In DataSpider Servista, it is possible to define a process flow and a data flow separately. i.e. the result data returned by an operation, for instance, can be shared, or reused among multiple operations which can suppress having each of them perform repetitive read operation.

Component

Components are group of operations
Components consists of the following elements.

Adapter

Adapter is a component which mainly reads and writes to external resources such as databases.
In the Designer tool palette, adapters are categorized as follows:

Category Description
Basic A category to which Validation and Assertion adapters belong.
Database A category to which adapters for connecting with RDB, XMLDB, and other databases belong.
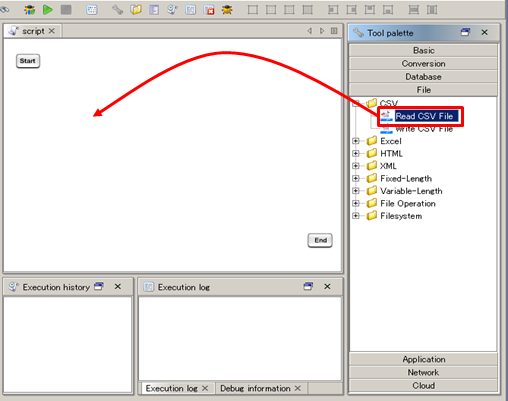
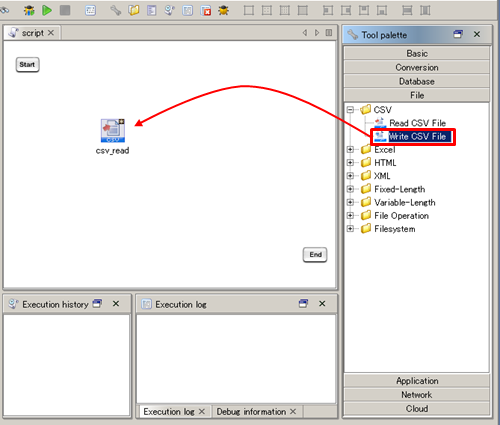
File A category to which adapters for handling CSV, XML and other file formats belong.
Application A category to which adapters that interface different kinds of applications belong. It would include BI tools, Groupware, ERP, mainframe, and etc.
Network A category to which adapters that perform network operations, such as Mail and FTP belong.
Cloud A category to which adapters that interact with various cloud services belong.

Converter

Converters converts the result data retrieved by an adapter operation and variables.
They all belong to the "Conversion" category in the tool palette.
The following converters are available.Mapper is a converter which has a dedicated GUI editing tool called Mapper Editor which is used to transform an input data to an expected data format.

Converter name Name Operation name Category
Mapper Variable Mapper Variable Assignment Basic Operation
Document Mapper Mapping Converter/Basic
Merge Mapper Merge Converter/Basic
Character Character Converter Convert CP932 into SJIS Converter/Character
Convert SJIS into CP932 Converter/Character
Ignore Invalid Char Filter Remove invalid XML characters Converter/Character
XSLT Convert XSLT Structure Converter/XSLT

Script Component

ScriptComponent encompasses flow-control, memo and other miscellaneous functions for creating a script.
It belongs to the 'Basic' category in the Designer tool palette.
There are following ScriptCompontns available.

Sub-Category Description
Operation Launch External Application operation, Wait operation, and etc.
Flow loop and try-catch exception handling
Others Grouping, Memo, and etc.

Flow

There are two types of data flow used in Designer context.A process flow which describes the order of components performing process and a data flow which describes how data traverses through components and consumed eventually.These are together called "Flows."
By separating the data flow from the process flow, a result of a process execution can be reused by subsequent processes in the same flow.

Process flow

Process flow is the order of process being executed in the order of the operations connected together in a script.
A process flow begins from a start component and ends at an end component or a break component.

Data Flow

Data Flow represents how data travels from a source to a destination.
A data flow line can be drawn from a Read-capable adapters and converters to write-capable adapters and converters.

Result Data

The result of a process execution by a component is called "result data".
Substantially, read-capable adapters and converters produce the result data and write-capable adapters and converters uses it as "input data".

Variables

There are four different types of variables available in DataSpider Servista: Script variables, component variables, environmental variables, and trigger variables.

Name variable scope Description Whether the value assigned is modifiable within a script Usage Example Remarks
Script variables Script Variables which are usable within from a script.
Script variables can be arbitrary defined by user.
Yes
(Use Variable Mapper )
${ScriptVariableMame} ${var}
Component variables Script Predefined variables implicitly used by declared components.
Number of rows having being processed or errors occurred during operations can be obtained through the component variables.
No
(variables are assigned automatically)
${ComponentName.ComponentVaribaleName} ${csv_read.count}
  • Initialized with its default value when component is executed.
  • For more details, please refer to the help document available for each adapter
Environmental variables DataSpiderServer Environmental variables can be used system wide.
Script variables can be arbitrary defined by user.
No %{EnvironmentalVariableName} %{DB_HOST}
Trigger variables Trigger Predefined variables implicitly used by triggers. No ${trigger.TriggerVariableName} ${trigger.projectName}

I/O

I/O in this context involves manipulation of script arguments(script input variables) and the return values(script output variables).A script can declare its own input and out variables with attributes.
It can have more than one input and output variables, therefore it can expect multiple input arguments and return more than one return value.These I/O variables are collectively called I/O Interface

Variables for the I/O can be configured in the property settings under [I/O] tab.

Exit Status

Exit Status is a value returned to the caller of the script when the execution completes.
For details, please refer to End status

Execution ID

An unique id is assigned to each script being executed by DataSpiderServer.This is called as "Execution ID".
Execution ID is used to identify a script in the Logs and Task Manager.

Execution Environment ID (VMID)

Execution Environment ID is an ID allocated to a DataSpiderServer process when it starts up.
Execution Environment ID is used for identification of a DataSpiderServer process in DataSpiderServer settings, Execution Environment ID of Mapper logic, and exec log.

User Management

DataSpider Servista manages its own set of user accounts and groups that works independently of the OS user account system.
The permissions and privileges that are assign to user accounts and group determine which actions users can perform, as well as which project resources they can access.
Only the root user (administrator) exists in DataSpiderServista when installed. Management of user accounts is performed through User Account in Control Panel.
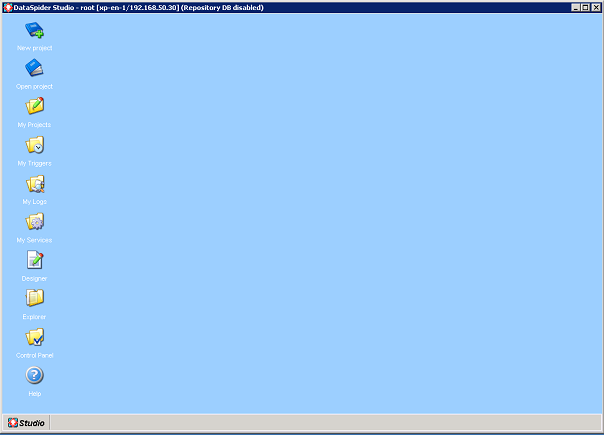
User accounts and groups cannot be added if no repository database is used.

Users and Groups

Home Directory

Every user account in DataSpider Servista has its own home directory and that is /home/<user name>.
The account's home directory is created when new account is created and it is where the projects created by the user are stored.

Tutorial

The following sections will give you a very simple tutorial which covers creation of a simple script and running it from Designer.
We are going to create a script that reads the contents of an existing CSV file and a write them to an another CSV file.

Start DataSpiderServer

Start DataSpiderServer by doing one of the following When DataSpiderServer is started normally, below messages are output to the server.log and the server starting console (only if you have not registered to the Windows service when installing DataSpiderServer).

--- |INFO|
--- |INFO|*****************************************************************
--- |INFO|*********************** DataSpider Server ***********************
--- |INFO|*****************************************************************
--- |INFO|Starting DataSpider Server...
--- |INFO|Loading system. System name: [DataSpider Server]
--- |INFO|System was successfully loaded.
--- |INFO|Loading modules...
(skip)
--- |INFO|Starting service of module [ScriptRunner Container]...
--- |INFO|Starting service of module [DataProcessingComponent Manager]...
--- |INFO|Service of module [DataProcessingComponent Manager] was successfully started.
--- |INFO|Service of module [ScriptRunner Container] was successfully started.
--- |INFO|System service was successfully started.
--- |NOTICE|DataSpider Server was successfully started.
--- |INFO|*****************************************************************

Start DataSpider Studio and login

In Windows menu, select "All Programs"-"DataSpider Servista <version>"-"DataSpiderStudio] to start.
When Studio is successfully launched, login screen is displayed.


To the [User] filed specify the 'root' and to the [Password] field, specify whatever the password created for it during the installation process, then press [Login] button to login.
Password defaults to 'password' if not specified explicitly during the installation process.
For how to change an account's password, refer to 'User Account Settings'

Upon successful login, Studio Desktop will be displayed.

Start Designer

Select [Designer] from Studio menu


Designer is started

Creating a project and a script

Press "New project" button in the tool bar.


"New Project" window will open Press [Next].


Press [Finish],


Both the project and the script which have been created will be displayed in the Project Explore and the script will be opened in the Script Canvas.


In the Project Explorer, different state of projects and scripts can be visibly noticed by icons change.

Icons Description Remarks
Represents that the projector the script has been modified.
  • The same holds true for the component icons in the Script Canvas and Mapping Canvas.
  • Will disappear when the project is saved.
  • When you close the designer and project without saving the project, any modifications made will be discarded.
Represents that the script is being edited (the script content is displayed) in the Script Canvas.  
Represents that the project or the script is being loaded.  
Represents that the script is locked.
  • For details regarding the lock, refer to Lock Script.

Creating input data.

Select [Explorer] from the Studio menu and start Explorer.


Select 'data' directory from the tree in the left pane.

In its adjacent right pane, right click to bring the menu in which you will then select [New]-[Text File].


Rename the file as "inputdata.csv".


Text editor will open by double clicking the file.


Enter the followings and save.

sampleDataA,100
sampleDataB,200
sampleDataC,300

Placing component icons

From the "File" category of the Designer tool palette, select "Read CSV File" and drag it onto the Script Canvas.


When it is dropped on the Script Canvas, the property dialog for Read CSV File operation will open.


In the [File] field, enter '/data/inputdata.csv' which is the absolute path that points to the csv file created in the previous step.
It could be also selected it the File Selectr that will appear when [Browse] button is clicked.
Click the [Add] and in the [Column name] input filed enter 'Product name'
Press [Add] again, but your will enter "quantity" in the [Column name] input filed this time.


When the [Finish] button is clicked, it will be placed in the Script Canvas.


From the "File" category, select "Write CSV File" and drag it onto the Script Canvas.


When it is dropped on the Script Canvas, the property dialog for Write CSV File operation will open.


In the [File] field, enter '/data/outputdata.csv' and click [Finish].

Draw a flow

Right click select the"csv_read"and drag it onto the"csv_write"component, holding the mouse button down.
Select the [Draw process flow and data flow] from the menu which will appear when the mouse button is released.

"Add mapping" dialog will open. Press [No],


Process flow is shown by the black solid line.
Data flow is shown by the yellow dashed lines .

Drag the "Start" component onto the "csv_read" and release the mouse button to drop.
Similarly, drag the "csv_write" onto the "End".


Script is now created.

Executing the script

Click the [Run] button in the tool bar.


The script is executed.
"Execute script" dialog will appear when the script completes successfully.


The duration of the script executed will appear in the Execution history.
When using Debug mode, it will show the duration of individual operations that comprises the process defined in the script.

See the execution result

Open the "data" directory in Explorer and confirm that there is "outputdata.csv" in it.


Double click "outputdata.csv" to open and see the result.


Saving the script.

Saving the script.

Select [Save Project] in the [File] menu.


Should the server restarts or the network connectivity is compromised, while the project is being saved, it may end up being saved in an invalid state and you may not be able to be reopen it.

We've reached the end of this tutorial.
Further reading "Service Development"