| Numbering in the figure |
Name |
Description |
Remarks |
| (1) |
Table list view |
Display a list of tables. |
- The maximum number of tables listed is determined by Global Resource settings.
 To add a table, select [Add] in the right-click menu in the root element and specify the table name. To add a table, select [Add] in the right-click menu in the root element and specify the table name. |
| (2) |
Table Canvas |
Configure the extraction definition of a read table. |
- To delete a read table, select [Remove] in the right-click menu on the table.
|
| (3) |
Extracted Column Editor |
Configure the order to write a read column and its alias. |
- An alias is used for describing a result of a SQL statement and a Mapper schema.
|
| (4) |
Root Elements |
Display the database name of the connecting destination. |
- Tables can be added by selecting [Add] in the right-click menu of the root element.
|
| (5) |
Read Table |
Tables to be read.
Specify which column to read. |
- The columns checked will be added to the extracted column editor.
- If you check the checkbox located on the left of [* (All columns)], you can set all columns to be read-only.
|
| (6) |
Mapping Link (Join) |
Define the key column and joint conditions. |
|
| (7) |
Up |
Move a read column up. |
|
| (8) |
Down |
Move a read column down. |
|
| (9) |
Generate SQL statement |
Automatically generate a SQL statement based on the settings. |
|
| (10) |
Help |
Start Help and display the SQL Wizard (Specifying SQL Statement) page. |
|
| Numbering in the figure |
Name |
Description |
Remarks |
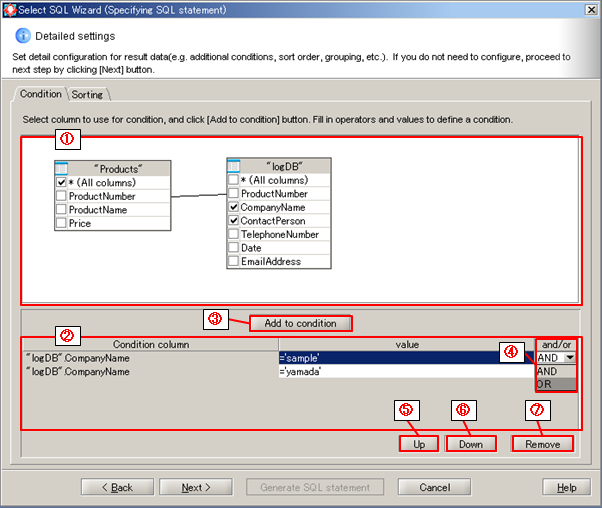
| (1) |
Table Canvas |
Configure the definition of read table definition. |
|
| (2) |
Condition Column Editor |
Configure the condition of read columns. |
-
Please use the consistent format for each database.
Example:
- If you want to read the record in which the value of the condition column is "Product A", set as "='Product A'"
- If you want to read the record in which the value of the condition column is "Product A" or "Product B", set as "IN('Product A', 'Product B'".
|
| (3) |
Add to condition |
Select columns you from the read table and add to the condition column. |
|
| (4) |
and/or |
Logic operators for multiple conditions.
|
|
| (5) |
Up |
Move a read column up. |
|
| (6) |
Down |
Move a read column down. |
|
| (7) |
Remove |
Delete a read column from a condition column editor. |
|
 For DataSpider Studio for Web, see here.
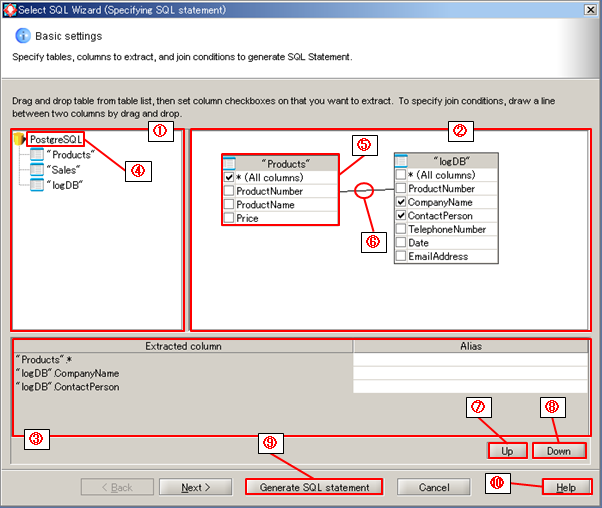
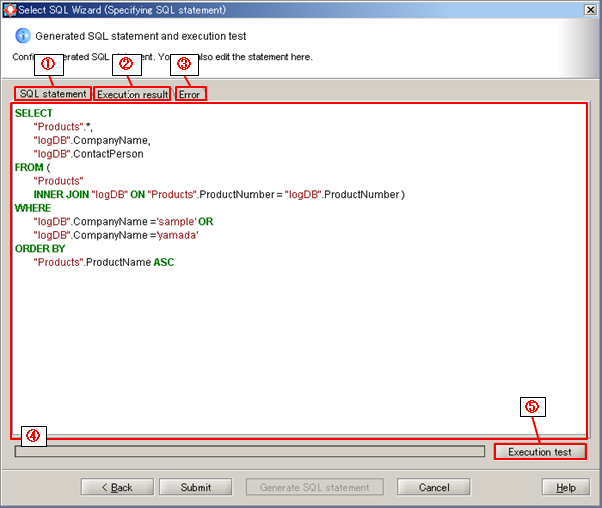
 If the SQL Statement is edited manually, not possible to edit in the Wizard.