Technical
Tips
How to Resume a Failed Transfer from the Point Where the Error Occurred
Introduction
When a transfer is interrupted because of a
problem, don't you wish that you could resume the transfer from the point where
the previous attempt left off?
HULFT provides a function that allows you to
resume a transfer from the point where an error or other abnormality occurred.
Because you don't need to resend the
portion of the data that has already been transferred, this function is
effective when there is a large amount of data in the send file.
- You can use the Checkpoint Resend function to resume a Send File, and the Checkpoint Resend Request function to resume a Send Request.
- Now, let’s go over the Checkpoint Resend function and the Checkpoint Resend Request function.
Notes
- The following conditions must be met in order to use a Checkpoint Resend File or a Checkpoint Resend Request.
- If even one of these conditions is not met, the entire file must be resent from the beginning.
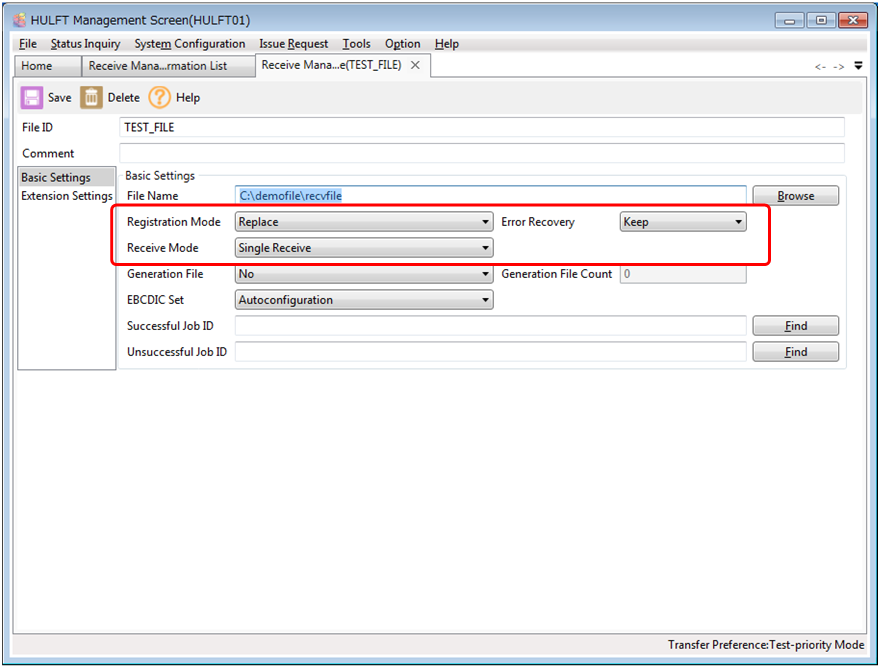
- - In the receive management information, for Registration Mode, either N (New Creation) or R (Replace) is specified.
- - In the receive management information, for Error Recovery, K (Save) is specified.
- - In the receive management information, for Receive Mode, S (Single Receive) is specified.
Checkpoint Resend File
How Checkpoint Resend File Works
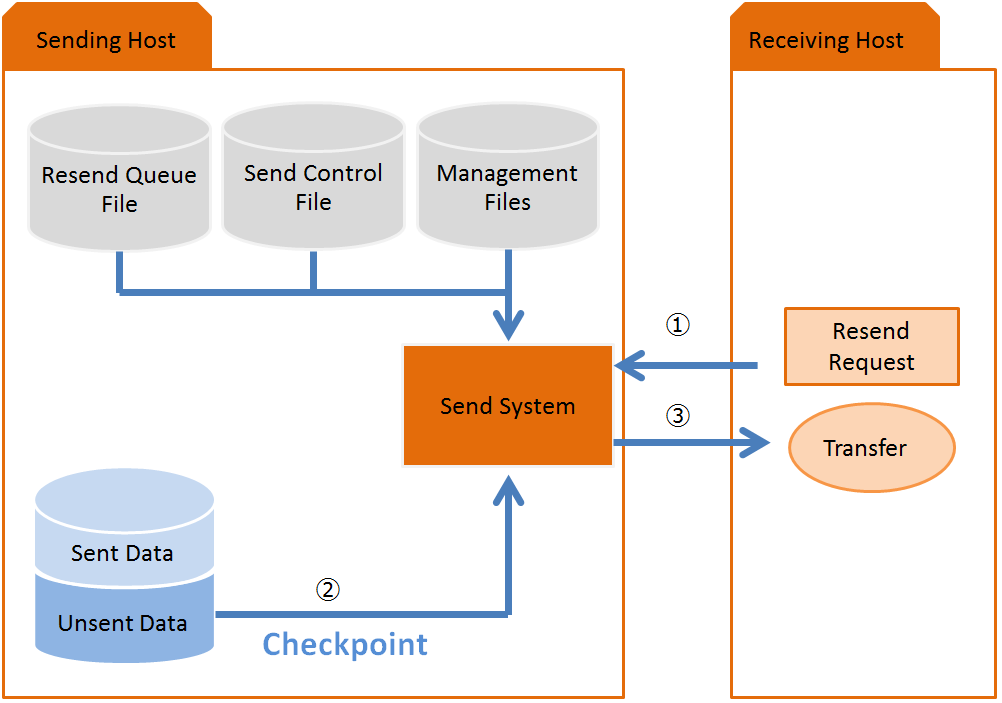
Now, we will explain how Checkpoint Resend File works by using the example shown in the following diagram.
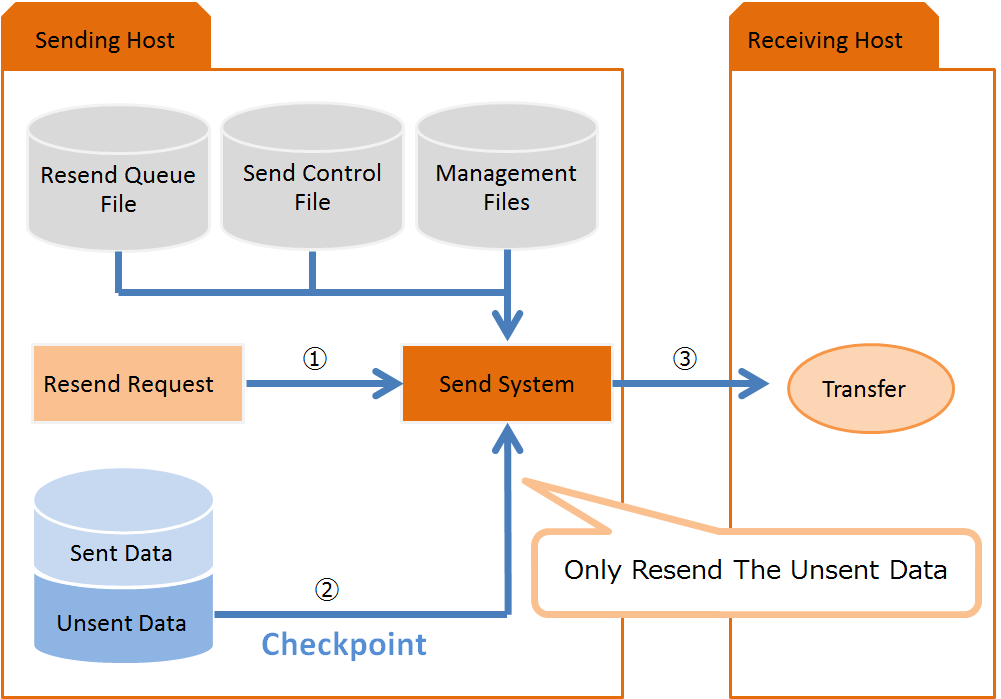
- 1. Issue the resend file command.
The file is resent by issuing a resend file
command.
Even if a pre-send job is specified in the
send management information, this pre-send job is not executed.
- 2. Skip reading the portion of the file that has already been sent.
When a Checkpoint Resend File is performed, the send system uses the size of the sent data and the number of sent records to determine which data has already been sent, and skips reading that portion of the data.
- 3. Send the file.
Code conversion and file compression are
performed based on the settings in the send management information for the last
suspended transfer, and the unsent data in the send file is transferred to the
remote host.
If you do not specify Checkpoint Resend
File when issuing a Resend File, the file is sent again from the beginning.
How to Execute Checkpoint Resend File
You can resend a file by using any of the
following four methods:
1. Issue a Resend File from the Issue Request menu.
2. Issue a Resend File from the Resend Queue Status List screen.
3. Issue a Resend File by using the
scheduler. (Windows only)
4. Issue a Resend File by using a command.
Now, I would like to explain these four methods.
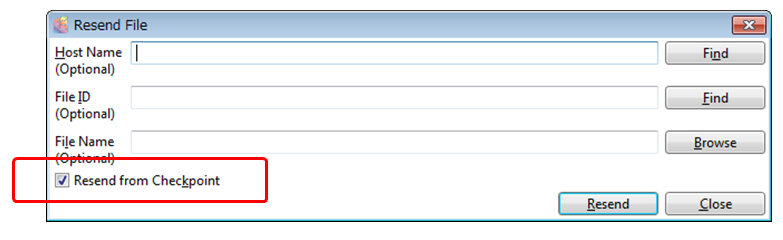
- 1. Issue a Resend File from the Issue Request menu.
Click Issue
Request and then Send File, and
then choose Resend File to open the Resend File dialog box.
To use Checkpoint Resend File, select the Resend from Checkpoint check box.
If you do not specify a host name, file ID,
or file name, resending will be performed for all transfers that are queued to
be resent.
This method is convenient when you want to
resend all files that are queued to be resent.
- 2. Issue a Resend File from the Resend Queue Status List screen.
Open the Resend Queue Status List screen and, from the list, choose the file
ID for which you want to issue a resend request.
Click Resend
to open the Resend File dialog box.
To use Checkpoint Resend File, select the Resend from Checkpoint check box.
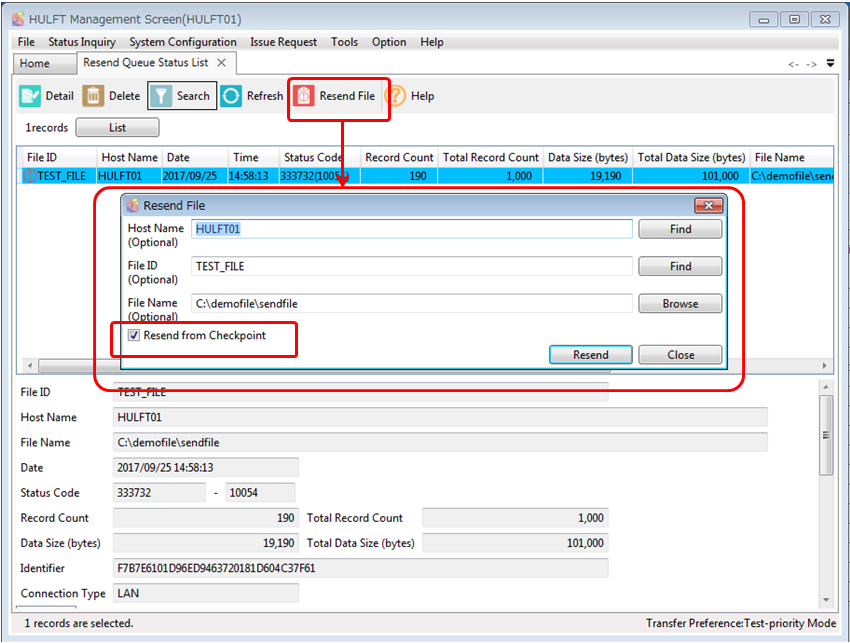
Because you can select the file ID from a list, this method is convenient when you want to specify a host name, file ID, or file name for the transfer you want to resend.
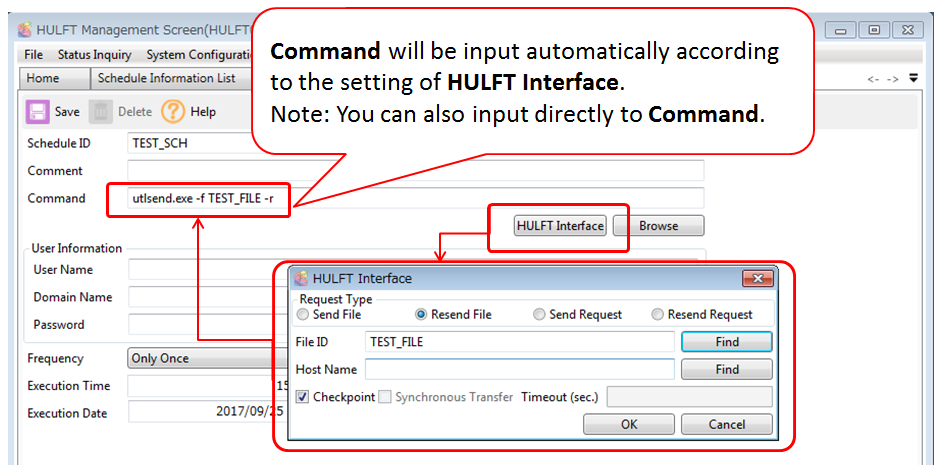
- 3. Issue a Resend File by using the scheduler. (Windows only)
In the Schedule
Information Update screen, click the HULFT
Interface button to open the HULFT
Interface dialog box.
To
resend the file from a checkpoint, select the Checkpoint check box.

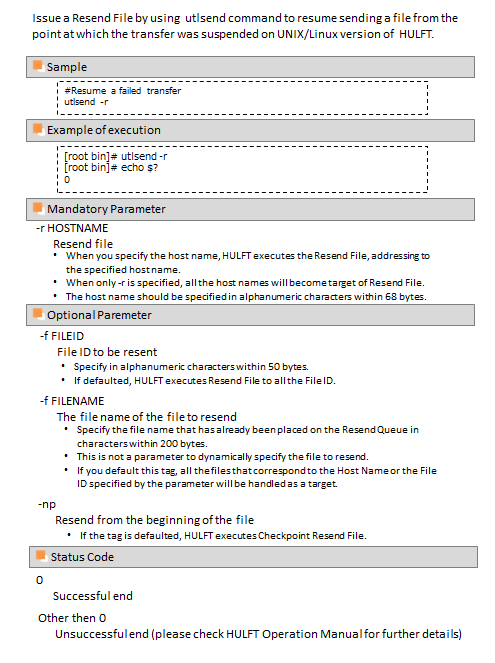
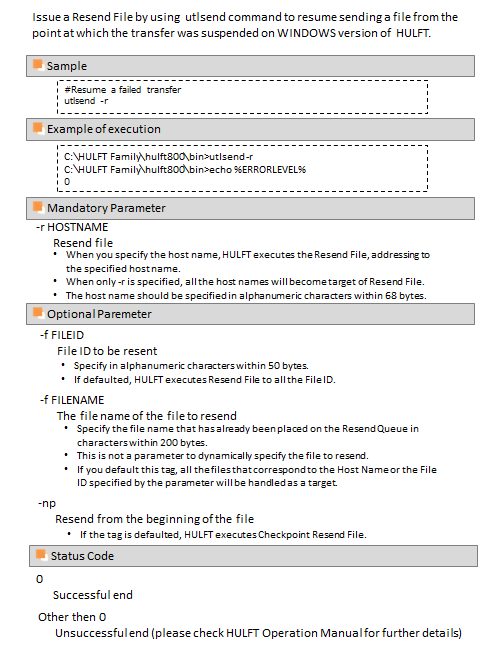
- 4. Issue a Resend File by using a command.
You can use the utlsend command to
resume sending a file from the point at which the transfer was suspended.
For details about this command, see the
section about resending in the reference materials.
- Resending (UNIX/Linux version)
- Resending (Windows version)
Checkpoint Resend Request
How Checkpoint Resend Request Works
Now, we will explain how Checkpoint Resend Request works by using the example shown in the following diagram.
- 1. Issue the Resent Request command.
The Request Acknowledge process
acknowledges the Resend Request from the receiving host.
When a file is to be resent, even if a
pre-send job is specified in the send management information, this pre-send job
is not executed.
- 2. Skip reading the portion of the file that has already been sent.
The send thread uses the resend queue file to determine the number of sent records and the size of the sent data, and skips the data that has already been sent.
- 3. Send the file.
The send thread performs code conversion
and file compression based on the settings in the send management information
for the last suspended transfer, and transfers the unsent data in the file to
the remote host.
If you do not specify Checkpoint Resend
Request when issuing a Resend Request from the receiving host, the file will sent
again from the beginning.
How to Execute Checkpoint Resend Request
You can request the resending of a file by
using any of the following three methods:
1. Issue a Resend Request from the Issue Request menu.
2. Issue a Resend Request by using the
scheduler. (Windows only)
3. Issue a Resend Request by using a
command.
Now, we would like to explain these three methods.
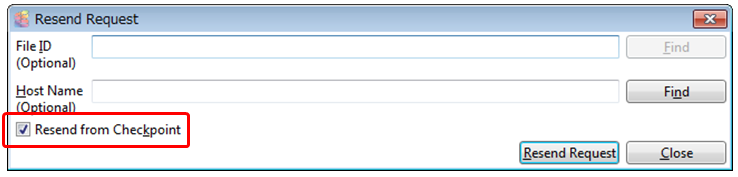
- 1. Issue a Resend Request from the Issue Request menu.
Click Issue
Request and then Send Request,
and then choose Resend Request to
open the Resend Request dialog box.
To use Checkpoint Resend Request, select
the Resend from Checkpoint check
box.
- 2. Issue a Resend Request by using the scheduler. (Windows only)
In the Schedule
Information Update screen, click the HULFT
Interface button to open the HULFT
Interface dialog box.
To resend the file from a checkpoint,
select the Checkpoint check box.
This method is convenient if you want to perform this action periodically.
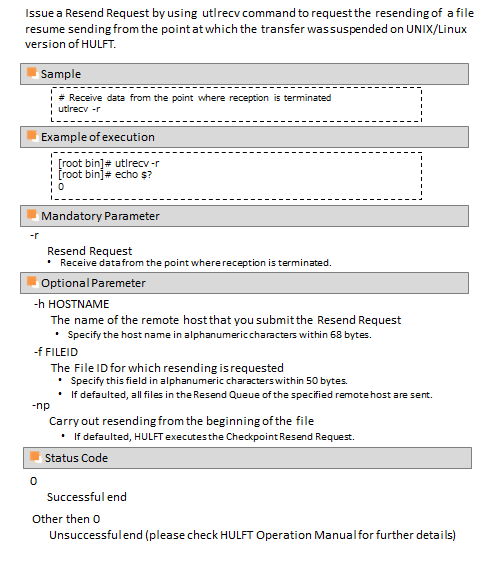
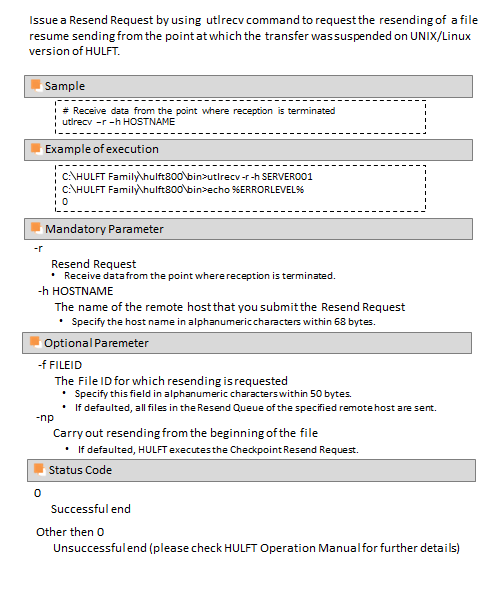
- 3. Issue a Resend Request by using a command.
You can use the utlrecv command to request the resending of a file resume sending from the point at which the transfer was suspended.
For details about this command, see the
section about resending in the reference materials.
- Requesting the resending of a file (UNIX/Linux version)
- Requesting the resending of a file (Windows version)
Conclusion
So, what do you think?
If you resume a file transfer from a
checkpoint, you can resume sending or receiving the file from that checkpoint,
without having to re-transfer data that was already transferred.
This is especially effective when the file to be sent contains a large volume of data. Please use these functions to help you in your operations.