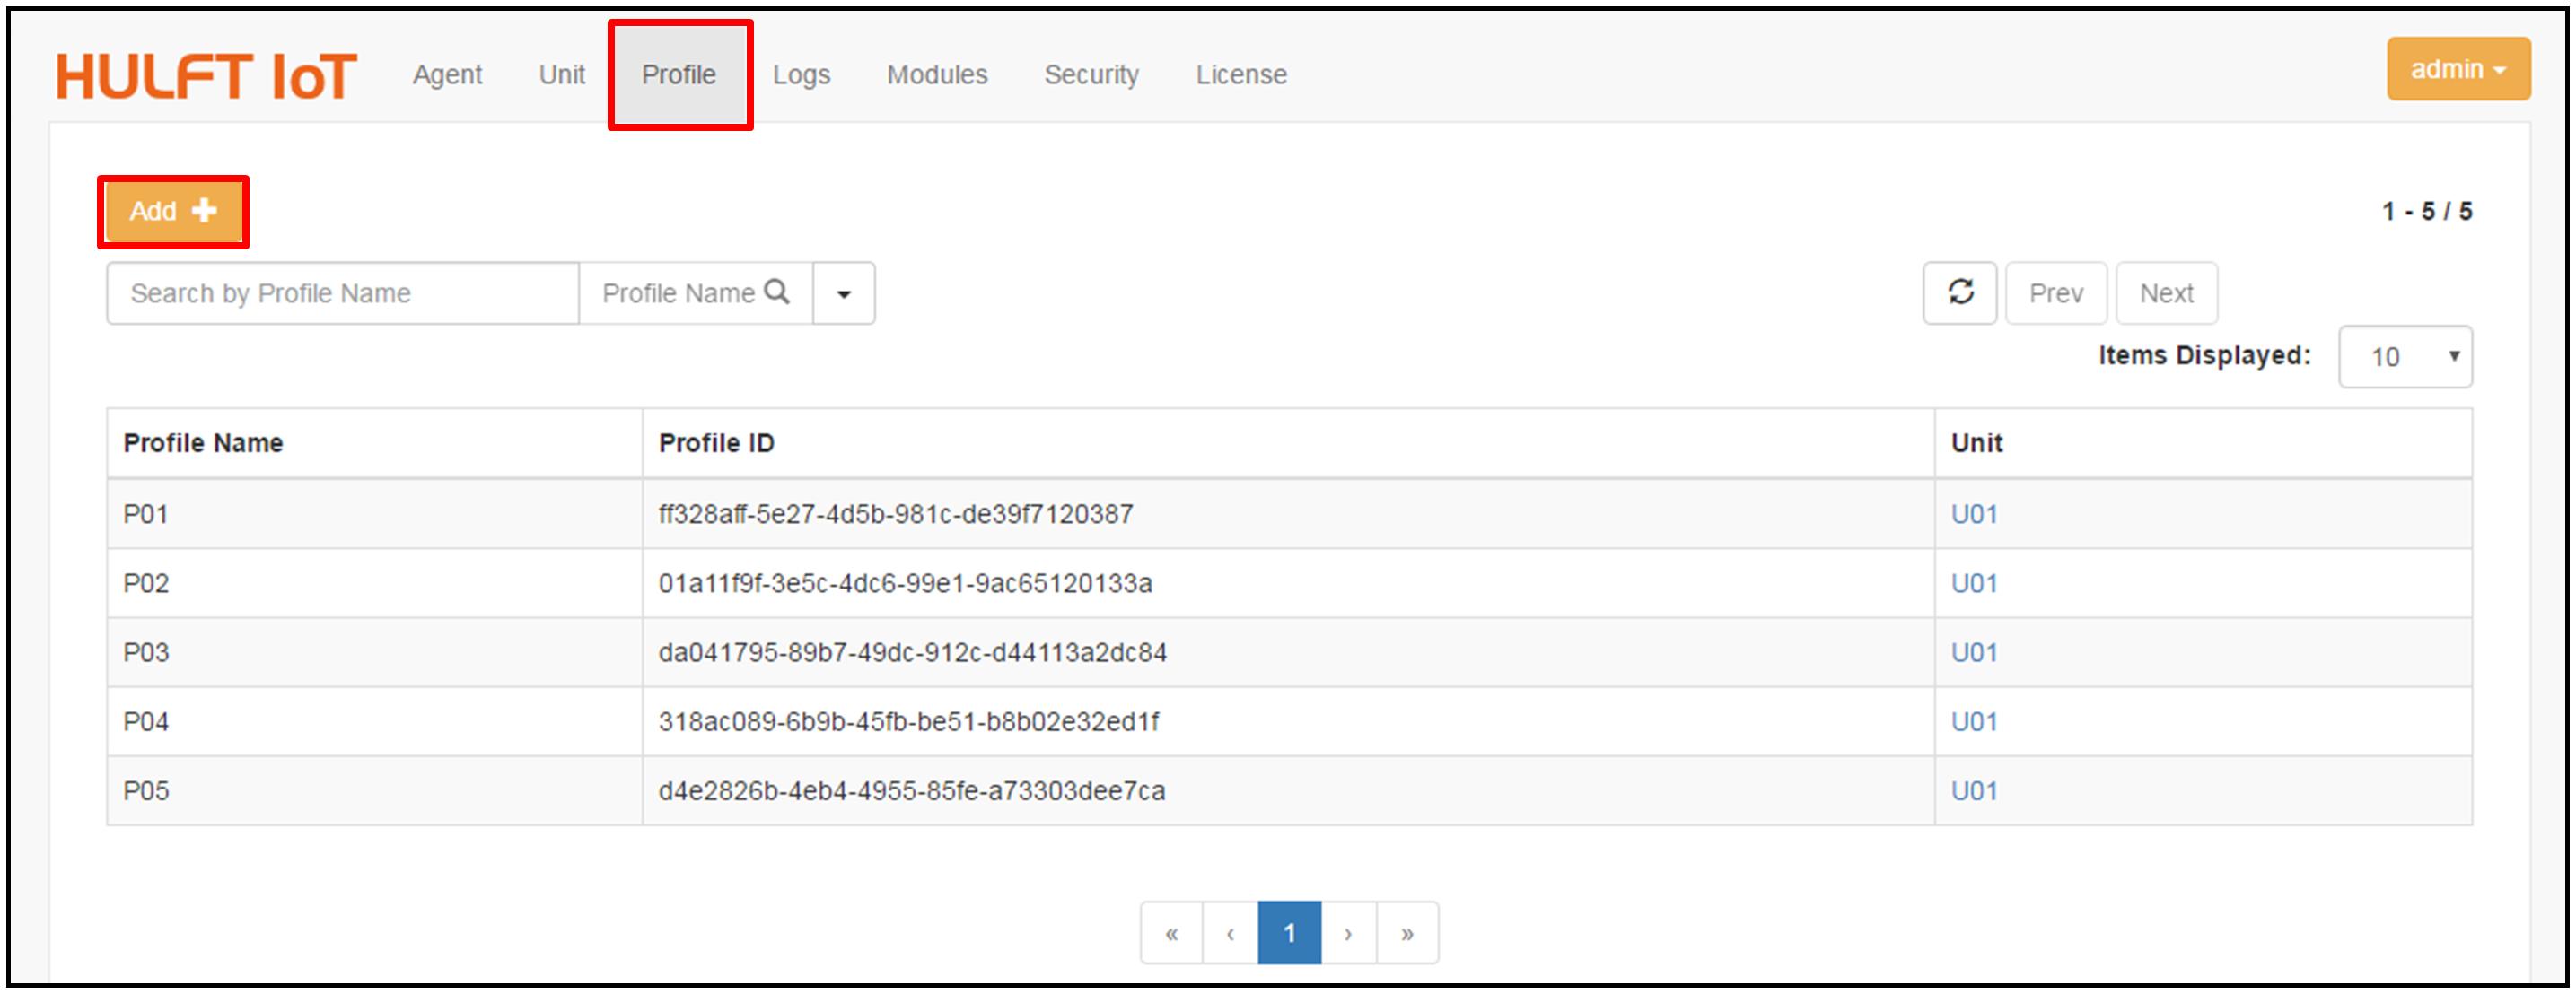
Creating profiles and transfer settings
You must set up "profiles" that define the settings necessary for file transfers (transfer settings).
To register profiles, perform the following procedure:
1. From the operation screen of Manager, select [Profile], and then on the Profile List screen, click [Add].
2. On the Create Profile screen, enter information into the fields, and then click [Create Profile].
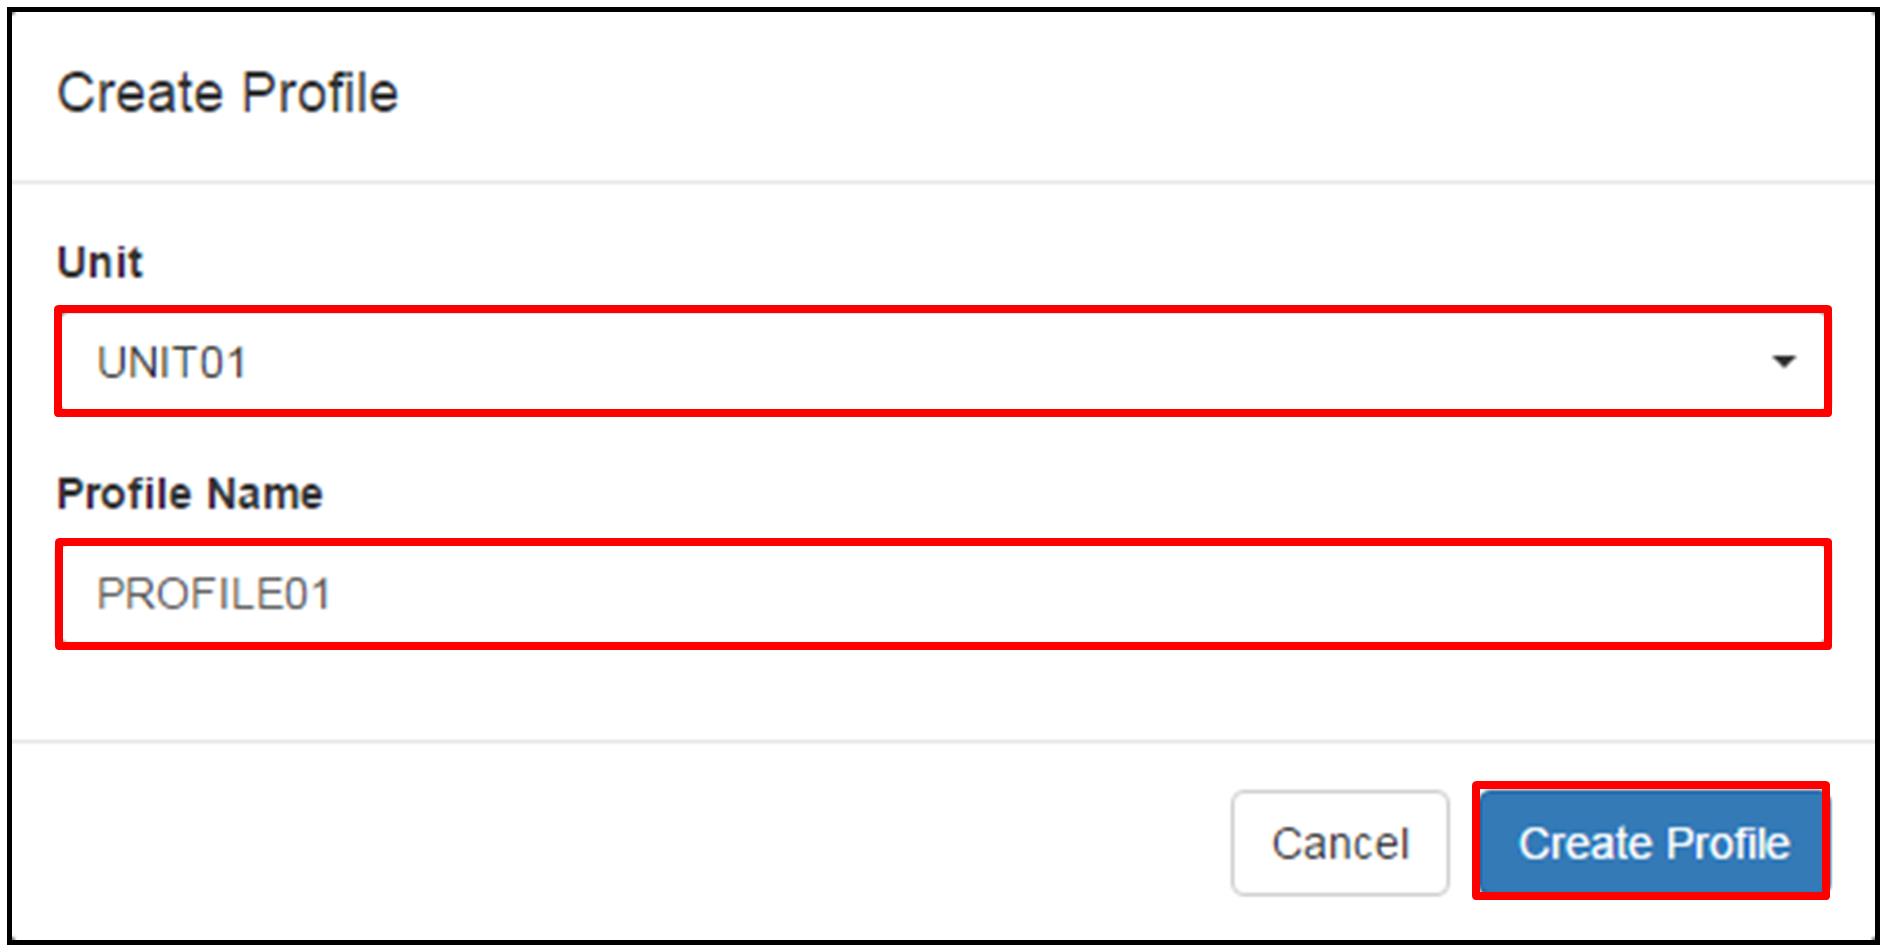
- Unit
Select the unit to which the creating profile belongs from the list of registered units.
- Profile Name
Specify a unique name for the profile.
Information about registered profiles appears on the Profile List screen.
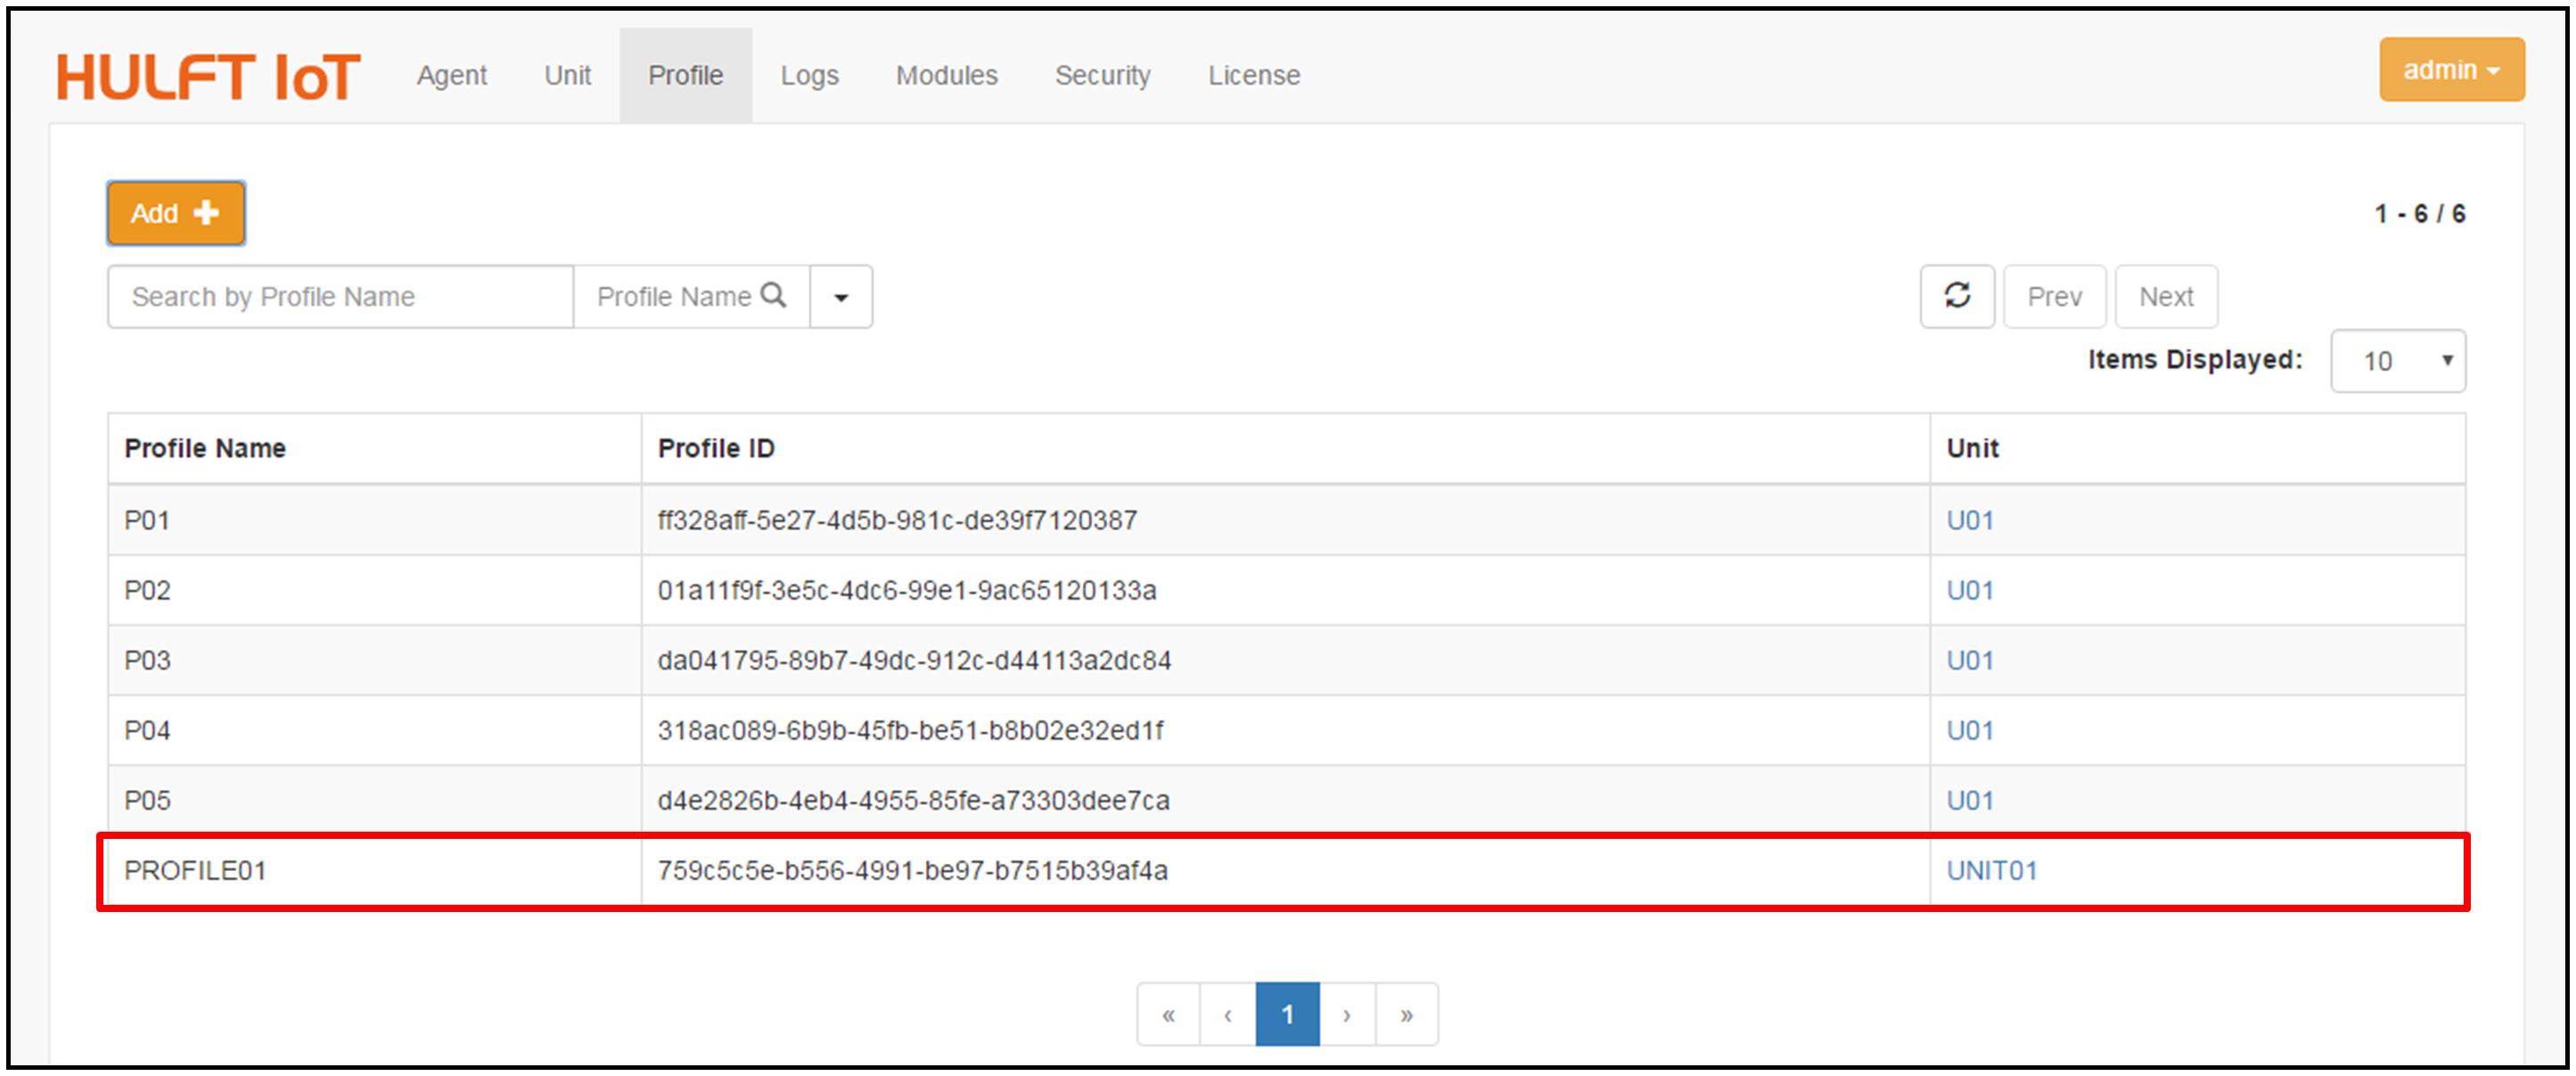
3. On the Profile List screen, click the profile information.
4. Under [Transfer Settings] on the [Basic Settings] tab of the Profile Details screen, click [Add].
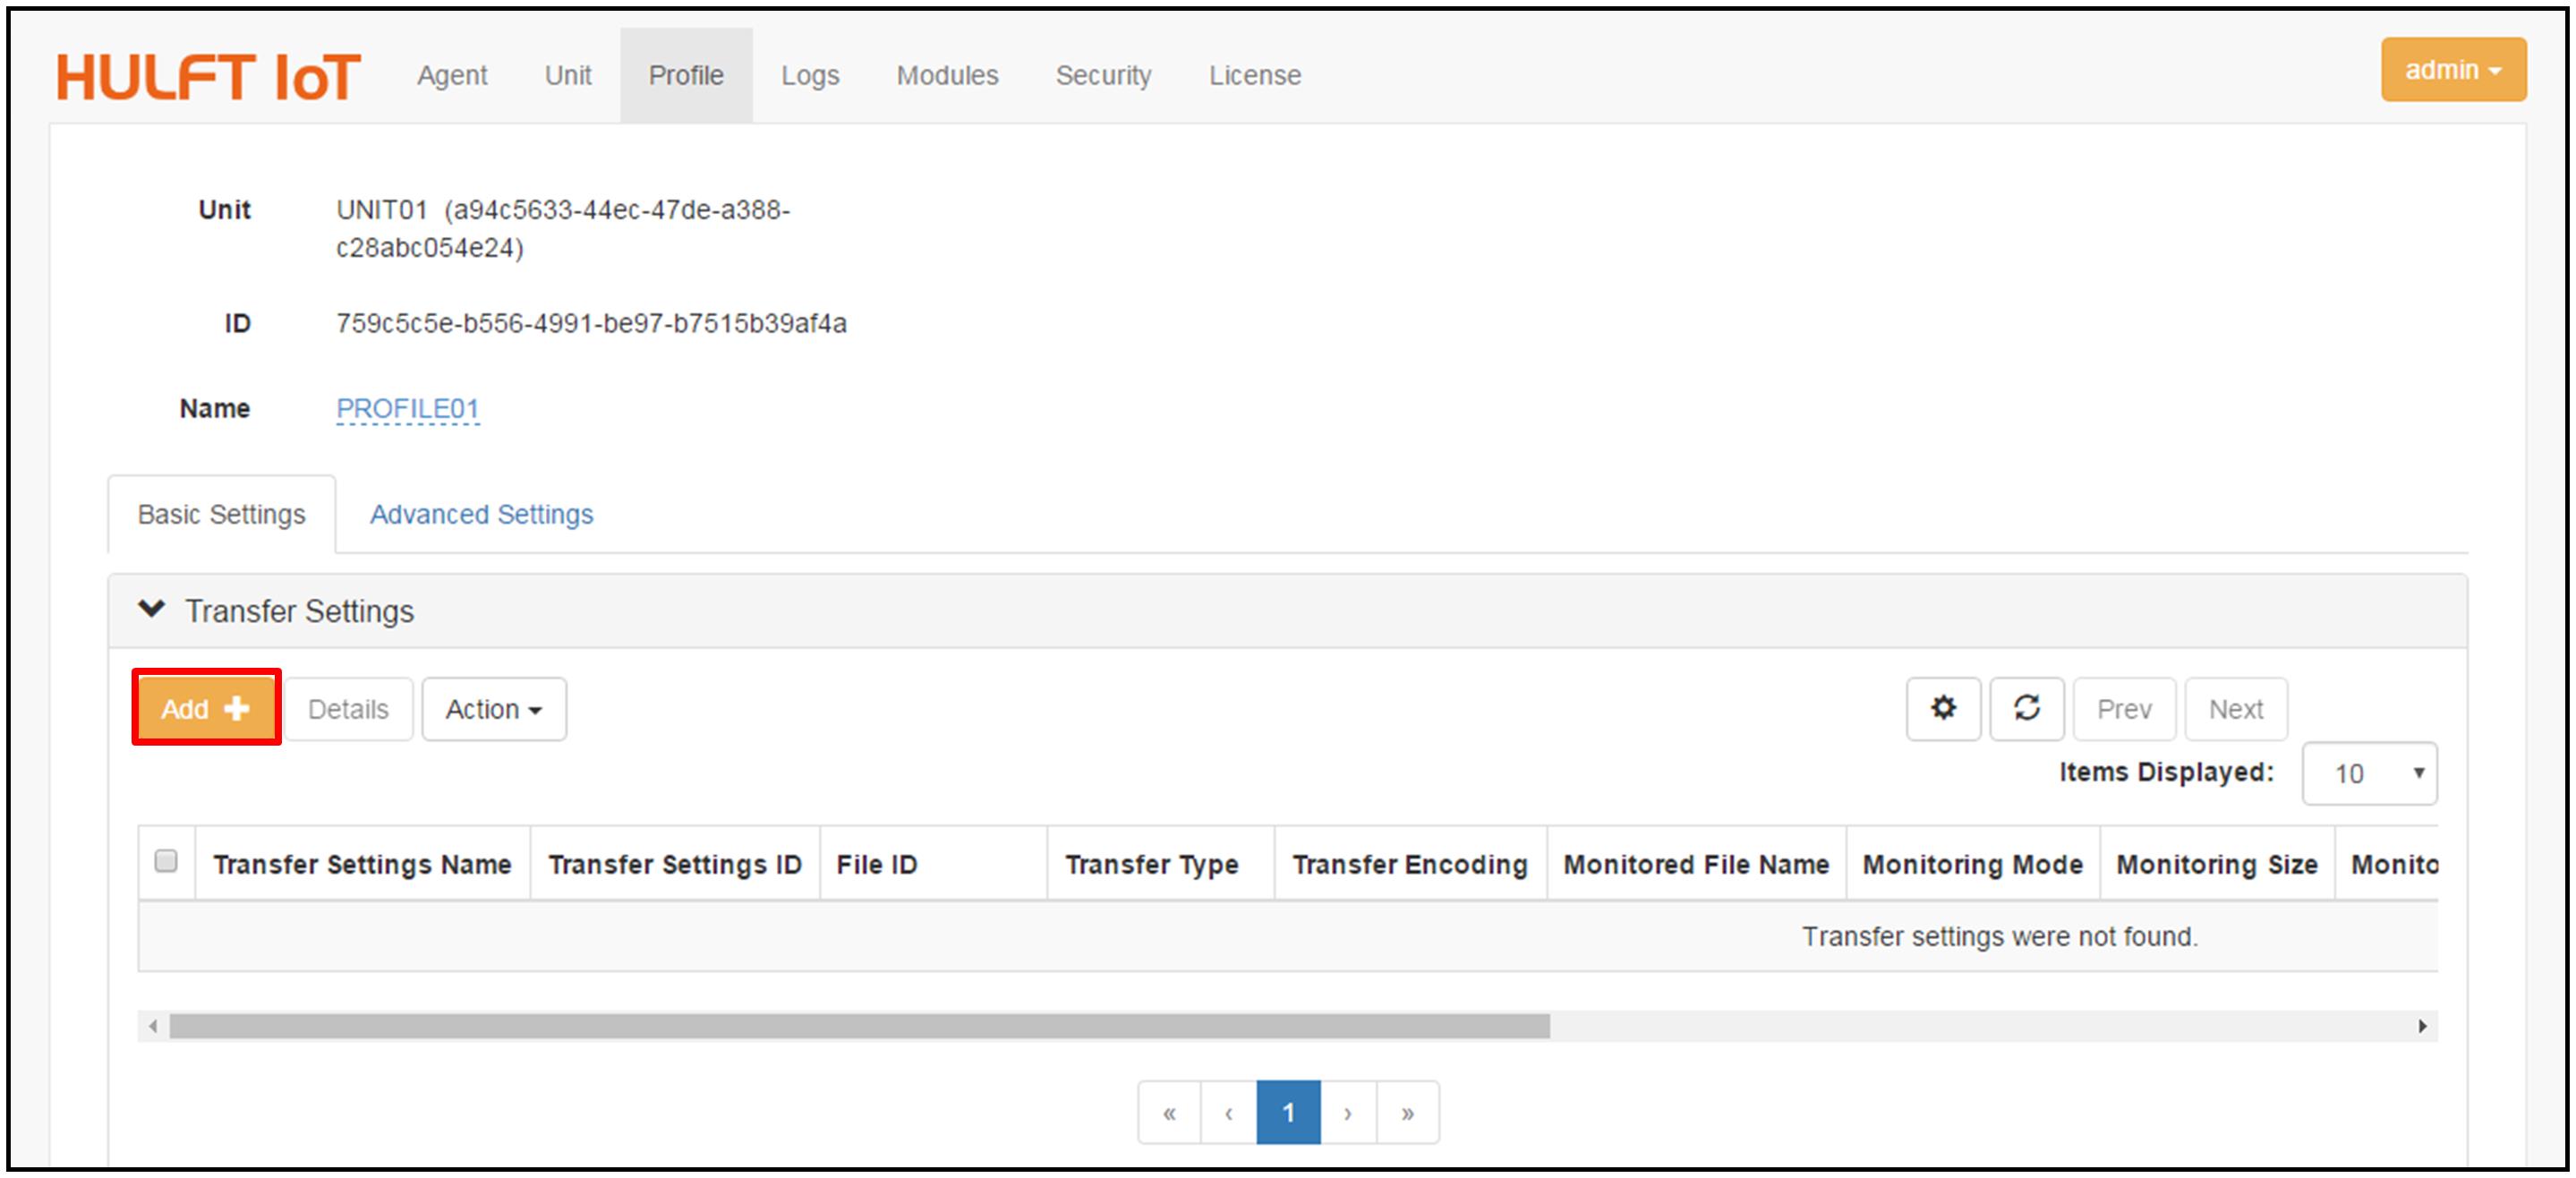
5. On the Transfer Settings screen, enter information in the fields, and then click [Save].
If the product is a region edition, [Encryption Type] is not displayed.
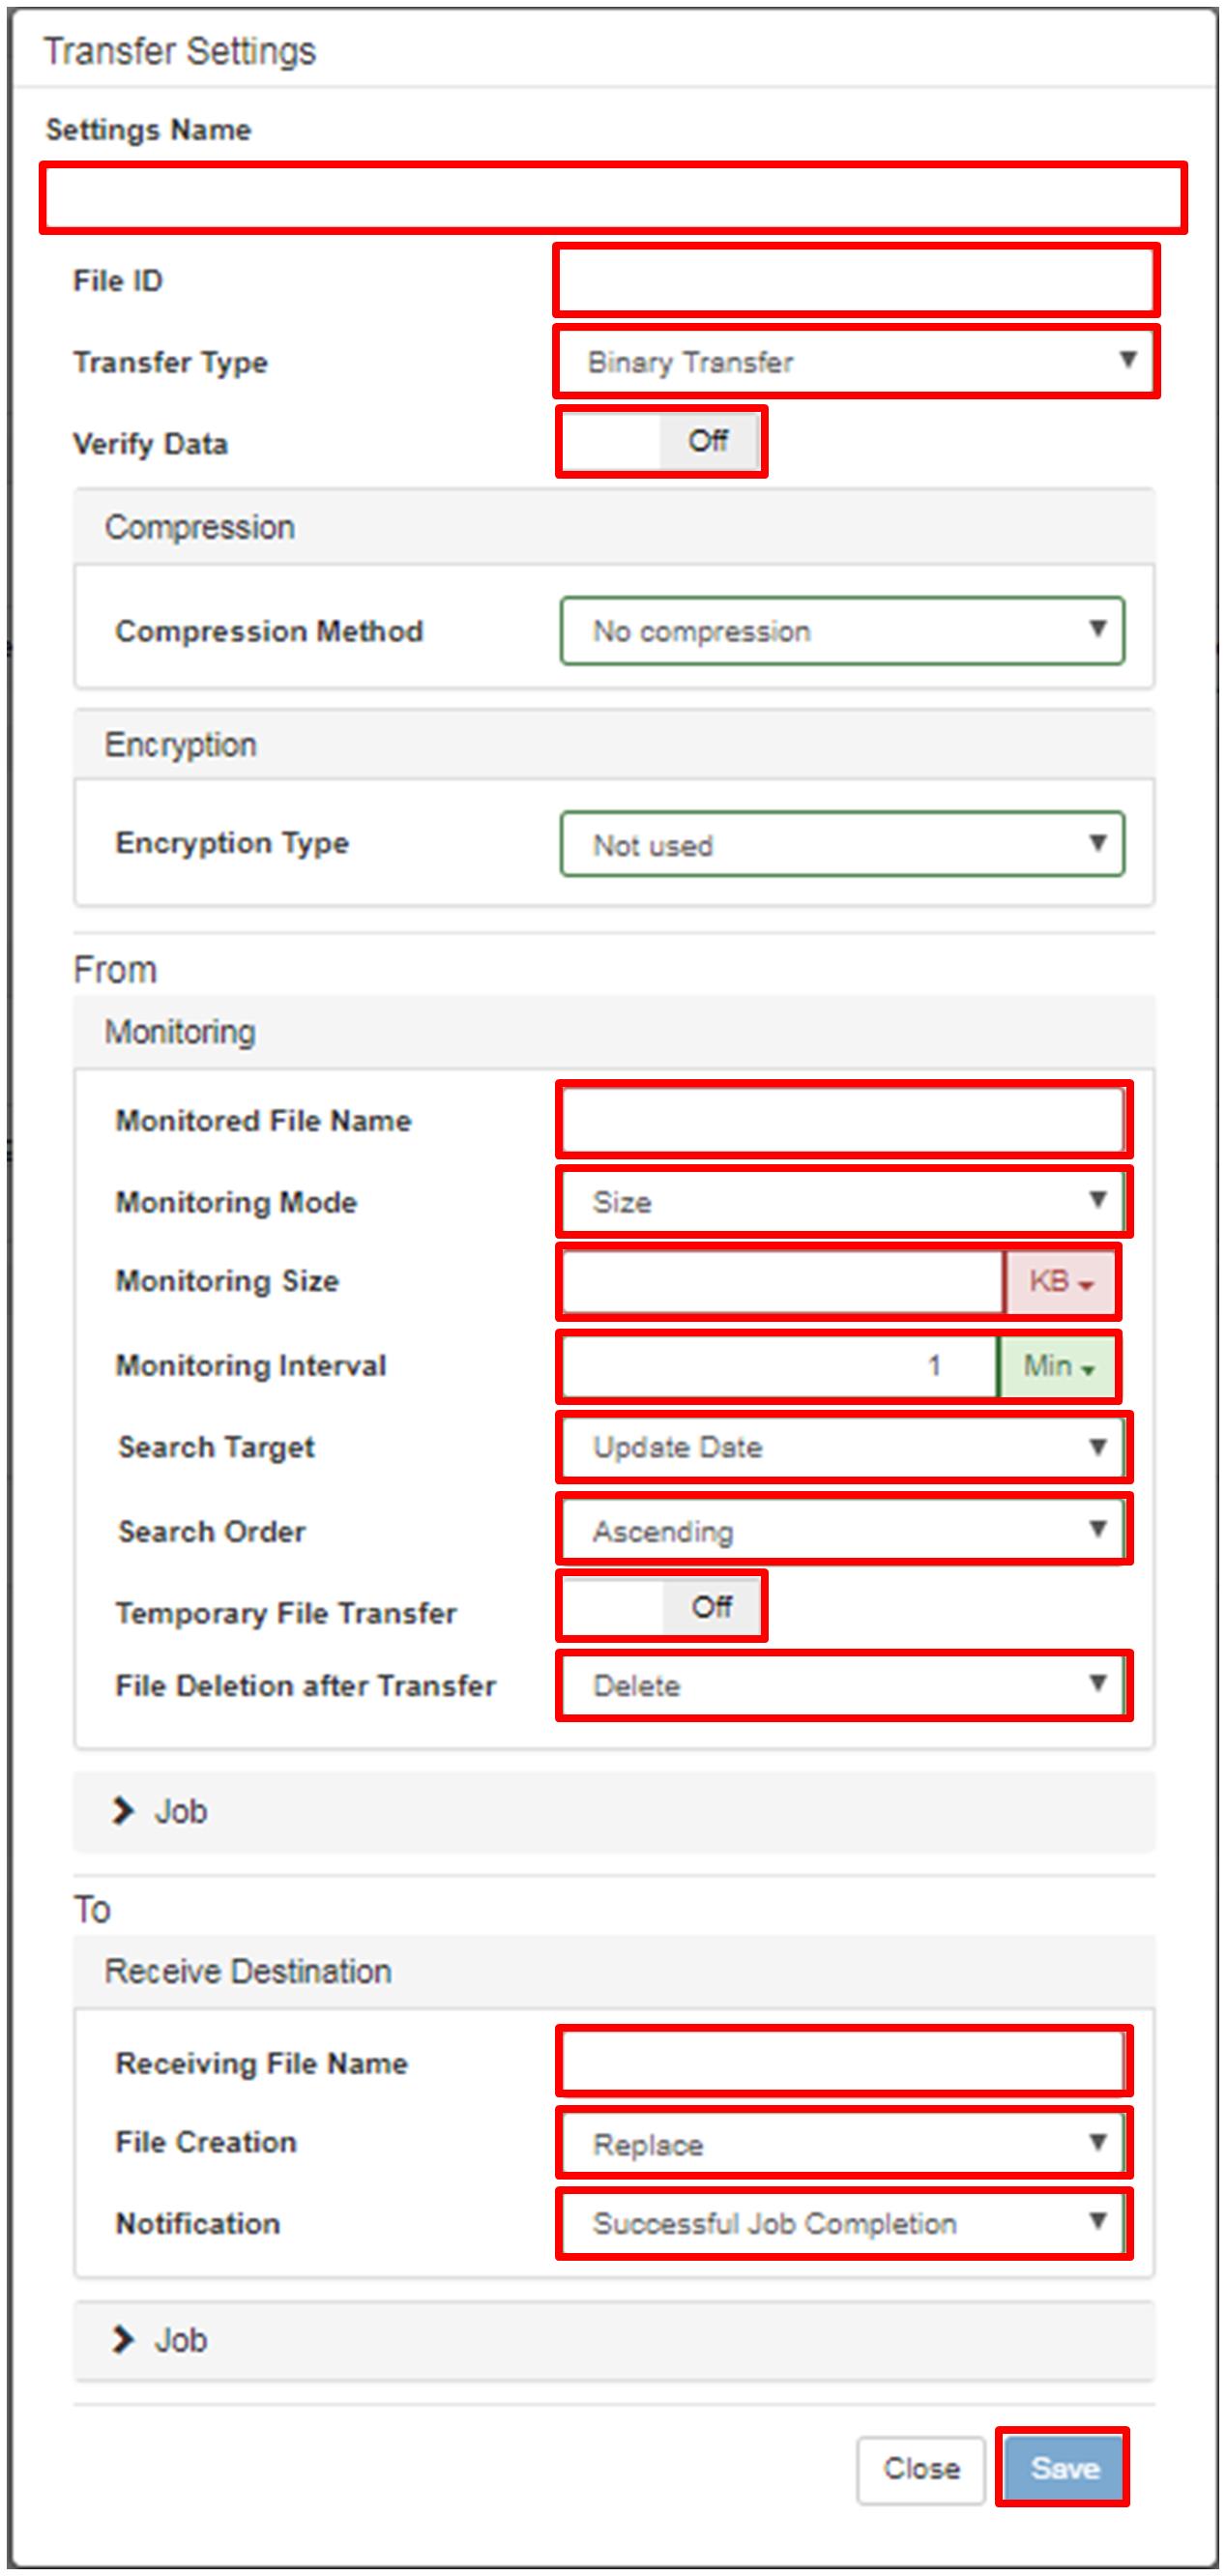
- Settings Name
Specify a unique name (with a maximum of 64 characters in length) for the file transfer settings. You can use multi-byte characters in [Settings Name].
- File ID
Specify a file ID (with a maximum of 50 characters in length) to be used in transfers to HULFT. You can use uppercase alphanumeric characters.
- Transfer Type
Choose whether transfer data is handled as binary data or text data. When data is handled as text data, character codes and newline codes are converted before the transfer.
- Verify Data
-
[On]: Data is verified.
If the verification result is invalid, receiving the file is canceled. Because the transfer fails, if Unsuccessful Job is registered on a sender and on a receiver, Unsuccessful Jobs are executed.
-
[Off]: Data is not verified.
Choose whether you want to verify the data of the transfer files on the receiver.
- Compression
Specify these items for the compression of file transfers.
|
Field name |
Description |
Specifiable values |
Default value |
|---|---|---|---|
|
Compression Method |
Specify whether to have transfer files be compressed. |
[No compression] or [DEFLATE compression] |
[No compression] |
| DEFLATE level |
Specify a value to adjust the compression ratio and compression speed when the transfer file is compressed. |
[Prioritize Compression Ratio]:Prioritize the compression ratio. [Prioritize Compression Speed] Prioritize the compression speed. [Default]:Perform no adjustments. |
None |
- Encryption
|
Field name |
Description |
Specifiable values |
Default value |
|---|---|---|---|
|
Encryption Type |
Specify whether to encrypt transfer files. |
[Not used]: Transfer files are not encrypted. [HULFT encryption]: Transfer files are encrypted by HULFT. |
[Not used] |
| Encryption Key |
If [HULFT encryption] is selected for the [Encryption Type] field, specify an encryption key to be used for transfers. |
8 to 20 characters Alphanumeric characters |
None |
- Monitoring (From)
-
- Monitored File Name
-
Specify the location of the file stored on the IoT equipment by using a full path (a file name or path).
- File Deletion after Transfer
If [Do not delete] is specified for the [File Deletion after Transfer] field, temporary files will remain after the transfer when [On] is specified for the [Temporary File Transfer] field.
Specify the names of files to be monitored and the monitoring conditions (Monitoring Mode, Monitoring Interval, etc.).
|
Field name |
Description |
Specifiable values |
Default value |
|---|---|---|---|
| Monitored File Name |
Specify a file name or path to be monitored. If a path is specified, all files in the specified path are monitored. You can use an asterisk (*) as a wildcard character in the file name to have Agent monitor multiple files. |
256 bytes |
None |
| Monitoring Mode |
Specify what will trigger a transfer of the monitored files. - [Size]: Agent transfers a file when the size of the monitored file exceeds a specified size. - [Time Stamp]: Agent transfers a file when the specified period has elapsed since the monitored file was last updated. |
[Size] or [Time Stamp] |
[Size] |
| Monitoring Size or Elapsed Monitoring Time |
Specify this value according to the type specified in the [Monitoring Mode] field. - If [Size] is specified: Specify the monitoring size, with a unit selected from among [B], [KB], [MB], and [GB]. - If [Time Stamp] is specified: Specify the elapsed time from the last update of the monitored file, with a unit selected from among seconds, minutes, hours, and days. |
Monitoring Size: Numeric characters from 1 to 1023 Elapsed Monitoring Time: Numeric characters from 1 to 59 |
None |
| Monitoring Interval |
Specify the interval at which to monitor the file that is specified in Monitored File Name. Use numeric characters, with a unit selected from among seconds, minutes, hours, and days. |
Numeric characters from 1 to 59 |
1 minute |
| Search Target |
Select the item that becomes the key of a transfer order when Agent transfers multiple files at the same time of a trigger fire. - [Update Date]: Agent searches the transfer files by using an update date of the file as a key. - [File Name]: Agent searches the transfer files by using a file name as a key. |
[Update Date] or [File Name] |
[Update Date] |
| Search Order |
Select the order that Agent searches a file to be transferred when Agent transfers multiple files at the same time of a trigger fire. When [Update Date] is selected as a search target: - [Ascending]: Agent searches the file from the oldest one. - [Descending]: Agent searches the file from the newest one. When [File Name] is selected as a search target. - [Ascending]: Agent searches the file name in ascending order according to the ASCII Code. For example, files are transferred in sequence from A-1.txt, A-2.txt, B-1.txt, B-2.txt, C-1.txt, and C-2.txt. - [Descending]: Agent searches the file name in descending order according to the ASCII Code. For example, files are transferred in sequence from C-2.txt, C-1.txt, B-2.txt, B-1.txt, A-2.txt, and A-1.txt. |
[Ascending] or [Descending] |
[Ascending] |
| Temporary File Transfer |
If this field is set to [On], temporary file transfer is performed. Agent changes the name of a file to a temporary file name before Agent transfers the file. You can use temporary file names when you want to continue using the same file name during file transfers. |
[On] or [Off] |
[Off] |
| File Deletion after Transfer |
Specify whether to have Agent delete files after they have been transferred. If you do not use this functionality to have Agent delete files, delete files by using a Successful Job. If transferred files are not deleted, the same files will be detected again. |
[Delete] or [Do not delete] |
[Delete] |
- Job (From)
Specify these items for the execution of jobs. For details of the execution mode, see (6) Specifying the job execution mode in Pre-send Jobs, Post-send Jobs, and Post-receive Jobs.
|
Field name |
Description |
Specifiable values |
Default value |
|---|---|---|---|
| Pre-send Job Execution Mode |
|
[Script Execution] or [Step Execution] |
[Script Execution] |
| Pre-send Job | Describe jobs that are executed before file transfer processing. |
ASCII characters (alphanumeric characters and symbols) Maximum 2048 characters |
None |
|
Successful Job Execution Mode |
|
[Script Execution] or [Step Execution] |
[Script Execution] |
| Successful Job | Describe jobs that are executed after files are successfully transferred. |
ASCII characters (alphanumeric characters and symbols) Maximum 2048 characters |
None |
| Unsuccessful Job Execution Mode |
|
[Script Execution] or [Step Execution] |
[Script Execution] |
| Unsuccessful Job | Describe jobs that are executed after file transfers fail. |
ASCII characters (alphanumeric characters and symbols) Maximum 2048 characters |
None |
- Receive Destination (To)
-
[Replace]: An old file is replaced by a new file.
If the file that is specified by [Receive File Name] does not exist on the receiver, the file is created.
-
[New Creation]: New file is created.
An error occurs when the file with the same name as Received File Name already exists.
-
[Append]: The received data are appended to the end of the existing file so that the received files can be merged into one file.
If the file that is specified by [Receive File Name] does not exist on the receiver, the file is created.
-
[Generation File]:Files of the number of generations that is specified by [Generation File Count] are created and managed.
If "C:\test\rcv.txt" is set for [Receiving File Name], a suffix number is added after the extension that is divided by a dot such as "rcv.txt.0001", "rcv.txt.0002", and so on.
-
[Replace]: save
The transfer files remain in the monitored directory.
-
[New Creation]: delete
The transfer files are deleted from the monitored directory.
-
[Append]: save
The transfer files remain in the monitored directory.
-
[Generation File]: delete
The transfer files are deleted from the monitored directory.
-
[Successful Job Completion]: The notification is sent to the instance of Agent at the completion of successful jobs.
-
[Receive Completion]: The notification is sent to the instance of Agent at the completion of receiving files. Even if a job ends abnormally, the transfer ends normally.
-
- Receiving File Name
For the Linux version, do not specify a path that includes one or more spaces.
Specify how to handle the files that are received from Agent on the receiver.
|
Field name |
Description |
Specifiable values |
Default value |
|---|---|---|---|
| Receiving File Name |
Specify a name of transferred files on the receiver by using a full path. If you monitor multiple files, the name of the received files will be the same. |
Maximum 200 characters ASCII characters (alphanumeric characters and symbols) |
None |
| File Creation |
Select the file creation method on the receiver. Receiving files from only one host, you must select [Replace], [New Creation] or [Generation File]. Receiving files from multiple hosts, you must select [Append]. If an attempt to receive a transfer file failed, Agent treats the transfer file as follows: |
[Replace], [New Creation], [Append], or [Generation File] |
[Replace] |
|
Generation File Count |
If you select the [Generation File] for [File Creation Method], specify the number of generations to be managed. |
Numeric characters from 2 to 9999 |
None |
| Notification |
Specify when the notification that file reception is completed is sent to an instance of Agent. At the specified time, the completion of the receiving files is displayed on the Logs screen of Manager. |
[Successful Job Completion] or [Receive Completion] |
[Successful Job Completion] |
- Job (To)
Specify these items if you want to execute jobs on the Manager environment after receiving files.
|
Field name |
Description |
Specifiable values |
Default value |
|---|---|---|---|
| Successful Job |
By using an absolute path, specify the batch file, shell script, or program name, which are executed on the application server after the file reception completes. You can describe up to 13 jobs by separating each job with a newline character. If you specify the parameters for the job, specify them by following the absolute path. The absolute path and the parameter, and each parameter should be divided by using a space. |
Maximum 200 characters for each job and up to 13 jobs ASCII characters (alphanumeric characters and symbols) |
None |
| Unsuccessful Job |
By using an absolute path, specify the batch file, shell script, or program name, which are executed on the application server after the file reception fails. You can describe up to 13 jobs by separating each job with a newline character. If you specify the parameters for the job, specify them by following the absolute path. The absolute path and the parameter, and each parameter should be divided by using a space. |
Maximum 200 characters for each job and up to 13 jobs ASCII characters (alphanumeric characters and symbols) |
None |