Official | HULFT IoT EdgeStreaming Adapter Reference First Edition: July 1, 2021
Edit resource list
On the editing screen for the resource list for the temporary table, you can change the settings for the registered temporary table.
To display the editing screen, in the Required settings tab on the writing operation screen, the monitoring records operation screen, or the get table status operation screen, open the pulldown list of Table, and then click Edit resource list.
The following types of operations use a common temporary table:
-
Writing operation
-
Monitoring records operation
-
Get table status operation
It is not necessary to create a temporary table for each component.
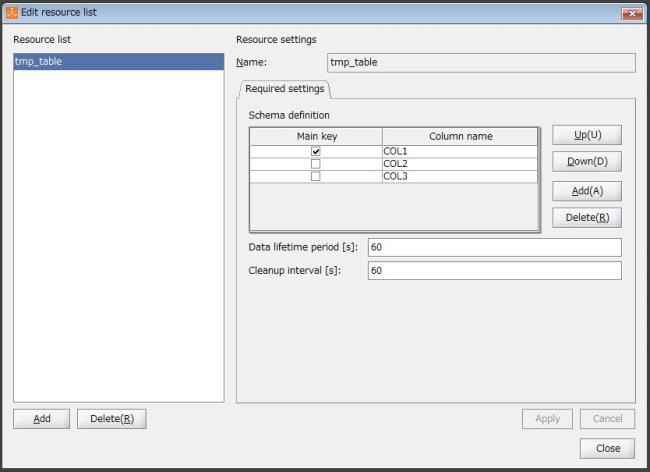
Figure 2.8 Edit resource list screen
(1) Field list
This is a list of the fields to configure on the Edit resource list screen.
|
Field Name |
Initial Value |
Setting Value |
Omission |
Notes |
|---|---|---|---|---|
|
Resource list |
|
Resource name of the registered temporary table |
- |
|
|
Name |
|
Single-byte alphanumeric characters and certain symbols (*1) |
- |
A value that begins with a single-byte alphabetic character |
|
Schema definition |
|
Schema definition for the temporary table |
- |
|
|
Main key |
|
|
- |
Select the appropriate check box to set the main key |
|
Column name |
|
Single-byte alphanumeric characters and certain symbols (*1) |
- |
A value that begins with a single-byte alphabetic character |
|
Data lifetime period |
0 |
From 0 to 86400 |
- |
Unit: seconds Set as integer |
|
Cleanup interval |
0 |
From 0 to 86400 |
- |
Unit: seconds Set as integer |
|
- |
: |
Impossible to omit |
|
*1 |
: |
Only "_" (underscore) can be specified. |
(2) Description of each field
This section explains each of the fields to configure on the Edit resource list screen.
After changing these settings, click Apply to save the settings.
Click Cancel to discard the changes.
Click Close to close the screen.
- Resource list
-
List of registered resources
The resource names of the registered temporary table are displayed in a list.
When you select a resource name, the registered contents are displayed.
When you click Add, the temporary table settings screen appears.
For details on the temporary table settings screen, refer to Temporary table settings.
When you click Delete, the selected temporary table is deleted.
- Name
-
Resource name of the temporary table
The resource name of the registered temporary table is displayed.
- Schema definition
-
Schema definition for the temporary table
The schema definition is displayed as a list.
Click Up and Down to move the selection.
Click Add or Delete to add or delete schema definitions.
- Main key
-
Schema definition main key
Among the temporary table schema settings, select the column that you want to use as the main key.
Clear the check box of columns that you do not want to use as the main key.
- Column name
-
Column names of the schema definition
Specify each column name among the schema definitions of the temporary table.
Single-byte alphanumeric characters and "_" (underscore) can be used.
Use a value that begins with a single-byte alphabetic character.
- Data lifetime period
-
Lifetime period of data stored in the temporary table (seconds)
Specify a number between "1" and "86400" for the storage period of data stored in the temporary table.
If you omit this setting, "0" is specified, and the value is deleted only when the value is obtained by the monitoring records operation.
- Cleanup interval
-
Interval at which the data in the temporary table is deleted (seconds)
Specify a number from "1" through "86400" for the interval at which data stored in the temporary table is deleted after the data lifetime is exceeded.
If you omit this setting, "0" is specified, and the value is deleted only when the value is obtained by the monitoring records operation.
Official | HULFT IoT EdgeStreaming Adapter Reference First Edition: July 1, 2021