Setting Oracle Instant Client
For details on database versions that can be connected to from DataMagic, see our website at the URL below:
URL: https://www.hulft.com/en/
(1) Installation procedure
To install Oracle Instant Client, download and install the module from the Oracle website. To use Instant Client, download the Basic package. For information about how to install the module, visit the Oracle website. To perform installation, follow the instruction below:
If the 32-bit version of DataMagic is installed, install the 32-bit version of Oracle Instant Client. If the 64-bit version of DataMagic is installed, install the 64-bit version of Oracle Instant Client.
1. Expand the bundled module.
Copy the module to the local disk.
2. Prepare the installation folder
Create an installation folder.
# mkdir /usr/local/lib/oracle
# cd /usr/local/lib/oracle
Do not specify a path or directory with a name that contains double-byte characters, spaces, or symbols.
3. Install the software.
Expand the module and store the expanded files in the installation directory.
4. Create symbolic links.
- For Linux (32-bit and 64-bit versions) and Solaris (64-bit version):
-
In the installation directory, create the symbolic links for the following files.
Table 8.1 Symbolic links that are created
Target file (*1)
Symbolic link file name
libclntsh.so.xx.x
libclntsh.so
libocci.so.xx.x
libocci.so
*1
:
xx.x depends on the version of Oracle Instant Client that is installed.
# ln -s libclntsh.so.10.1 libclntsh.so
# ln -s libocci.so.10.1 libocci.so
- For AIX (32-bit and 64-bit versions):
-
You do not need to create symbolic links.
- For the other operating systems (32-bit and 64-bit versions):
-
Create symbolic links by using libclntsh.so.10.1 and libocci.so.10.1 as the libraries of the installed version (libclntsh.so.xx.x and libocci.so.xx.x). For details about the command used to create symbolic links and the corresponding options, see the manual for the operating system you are using.
(2) Setting up the environment
This section describes how to set up Oracle Instant Client.
Specify the following environment variables as described below. To use Oracle Instant Client, you do not need to set ORACLE_HOME.
- LD_LIBRARY_PATH
-
Specify the installation directory for Oracle Instant Client.
For AIX, specify LIBPATH as the directory. For HPUX, specify SHLIB_PATH as the directory.
- NLS_LANG
-
Specify the character encoding of the installation environment.
Table 8.2 NLS_LANG Settings
Language
Encoding (*1)
NLS_LANG
Japanese version
EUC
JAPANESE_JAPAN.JA16EUC
SHIFT-JIS
JAPANESE_JAPAN.JA16SJIS (*2)
UTF-8
JAPANESE_JAPAN.AL32UTF8
English version
-
AMERICAN_AMERICA.WE8MSWIN1252 (*3)
*1
: Operations with a UTF-16 character set such as AL16UTF16 or AL16UTF16LE specified for NLS_LANG are not supported. This limitation is due to the product specifications of Oracle.
*2
:
If "~" in SHIFT-JIS will be handled, specify JAPANESE_JAPAN.JA16SJISTILDE.
*3
:
To use data that includes Japanese, specify a value as if you were using the Japanese version.
NoteNote the following if you intend to execute data processing that requires a connection to Oracle in DataMagic:
-
If the NLS_CHARACTERSET or NLS_NCHAR_CHARACTERSET setting on the Oracle server is different from the NLS_LANG setting on the DataMagic Server side, character string data is converted before and after the conversion processing by DataMagic. This operation is performed on the Oracle side, so DataMagic has no control over it.
-
If data that contains data types corresponding to the NCHAR character set will be handled, specify JAPANESE_JAPAN.AL32UTF8 for NLS_LANG. The Oracle column types corresponding to the NCHAR character set are as follows:
-
NCHAR
-
NCLOB
-
NVARCHAR2
-
-
In the data processing information settings to connect to Oracle, specify the same character set as NLS_LANG for Kanji code type in the input settings and the output settings. If the settings are different, an error occurs in data processing.
-
- TNS_ADMIN (required only if using TNS connection)
-
Specify the tnsnames.ora directory in which the net service name is described. If you omit this setting and attempt to establish a TNS connection, tnsnames.ora in $ORACLE_HOME/network/admin is used.
(3) Using a net service name to connect
You can connect to Oracle by using the net service names described in the local naming parameter file (tnsnames.ora). Environment variable TNS_ADMIN has to be specified only when you use the TNS connection. For details about how to configure the environment variables, see Setting Oracle Instant Client in (2) Setting up the environment.
Also make sure that the local naming parameter file (tnsnames.ora) exists in the directory where you set the environment variable.
Use the Database Connection - Detailed Information screen of DataMagic to specify the net service name used for the connection.
1. Setting Database Connection - Detailed Information screen of DataMagic.
Enter or select the following items.
- Product type
-
: Select Oracle.
- Database name
-
: Select TNS.
- TNS
-
: The net service name used to connect.
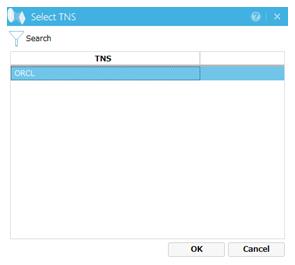
- TNS (Browse button)
-
: Displays the Select TNS screen.
This screen displays the net service names written in the local naming parameter file tnsnames.ora.
Select the net service name used to connect from this screen, and then click the OK button.
- User ID
-
: Enter the user ID.
- Password
-
: Enter the password.
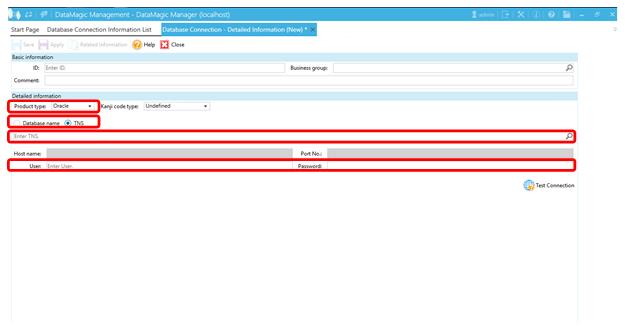
Screen 8.1 Database Connection - Detailed Information screen
Screen 8.2 Select TNS
2. Confirm the connection.
When you finish specifying the settings, click the Test Connection button to run a test, and then confirm that a connection with Oracle has been established.