Data processing information
Configure the data processing information settings.
In the DataMagic Management screen, click the Data processing to display the Data Processing Information List screen, and then click the New button to display the Data Processing Settings screen. Configure the settings as shown below and save them.
1. Enter cnv20 in the ID field.
2. Configure the settings for the input file (C:\Examples\20\input\sampleIN20.dat) and the extraction condition.
Select an input file format in the Object palette, and then drag and drop it on the input area. Double-click the icon to display the Input Settings screen.
Configure the settings as shown below.
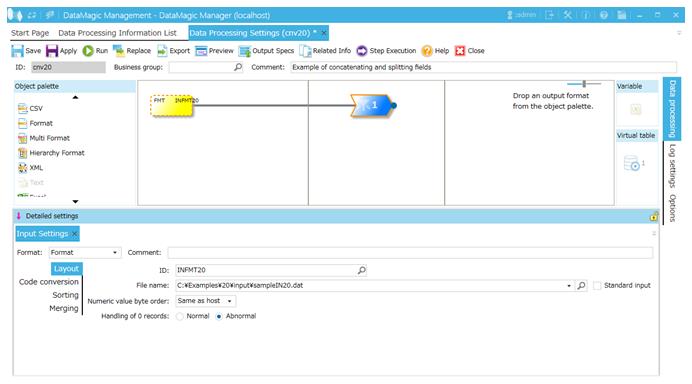
Screen 8.176 Input Settings screen
3. Configure the settings for the output file (C:\Examples\20\output\sampleOUT20.dat).
Select an output file format in the Object palette, and then drag and drop it on the output area. Double-click the icon to display the Output Settings screen.
Configure the settings as shown below.
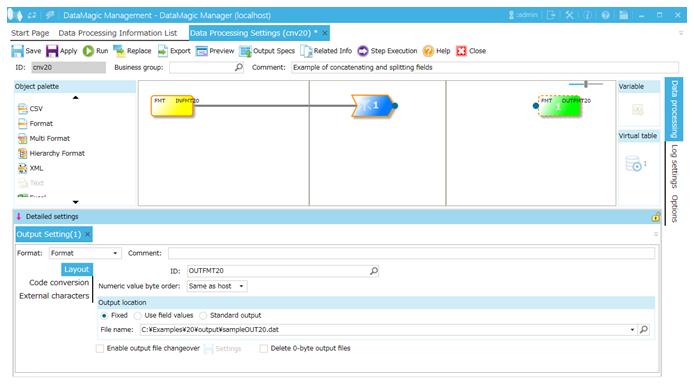
Screen 8.177 Output Settings screen
4. Link the extraction condition and output file.
Choose the Extraction Condition icon and drag and drop it onto the File icon on the right to draw a relation line.

Screen 8.178 Mapping of extraction conditions and output file
5. Specify the output format.
1) Display the Set Mapping Information screen.
Double-click the Mapping icon created on the relation line between the Extraction Condition icon and Output icon. This displays the Set Mapping Information screen.
2) Check the tree view.
The tree view of the input (left) should show the format information (ID=INFMT20) fields.
The tree view of the output (right) should show the format information (ID=OUTFMT20) fields.
3) Draw relation lines (General).
You can draw a relation line by dragging and dropping the field node in the left tree to the field node in the right tree. Draw relation lines as shown in the screen below.
The input field koumoku1 will be converted to the output field koumoku1.
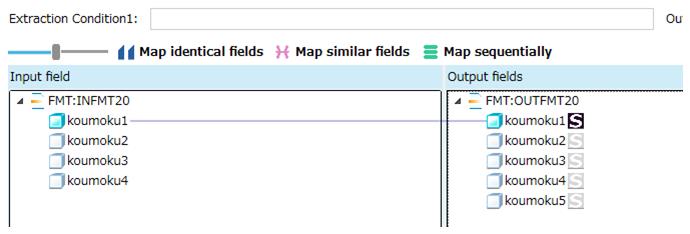
Screen 8.179 Input-Output relation lines
4) Draw relation lines (concatenation).
Here, you will configure the settings for combining the values of input fields koumoku2 and koumoku4 and converting the result to the output field koumoku2.
Draw relation lines from input fields koumoku2 and koumoku4 to the output field koumoku2 as shown in the screen below.
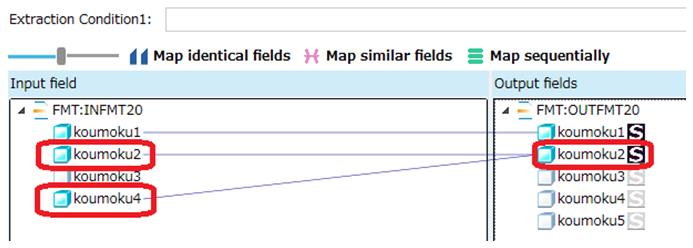
Screen 8.180 Input-Output relation lines
5) Draw relation lines (splitting).
Here, you will configure the settings for splitting the values of input field koumoku3 and converting the results to the output fields koumoku3, koumoku4, and koumoku5.
Draw connections from input field koumoku3 to the output fields koumoku3, koumoku4, and koumoku5 as shown in the screen below.
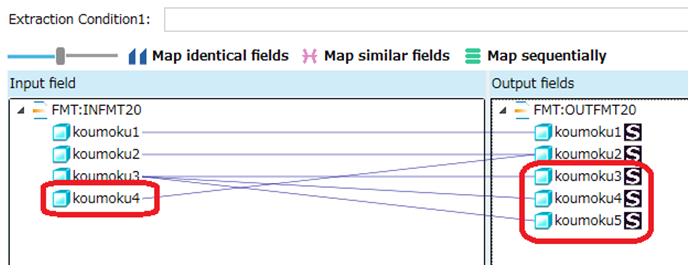
Screen 8.181 Input-Output relation lines
Next, specify the output start position and size. Select the output field koumoku3 in the tree and click the Edit button in the Output information area. This displays the Output Information Settings screen. Set Start position to 7 and Output size to 2.
Similarly, for output field koumoku4, set Start position to 5 and Output size to 2, and for output field koumoku5, set Start position to 1 and Output size to 4.
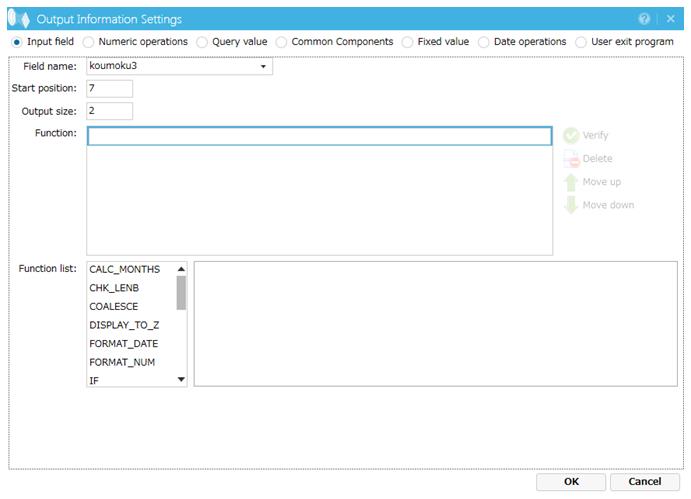
Screen 8.182 Byte specification (koumoku3 settings)
6) Register the mapping information.
Click the OK button to register the mapping information.
6. Click the Apply button to save the data processing information.